Invoices
Introduction
You can create invoices for purchase orders, individual line items, and blanket purchases. You can also link existing invoices to purchase orders. Additionaly, you can add specific line items to an invoice from the purchase order or acquisitions search results screen. You can also search for relevant line items from within the invoices interface. You can also add all line items from an entire purchase order to an invoice or you can create a blanket invoice for items that are not attached to a purchase order.
You can invoice items before you receive the items if desired. You can also reopen closed invoices, and you can print invoices.
Creating invoices
To create a new blank invoice, navigate to Acquisitions → Create Invoice.
Invoices are laid out in three main sections from top to bottom.
The first section is the summary section.
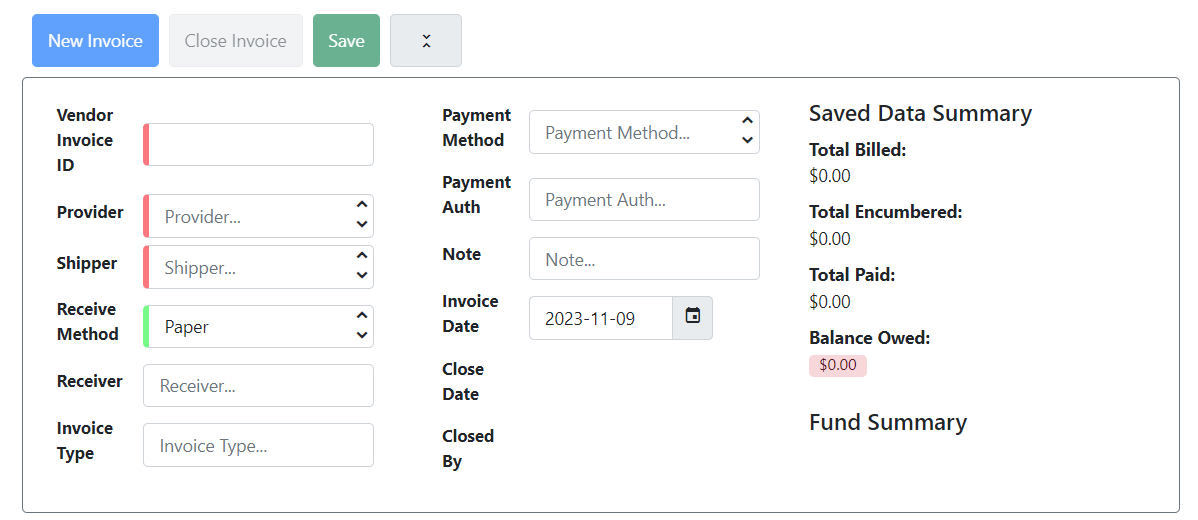
The summary section contains the following fields, some for entry and other which are read-only:
-
Vendor Invoice ID (required) - This number may be listed on the paper invoice sent from your vendor, or may be an internal identifier. This field must be unique.
-
Provider (required) - Select a provider, if this field is empty. If you have created an invoice from a purchase order this field will be generated from the purchase order and is entered by default.
-
Shipper (required) - This defaults to the provider that was entered in the provider field.
-
Receive Method (required) - Select a receive method. The system will default to Paper.
-
Receiver (required) - The receiver defaults to the branch at which your workstation is registered. You can change the receiver by selecting a different org unit. *Invoice Type (optional) - This is a free text field.
-
Payment Method (optional) - Select a payment method. Payment methods are set in Acquisitions Administration.
-
Payment Auth (optional) - This is a free text field.
-
Note (optional) - This is a free text field.
-
Invoice Date (required) - This default as the date that you create the invoice. You can change the date by clicking in the field or using the calendar picker.
-
Close Date - This will show the date an invoice was closed. It is empty in the case of an open invoice.
-
Closed By - This will show the staff member who closed the invoice. It is empty in the case of an open invoice.
-
Saved Data Summary - After saving an invoice, this section will show the current total billed, total encumbrances, total paid, and balance owed of all invoice items.
-
Fund Summary - After an invoice is closed, this will show the totals for each fund billed in the invoice.
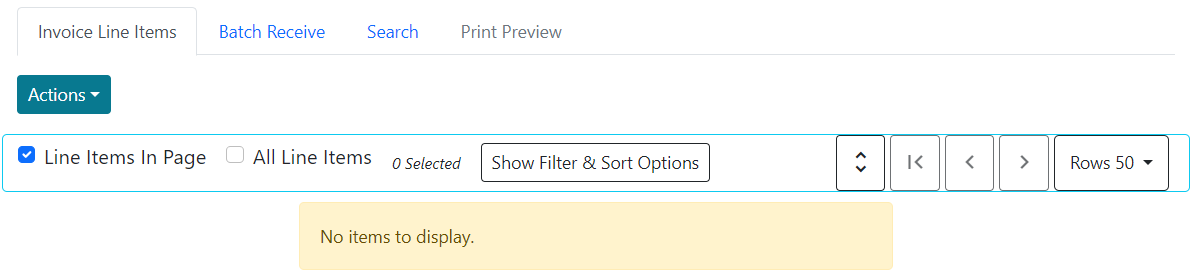
The next section is the line items section. This section also contains tabs to navigate to batch receive, search, and print preview.
When this section is populated with line items, you can use the filter and sort options or expand / collapse all or selected line items. For more information on these filter and sort options, please see the Line Items documentation.
Along with the title and author of the line items is a summary of copies ordered, received, invoiced, claimed, and cancelled. You can also view the amounts estimated, encumbered, and paid for each line item. Finally, each line item has a line item ID, and links to the selection list (if used) and the purchase order. In the example below, the line item ID is 563 and the purchase order is 71. There is no selection list on this example.
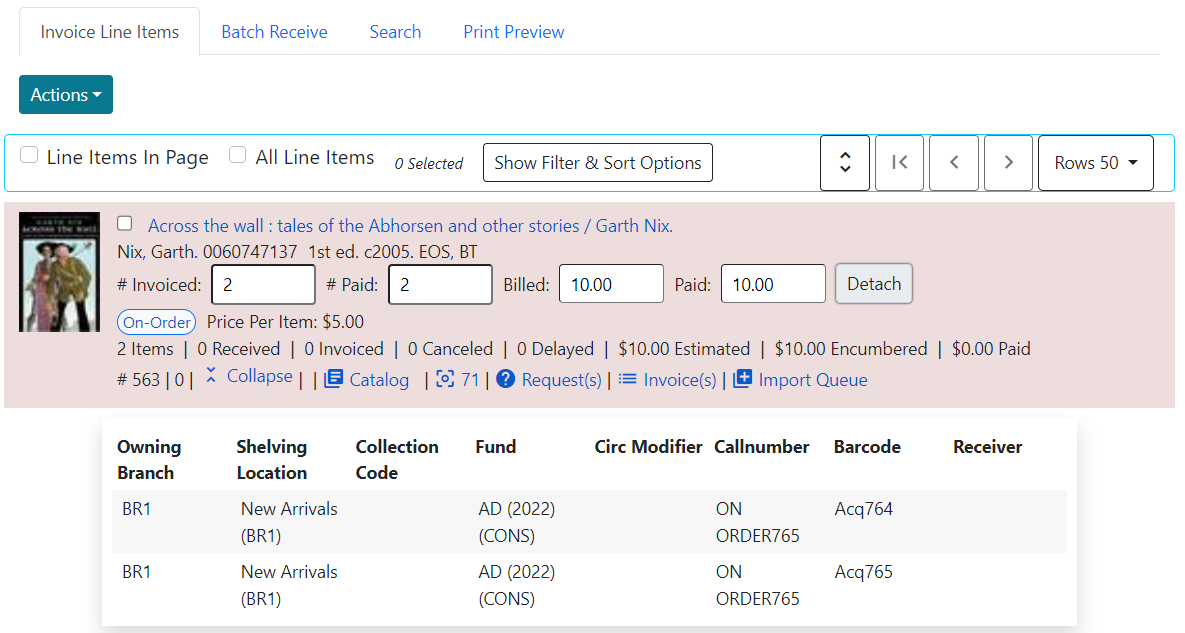
Evergreen automatically enters the number of items that were ordered in the # Invoiced and # Paid fields. You may adjust these quantities as needed.
Evergreen will also pull over line item prices from the purchase order. If you need to change this amount, enter the amount that the organization was billed. This entry will automatically propagate to the Paid field. The Per Copy field calculates the cost of each copy by dividing the amount that was billed by the number of copies for which the library paid.
If you wish to detach an existing line item from an invoice, select the Detach button to the right of the paid fields.
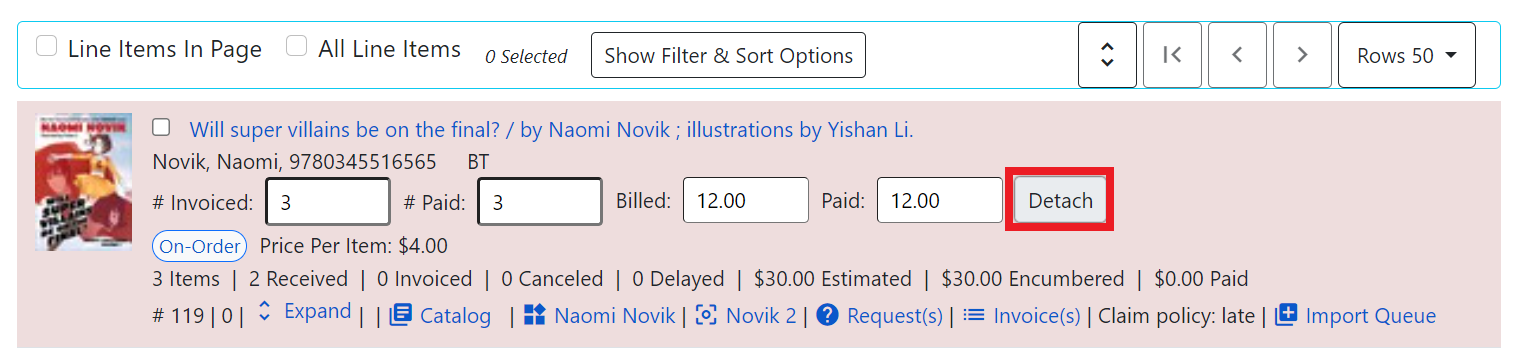
The line item styling will update to show a dashed black border. If you wish to reattach the item, click Reattach. The detatched status will not be saved until you select the Save button at the top or bottom of the invoice.

The last section of the invoice page is the direct charges section. You have the option to add charge types if applicable. Charge types are additional charges that can be selected from the drop-down menu. Common charge types include taxes and handling fees. This is also the section where you would create a blanket invoice, so documentation for this section is below in Creating a blanket invoice.
You can edit direct charges as long as the invoice is open. Any changes to direct charges will not be saved until you select Save at the top or bottom of the invoice.
Search for line items from an invoice
You can open an invoice, search for line items from the invoice, and add your search results to a new or existing invoice. This feature is especially useful when you want to populate an invoice with line items from multiple purchase orders.
-
Navigate to Acquisitions → Create Invoice, or open an existing invoice.
-
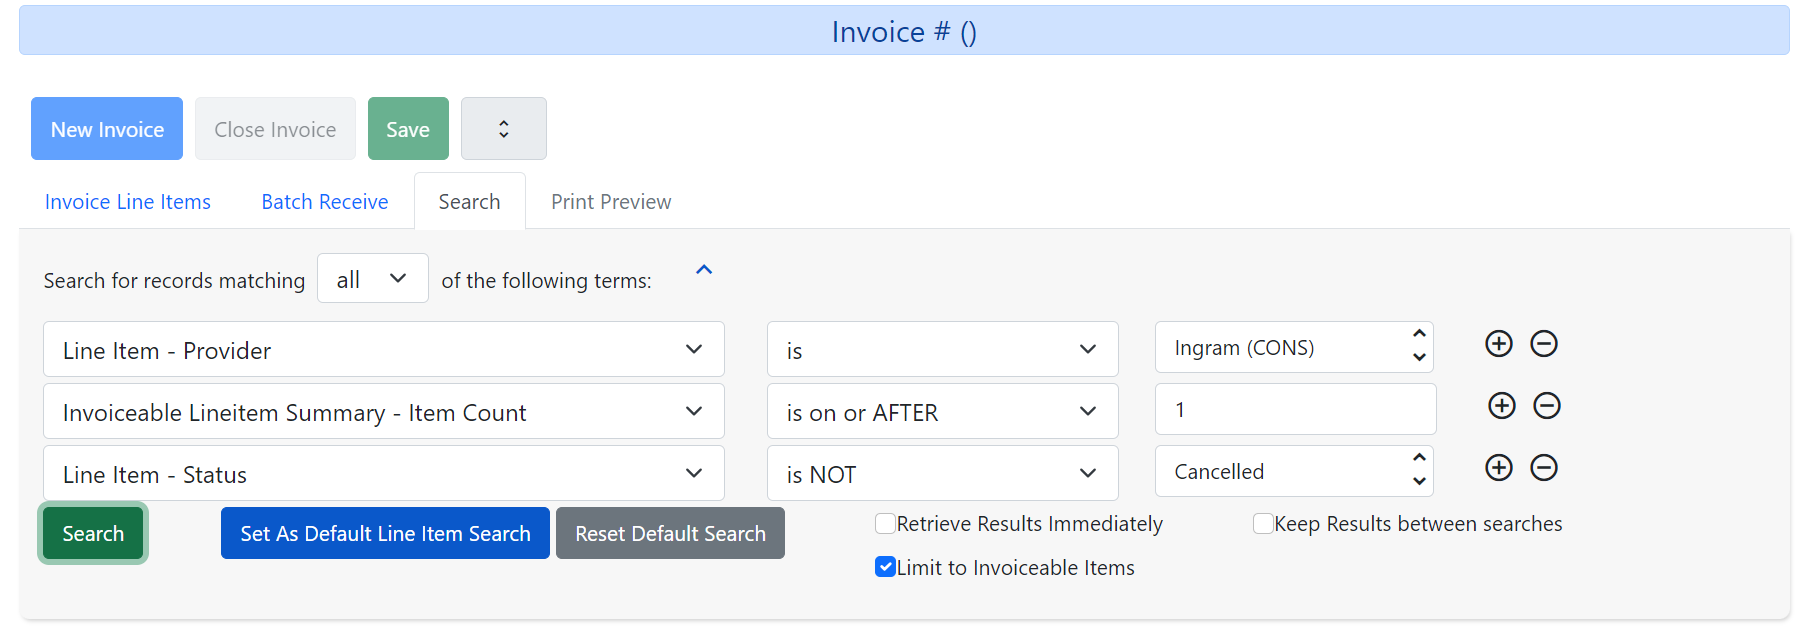
Select the Search tab to add line items to an invoice.
-
Search criteria will default to the following:
-
Item Count is greater than or equal to 1
-
Line Item Status is not cancelled
-
Line Item Provider is equal to the Provider selected in the invoice, if the Limit to Invoiceable Items checkbox is selected.
-
-
Add additional search search criteria if you wish.
-
The Limit to Invoiceable Items checkbox is selected by default.
Invoiceable items are those that are on order, have not been cancelled, and have not yet been invoiced. Evergreen also filters out items that have already been added to an invoice. Finally, if this box is checked, and if your entered the invoice details at the top of the screen. -
The Keep results between searches checkbox is deselected by default. When this checkbox is deselected, new search results will replace previous results in the grid. Check this box for the search results list to build with each subsequent search. This option is useful for libraries that might search for line items by scanning an ISBN. Several ISBNs can be scanned and then the entire result set can be selected and moved to the invoice in a batch.
-
Once you have your search criteria established, select the Search button.
-
By default, results are sorted by line item number. Click on column headers to change the sort.
-
Select one or many line item(s) to add to your invoice. The rows that you selected will be highlighted.
-
Once you have selected all desired line items from your search results, click the button Add Selected Items to Invoice.
-
Select the Invoice Line Items tab to return to the main invoice view.
-
Evergreen automatically enters the number of items that were ordered and their prices in the # Invoiced, # Paid, Billed, and Paid fields. Adjust these quantities as needed.
-
Note that if the Billed and Paid fields come over as null, you can enter a billed price that will propagate to the paid price. Changes to non-null values will not propagate between these fields.
-
-
The Price Per Item field calculates the cost of each copy by dividing the amount that was billed by the number of copies for which the library paid.

Create an invoice from a purchase order
You can create an invoice for all of the line items on a purchase order, after the purchase order is activated.
-
Navigate to a purchase order.
-
From the purchase order summary, you have three options to create an invoice:
-
Create Invoice - this creates an invoice from all line items + direct charges. Line item prices will carry over, but direct charge prices will not.
-
Create Invoice with PO prices - this creates an invoice from all line items + direct charges, including prices for line items and direct charges.
-
Legacy Create Invoice - this opens the legacy (Dojo) invoices interface. This interface is no longer actively being maintained. You will only see this option if you have the Library Setting Display Links to Deprecated Acquisitions Interfaces set to TRUE for your workstation location.
-
-
Once you are in the invoice interface, follow the instructions listed above under Creating Invoices.
-
You have four options for saving an invoice.
-
Select Save to save the changes you have made while staying in the current invoice. If your invoice will exceed the fund warning or fund stop balance, you will see a warning to that effect. If you exceed the stop balance, you will need to correct the overage before saving the invoice.
-
Select New Invoice to save the changes you have made and to replace the current invoice with a new invoice so that you can continue invoicing items.
-
Select Prorate to save the invoice and prorate any additional charges, such as taxes, across funds, if multiple funds have been used to pay the invoice.
Prorating will only be applied to charge types that have the Prorate? flag set to true. This setting can be adjusted via Administration → Acquisitions Administration → Invoice Item Types. -
Select Close Invoice. Choose this option when you have completed the invoice. This option will also save any changes that have been made. Funds will be disencumbered when the invoice is closed.
-
-
You can re-open a closed invoice by selecting the Re-open invoice button. This button appears on closed invoices.
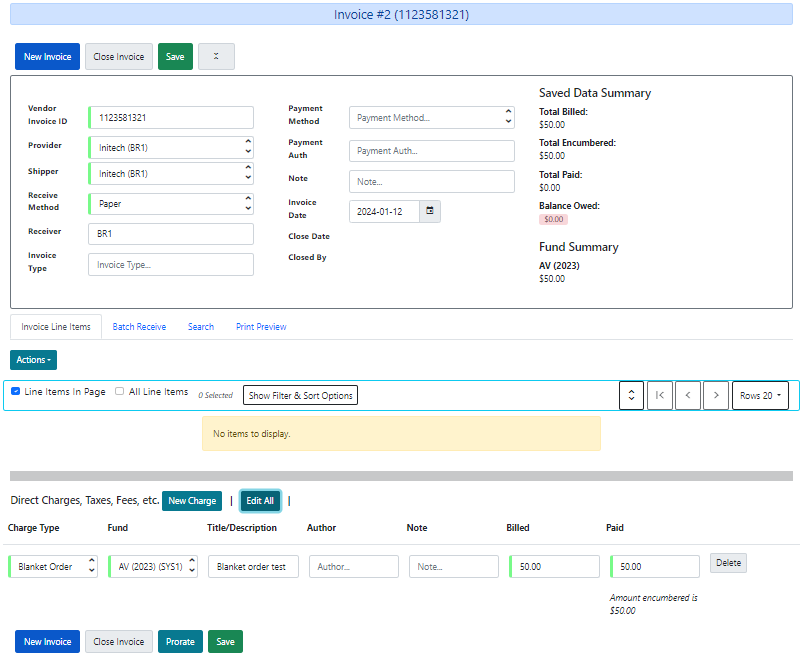
Creating a blanket invoice
You can create a blanket invoice for purchases that are not attached to a purchase order.
-
Navigate to Acquisitions → Create invoice.
-
Enter the invoice information in the top part of the screen.
-
Scroll to the bottom of the screen to the section labeled Direct Charges, Taxes, Fees, etc. and select the New Charge button.
-
This functionality may also be used to add shipping, tax, and other fees.
-
-
Select a charge type from the drop-down menu. This field is required.
New charge types can be added via Administration → Acquisitions Administration → Invoice Item Types. -
Select a fund from the drop-down menu. This field is required for all non-proratable charge types.
-
Charge types that are proratable will be not be permitted to select a fund, since they will be prorated across all funds on the invoice.
There is a known issue with prorated fund types. Since purchase orders require all direct charges to have a fund type, even proratable funds, invoices do not permit a fund selection for proratable charge types. The latter is the correct behavior, but be aware that this can cause a discrepancy in the invoice summary calculation.
-
-
Enter a Title/Description of the resource, if applicable.
-
Enter an Author, if applicable.
-
Enter a Note, if applicable.
-
Enter the amount that you were billed. This field is required.
-
Enter the amount that you paid. This field is required.
-
Save the invoice.
You can edit direct charges as long as the invoice is open. Any changes to direct charges will not be saved until you select Save at the top or bottom of the invoice.
Creating an invoice for specific line items
You can create an invoice or add line items to an invoice directly from a purchase order.
-
Navigate to your purchase order.
-
Place a checkmark in the box for selected line items in the purchase order.
-
If you are creating a new invoice for your selected items, navigate to Actions → Create Invoice From Selected Line Items. Enter the invoice information in the top half of the screen. Proceed with the instructions listed above under Creating Invoices.
-
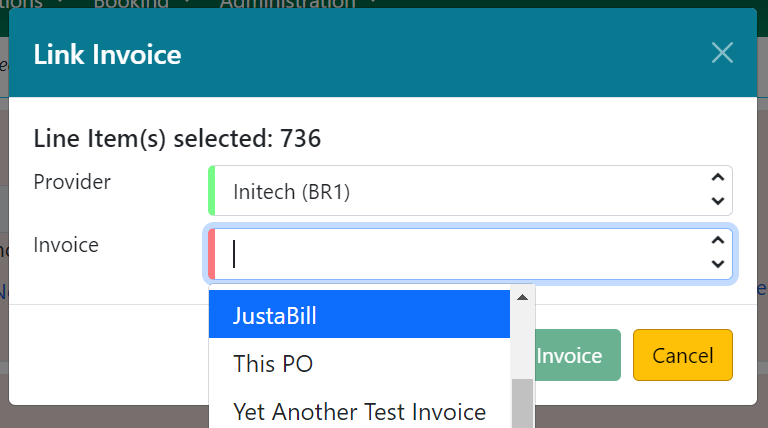
If you are adding the line items to an existing invoice, navigate to Actions → Link Selected Line Items to Invoice. Select the Provider and then the Invoice from the dropdowns, then select the Link Invoice button.
-
Evergreen automatically enters the number of items that were ordered and their prices in the # Invoiced, # Paid, Billed, and Paid fields. Adjust these quantities as needed.
-
Note that if the Billed and Paid fields come over as null, you can enter a billed price that will propagate to the paid price. Changes to non-null values will not propagate between these fields.
-
-
You have the option to add charge types if applicable. Charge types are additional charges that can be selected from the drop-down menu. Common charge types include taxes and handling fees.
-
You have four options for saving an invoice.
-
Select Save to save the changes you have made while staying in the current invoice. If your invoice will exceed the fund warning or fund stop balance, you will see a warning to that effect. If you exceed the stop balance, you will need to correct the overage before saving the invoice.
-
Select New Invoice to save the changes you have made and to replace the current invoice with a new invoice so that you can continue invoicing items.
-
Select Prorate to save the invoice and prorate any additional charges, such as taxes, across funds, if multiple funds have been used to pay the invoice.
Prorating will only be applied to charge types that have the Prorate? flag set to true. This setting can be adjusted via Administration → Acquisitions Administration → Invoice Item Types. -
Select Close Invoice. Choose this option when you have completed the invoice. This option will also save any changes that have been made. Funds will be disencumbered when the invoice is closed.
-
-
You can re-open a closed invoice by selecting the Re-open invoice button. This button appears on closed invoices.
Creating an invoice from line items in acquisitions search
You can create an invoice or add line items to an invoice directly from the line search results screen in the acquisitions general search interface.
-
Navigate to Acquisitions → General Search → Line Items Search and perform a line items search.
-
Place a checkmark in the box for selected line items from the search results grid.
-
If you are creating a new invoice, either right click or navigate to the actions menu and select Create Invoice From Selected Line Items. Enter the invoice information in the top half of the screen. Proceed with the instructions listed above under Creating Invoices
-
If you are adding the line items to an existing invoice, either right click or navigate to the actions menu and select Link Selected Line Items to Invoice. Select the Provider and then the Invoice from the dropdowns, then select the Link Invoice button.
-
Evergreen automatically enters the number of items that were ordered and their prices in the # Invoiced, # Paid, Billed, and Paid fields. Adjust these quantities as needed.
-
Note that if the Billed and Paid fields come over as null, you can enter a billed price that will propagate to the paid price. Changes to non-null values will not propagate between these fields.
-
-
You have the option to add charge types if applicable. Charge types are additional charges that can be selected from the drop-down menu. Common charge types include taxes and handling fees.
-
You have four options for saving an invoice.
-
Select Save to save the changes you have made while staying in the current invoice. If your invoice will exceed the fund warning or fund stop balance, you will see a warning to that effect. If you exceed the stop balance, you will need to correct the overage before saving the invoice.
-
Select New Invoice to save the changes you have made and to replace the current invoice with a new invoice so that you can continue invoicing items.
-
Select Prorate to save the invoice and prorate any additional charges, such as taxes, across funds, if multiple funds have been used to pay the invoice.
Prorating will only be applied to charge types that have the Prorate? flag set to true. This setting can be adjusted via Administration → Acquisitions Administration → Invoice Item Types. -
Select Close Invoice. Choose this option when you have completed the invoice. This option will also save any changes that have been made. Funds will be disencumbered when the invoice is closed.
-
-
You can re-open a closed invoice by selecting the Re-open invoice button. This button appears on closed invoices.
Link an existing invoice to a purchase order
You can use the link invoice feature to link an existing invoice to a purchase order. For example, an invoice is received for a shipment with items on purchase order #1 and purchase order #2. When the invoice arrives, purchase order #1 is retrieved, and the invoice is created. To receive the items on purchase order #2, simply link the invoice to the purchase order. You do not need to recreate it.
-
Open a purchase order.
-
Select Link Invoice.
-
Select the Provider and then the Invoice from the dropdowns, then select the Link Invoice button.
Electronic invoicing (EDI)
Evergreen can receive electronic invoices from providers. To access an electronic invoice, you must:
-
Configure EDI for your provider. See the Acquisitions Administration documentation for more information.
-
Evergreen will receive invoices electronically from the provider.
-
Navigate to Acquisitions → Invoices_ to view a list of open invoices, or use the General Search to retrieve invoices. Click the hyperlinked invoice ID in the Vendor Invoice ID field to view the invoice.
View an invoice
You can view an invoice in one of four ways: view open invoices; view invoices on a purchase order; view invoices by searching specific invoice fields; view invoices attached to a line item.
-
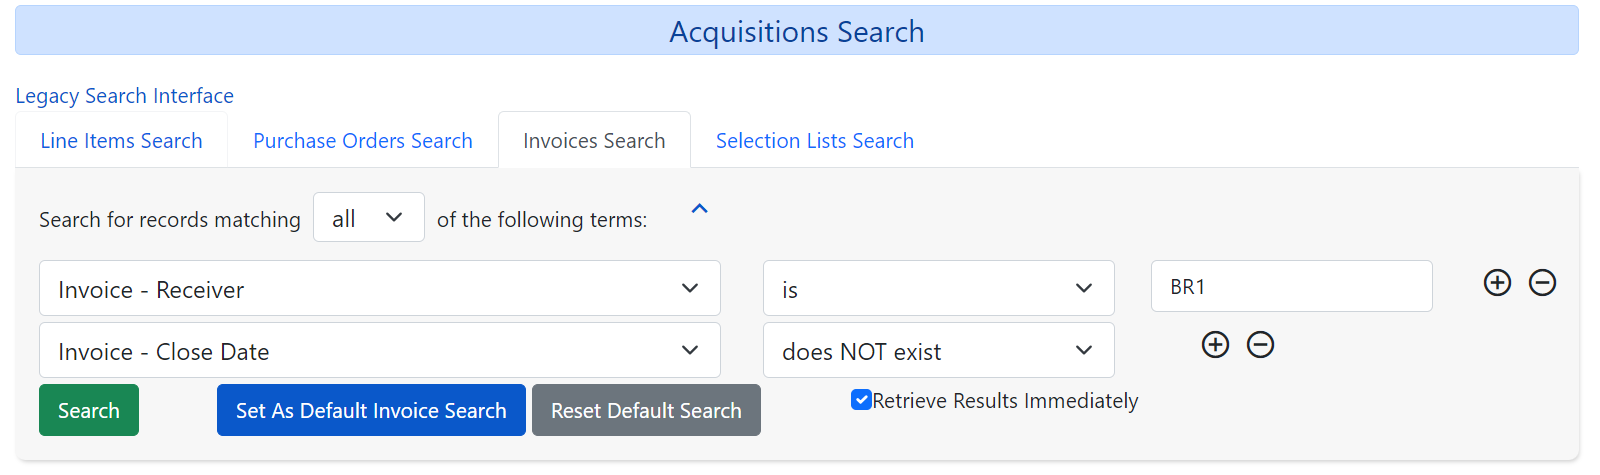
To view open invoices, navigate to Acquisitions → Invoices. This opens the Acquisitions Search screen. The default fields search for open invoices at your workstation library.Click Search.
-
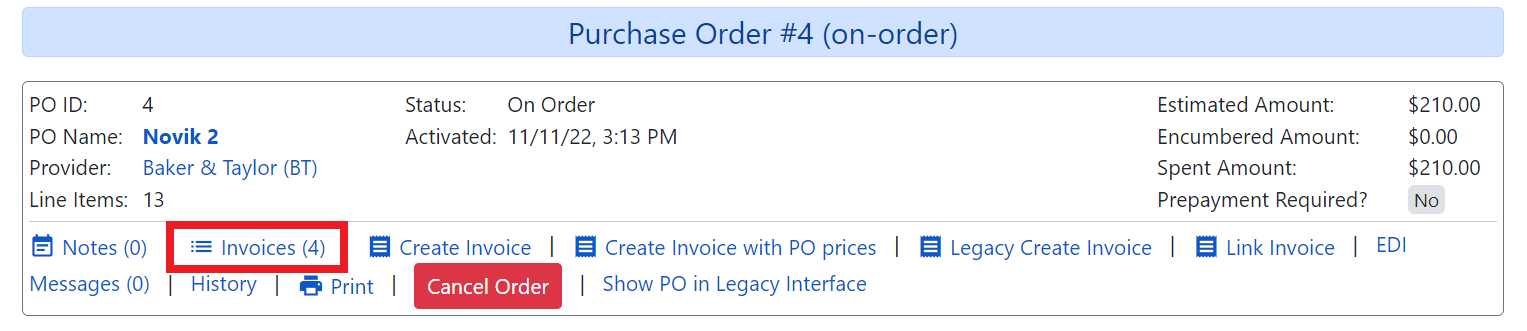
To view invoices on a purchase order, open a purchase order and select the Invoices link. The number in parentheses indicates the number of invoices that are attached to the purchase order.
-
To view invoices by searching specific invoice fields, see the section on Acquisitions General Search.
-
To view invoices for a line item, see the section above on line item invoices.
Receive items from an invoice
This feature enables users to receive items from an invoice. Staff can receive individual copies, or they can receive items in batch. As of Evergreen VERSION, these interfaces are combined.
You can choose per line item whether you want to receive a count of items on an line item (formerly known as list mode, or batch mode), or receive specific items (formerly known as numeric mode). The latter is helpful if you have vendor-provided barcodes on incoming items.
You can also choose to receive all line items in the page, or all line items on the invoice.
-
Navigate to an invoice that has unreceived items.
-
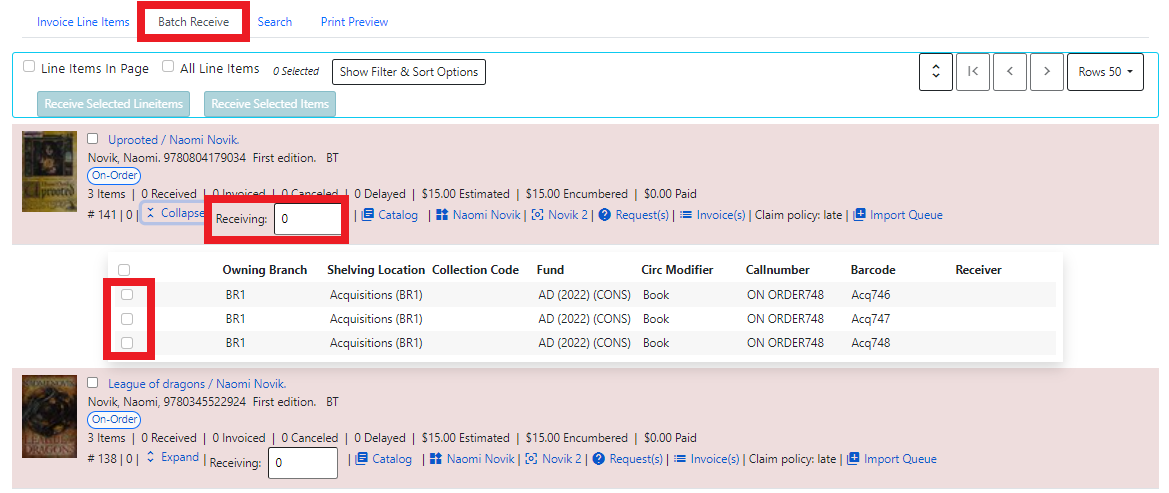
Select the _Batch Receive_tab.
-
For each line item, you can choose to receive any or all items.
-
To receive all items on a line item, select the checkbox next to the line item title.
-
To select items to receive, select either a count or specific items on the line item:
-
To receive a count of items, enter a number in the Receiving box that is equal or less than the number of unreceived copies.
-
To receive specific copies, expand the line item and select the checkbox on each item you want to receive.
-
-
-
If you have selected only line items, the Receive Selected Lineitems button will be activated. Click this button to receive your selected line items. If you have selected individual items from line items, the Receive Selected Items button will be activated. Click this button to receive your selected items.