Describing Your People
Staff and patrons use the Evergreen system to perform the wide variety of tasks involved in the library. What functions any user can perform are determined by what permissions and permission groups are assigned to their account. It is essential to understand how permissions can be used to ensure users only have access to the appropriate level. For example, patrons need permissions to be able to log in to the public catalog and place holds; however, they should not have the permission to log in to the staff client.
Permissions and Permission Groups
A permission is a rule that controls what a user can see and do within Evergreen. For example, the COPY_CHECKIN permission allows staff to check in materials. The Permissions List in the appendix provides a full list of available default permissions with their descriptions.
When a user performs an action, the system looks at the following:
-
Is the user active?
-
Does the user have the permission to perform the action?
-
Where can the user exercise this permission? (i.e., depth)
-
For patrons, the system looks at the home library.
-
For staff, the system looks at the home library, workstation, and working location(s). (How to set a staff member’s working location is covered at the end of this section.)
-
A permission group is a set of permissions that can be assigned to a user simultaneously. The permission group indicates which role the user has in the library, for example, Patron or Cataloger. Upon first installing Evergreen, the following default permission groups are automatically created:
-
Users
-
Patrons
-
Staff
-
Acquisitions
-
Acquisitions Administrator
-
Catalogers
-
Cataloging Administrator
-
Circulators
-
Circulation Administrator
-
Data Review
-
Global Administrator
-
Local Administrator
-
Serials
-
System Administrator
-
Volunteers
-
-
Comparing Approaches for Managing Permissions
Permissions and permission groups are not carved in stone. You may set and alter the permissions for each permission group in line with what your library, or possibly your consortium, defines as the appropriate needs for each function in the library. The Evergreen community uses two different approaches to manage permissions and groups: 1) staff client and 2) database access.
Managing Permissions in the Staff Client
Evergreen libraries that are most comfortable using the staff client tend to manage permissions within its various administrative interfaces. Below, each interface name is linked to its specific page in the documentation.
Under Administration > Server Administration:
-
Permissions: Used to manage the list individual permissions.
-
Permission Groups: Used to manage permissions groups and their attritubes and permissions.
Under Administration > Local Administration:
-
Permission Tree Display Entries: Used to manage the order in which permission groups display in menu dropdowns.
Assigning Permission Groups in the Staff Client
Permission groups are assigned the same way whether you are managing a staff account or patron account - using the Main (Profile) Permission Group field of the account.
To assign or update a permission group:
-
Open the account and click the Edit tab.
-
Click the Profile Group dropdown and select the group name from the menu. (Note that groups that were marked to not have users will be greyed out in the menu.)

-
Click Save at the top of the account edit screen.
Assigning Secondary Permission Groups
If staff need to perform multiple types of functions within the staff client, for example, circulation and catalogings tasks, they can be assigned multiple permission groups. The Secondary Groups functionality enables supplemental permission groups to be added to staff accounts. The CREATE_USER_GROUP_LINK and REMOVE_USER_GROUP_LINK permissions are required to display and use this feature.
Secondary permission groups are created the same way main permission groups are created, in the Permission Groups interface. In general, when creating a secondary permission group, do not grant the permission to log in to Evergreen.
To assign a secondary permission group:
-
Open the account of the user.
-
Click Edit.
-
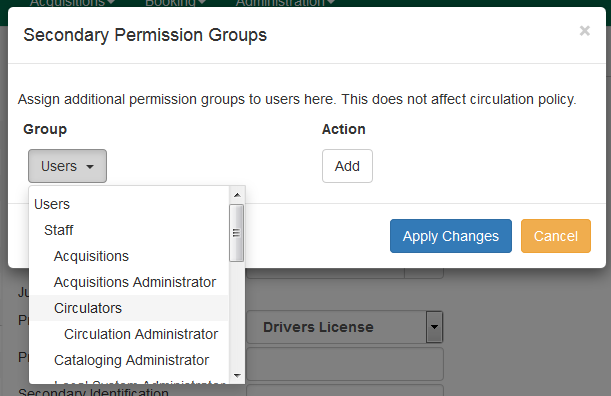
Click Secondary Groups, located to the right of the Main (Profile) Permission Group.

-
From the dropdown menu, select one of the secondary permission groups.
-
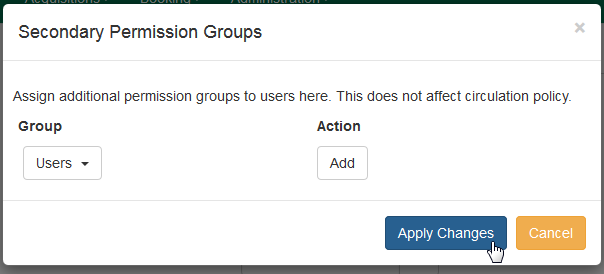
Click Add.
-
Click Apply Changes.
-
Click Save in the top right hand corner of the edit screen to save the user’s account.
Removing Secondary Group Permissions
To remove a secondary permission group:
-
Open the account of the user you wish to remove the secondary permission group from.
-
Click Edit.
-
Click Secondary Groups, located to the right of the Main (Profile) Permission Group.
-
Click Delete beside the permission group you would like to remove.
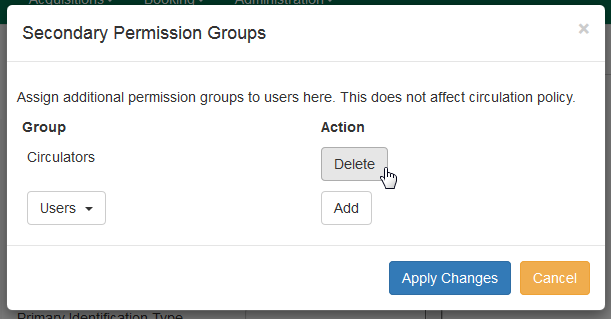
-
Click Apply Changes.
-
Click Save in the top right hand corner of the edit screen to save the user’s account.
Granting Additional Permissions
If a permission is designated as Grantable for a staff permission group, that permission can be assigned individually to another staff member’s account through the User Permission Editor. (See Depth and Grantability for more information on grantability). Evergreen provides group application permissions in order to restrict which staff members have the ability to assign elevated permissions to a user, and which staff members have the ability to edit users in particular groups.
The User Permission Editor displays the full list of permissions available in Evergreen and shows which permissions are assigned to a specific account.
To access the User Permission Editor:
-
Go to Administration > *User Permission Editor and enter the staff account barcode.
OR
Retrieve the staff account first through the patron search, then go to Other > User Permission Editor.

-
The User Permission Editor will load (this may take a few seconds). Greyed-out permissions cannot be edited because they are either a) already granted to the account, or b) not grantable, i.e., not available for the staff member to assign.
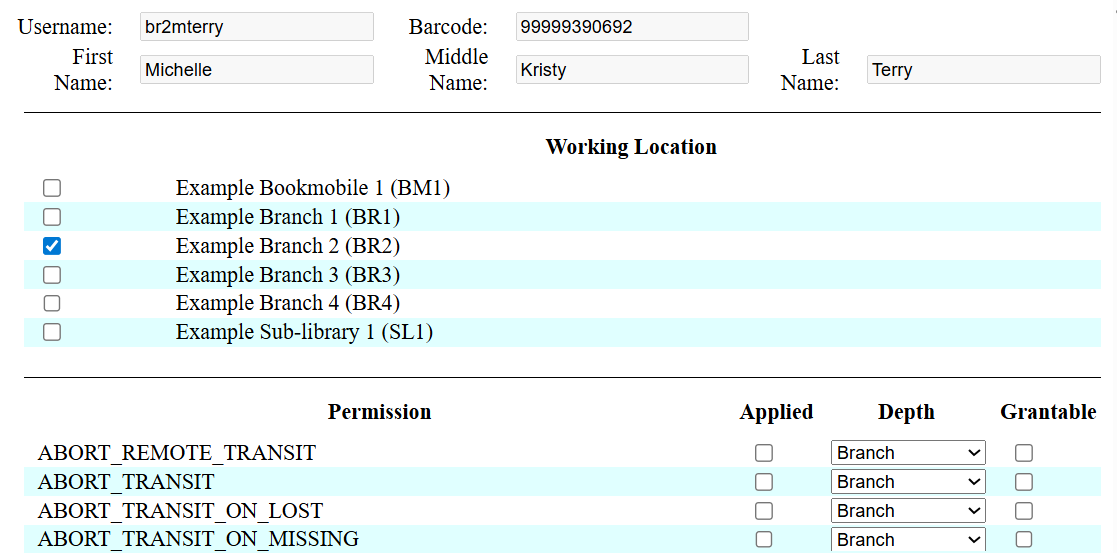
This interface shows:
-
The list of permissions available in Evergreen.
-
Whether or not the permission is applied, or assigned. If the Applied column is checked, the permission is assigned.
-
The depth at which the permission is assigned.
-
Whether the permission is grantable. If the Grantable column is checked, the staff account will be able to grant the new privilege to other accounts (not recommended).
-
To assign a permission:
-
Check the Applied column next to the permission name, for example, OFFLINE_EXECUTE.

-
Scroll down and click Save to apply the changes.

Managing Permissions in the Database
Evergreen libraries that are comfortable manipulating the database directly may choose to manage permissions at the database level. At the database level, you can make a user belong to many different permission groups, and that can simplify your permission management efforts. For example, if you create a Student Circulator group and a Student Cataloger group, and a new employee needs to perform both of these roles, you can simply assign them to both of the groups; you do not need to create an entirely new permission group in this case. An advantage of this approach is that the user profile can represent only the user’s borrowing category and requires only the basic Patrons permissions, which can simplify your circulation and hold rules.
Permissions and profiles are not carved in stone. As the system administrator, you can change them as needed. You may set and alter the permissions for each permission group in line with what your library, or possibly your consortium, defines as the appropriate needs for each function in the library.
While the ability to assign a user to multiple permission groups has existed in Evergreen for years, a staff client interface is not currently available to facilitate the work of the Evergreen administrator. However, if you or members of your team are comfortable working directly with the Evergreen database, you can use this approach to separate the borrowing profile of your users from the permissions that you grant to staff, while minimizing the amount of overlapping permissions that you need to manage for a set of permission groups that would otherwise multiply exponentially to represent all possible combinations of staff roles.
In the following example, we create three new groups:
-
a Student group used to determine borrowing privileges
-
a Student Cataloger group representing a limited set of cataloging permissions appropriate for students
-
a Student Circulator group representing a limited set of circulation permissions appropriate for students
Then we add three new users to our system: one who needs to perform some cataloging duties as a student; one who needs perform some circulation duties as a student; and one who needs to perform both cataloging and circulation duties. This section demonstrates how to add these permissions to the users at the database level.
To create the Student group, add a new row to the permission.grp_tree table as a child of the Patrons group:
INSERT INTO permission.grp_tree (name, parent, usergroup, description, application_perm)
SELECT 'Students', pgt.id, TRUE, 'Student borrowers', 'group_application.user.patron.student'
FROM permission.grp_tree pgt
 WHERE name = 'Patrons';
To create the Student Cataloger group, add a new row to the permission.grp_tree table as a child of the Staff group:
INSERT INTO permission.grp_tree (name, parent, usergroup, description, application_perm)
SELECT 'Student Catalogers', pgt.id, TRUE, 'Student catalogers', 'group_application.user.staff.student_cataloger'
FROM permission.grp_tree pgt
WHERE name = 'Staff';
To create the Student Circulator group, add a new row to the permission.grp_tree table as a child of the Staff group:
INSERT INTO permission.grp_tree (name, parent, usergroup, description, application_perm)
SELECT 'Student Circulators', pgt.id, TRUE, 'Student circulators', 'group_application.user.staff.student_circulator'
FROM permission.grp_tree pgt
WHERE name = 'Staff';
We want to give the Student Catalogers group the ability to work with MARC records at the consortial level, so we assign the UPDATE_MARC, CREATE_MARC, and IMPORT_MARC permissions at depth 0:
WITH pgt AS (
  SELECT id
  FROM permission.grp_tree
  WHERE name = 'Student Catalogers'
)
INSERT INTO permission.grp_perm_map (grp, perm, depth)
SELECT pgt.id, ppl.id, 0
FROM permission.perm_list ppl, pgt
WHERE ppl.code IN ('UPDATE_MARC', 'CREATE_MARC', 'IMPORT_MARC');
Similarly, we want to give the Student Circulators group the ability to check out items and record in-house uses at the system level, so we assign the COPY_CHECKOUT and CREATE_IN_HOUSE_USE permissions at depth 1 (overriding the same Staff permissions that were granted only at depth 2):
WITH pgt AS (
  SELECT id
  FROM permission.grp_tree
  WHERE name = 'Student Circulators'
) INSERT INTO permission.grp_perm_map (grp, perm, depth)
SELECT pgt.id, ppl.id, 1
FROM permission.perm_list ppl, pgt
WHERE ppl.code IN ('COPY_CHECKOUT', 'CREATE_IN_HOUSE_USE');
Finally, we want to add our students to the groups. The request may arrive in your inbox from the library along the lines of "Please add Mint Julep as a Student Cataloger, Bloody Caesar as a Student Circulator, and Grass Hopper as a Student Cataloger / Circulator; I’ve already created their accounts and given them a work organizational unit." You can translate that into the following SQL to add the users to the pertinent permission groups, adjusting for the inevitable typos in the names of the users.
First, add our Student Cataloger:
WITH pgt AS (
  SELECT id FROM permission.grp_tree
  WHERE name = 'Student Catalogers'
)
INSERT INTO permission.usr_grp_map (usr, grp)
SELECT au.id, pgt.id
FROM actor.usr au, pgt
WHERE first_given_name = 'Mint' AND family_name = 'Julep';
Next, add the Student Circulator:
WITH pgt AS (
  SELECT id FROM permission.grp_tree
  WHERE name = 'Student Circulators'
)
INSERT INTO permission.usr_grp_map (usr, grp)
SELECT au.id, pgt.id
FROM actor.usr au, pgt
WHERE first_given_name = 'Bloody' AND family_name = 'Caesar';
Finally, add the all-powerful Student Cataloger / Student Circulator:
 WITH pgt AS (
  SELECT id FROM permission.grp_tree
  WHERE name IN ('Student Catalogers', 'Student Circulators')
)
INSERT INTO permission.usr_grp_map (usr, grp)
SELECT au.id, pgt.id
FROM actor.usr au, pgt
WHERE first_given_name = 'Grass' AND family_name = 'Hopper';
While adopting this role-based approach might seem labour-intensive when applied to a handful of students in this example, over time it can help keep the permission profiles of your system relatively simple in comparison to the alternative approach of rapidly reproducing permission groups, overlapping permissions, and permissions granted on a one-by-one basis to individual users.
Assigning Working Locations to Staff Accounts
In addition to having the appropriate permission groups(s) assigned, staff need a working location to perform the necessary functions within the staff client. During the initial permission check, the working location is looked at in determining where the staff member can complete certain actions.
To assign a working location:
-
Go to Administration > User Permission Editor and enter the staff account barcode.
OR
Retrieve the staff account first through the patron search, then go to Other > User Permission Editor.
-
Place a check in the box next to the desired working location, then scroll to the bottom of the display and click Save.
In multi-branch libraries, it is possible to assign more than one working location.
Patron accounts do not need a working location assigned.