Using the Holdings Editor
The Holdings Editor is the tool where you can edit all holdings data, including call number (volume) data as well as item-level data.
Notes on specific fields
Acquisitions Cost
This field is populated with the invoiced cost of the originating acquisition. This field will be empty until its originating acquisition is connected to an invoice.
Item Number
If you have multiple items of the same item, you may want to assign them item numbers to help distinguish them. If you do not include an item number in this field, Evergreen will assign your item a default item number of 1.
Item Tags, Notes, and Alerts
For information on item tags, notes, and alerts, please see the specific documentation for item tags, notes, and alerts.
Accessing the Holdings Editor by barcode
Navigate to Search → Search for Items by Barcode.
Scan your barcode or list of barcodes.
Right click on the entry in the grid.
Select Edit → Call Numbers and Items on the actions menu that appears.
Accessing the Holdings Editor from a catalog record
The bibliographic record detail page displays library holdings, including the call number, shelving location, and item barcode. Within the staff client, the holdings list displays a column next to the item barcode(s) containing two links, View and Edit.
Selecting the View link opens the Item Status screen for that specific item.
Clicking on the Edit link opens the Holdings Editor screen for that specific item.
The Edit link will only be exposed next to items when the user has the UPDATE_COPY permission at the item owning library.
Editing attributes in the Holdings Editor
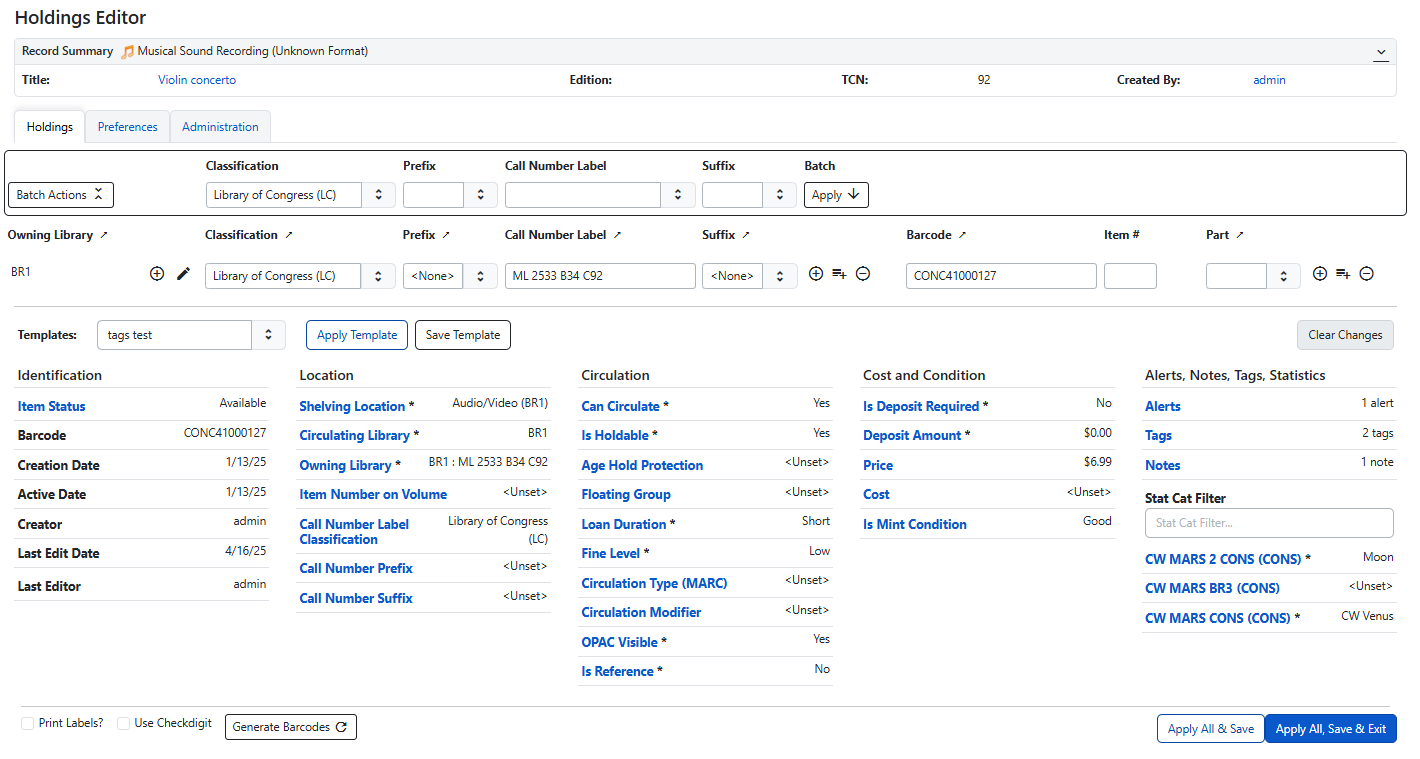
The Holdings Editor is where you can create or edit one or several items and call numbers. Call numbers are owned by an Organizational Unit, and items are individual items associated with a call number and Organizational Unit.
The Holdings Editor will also display call number-level data such as call number prefixes and suffixes, and these affixes can be saved in a holdings template.
To change an item attribute, click on the attribute. Depending on the attribute, you will have a dropdown (which allows typeaheads), a numeric area, a text area, or a modal. Once you have made your edits to the field, click Apply. The styling of the field will change to show that edits are pending. Once you have finished making edits, select either Apply All & Save if you wish to make more changes, or Apply All, Save & Exit if you wish to save and close the Holdings Editor.
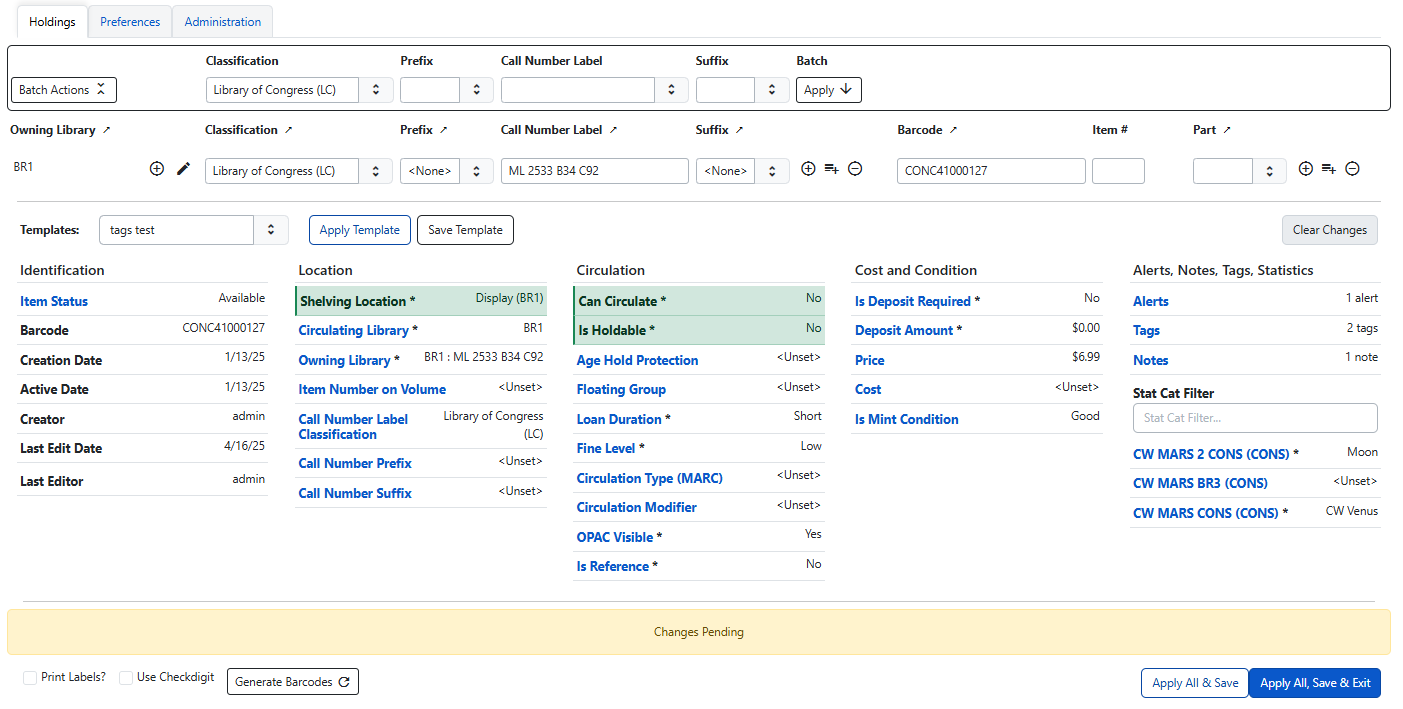
If you are editing a batch of items, the Holdings Editor will show all values of your currently selected items, including counts of which items have which attribute level. Any changes you make will be to all item attributes.
| Certain statuses, such as Checked Out, In Transit, etc. are considered “magical” statuses and cannot be edited from the Holdings Editor. If your batch contains item(s) with these statuses, you will not be able to update any item statuses in the batch. |
As above, to change an item attribute, click on the attribute. Depending on the attribute, you will have a dropdown (which allows typeaheads), a numeric area, a text area, or a modal. Once you have made your edits to the field, click Apply. The styling of the field will change to show that edits are pending. Once you have finished making edits, select either Apply All & Save if you wish to make more changes, or Apply All, Save & Exit if you wish to save and close the Holdings Editor.
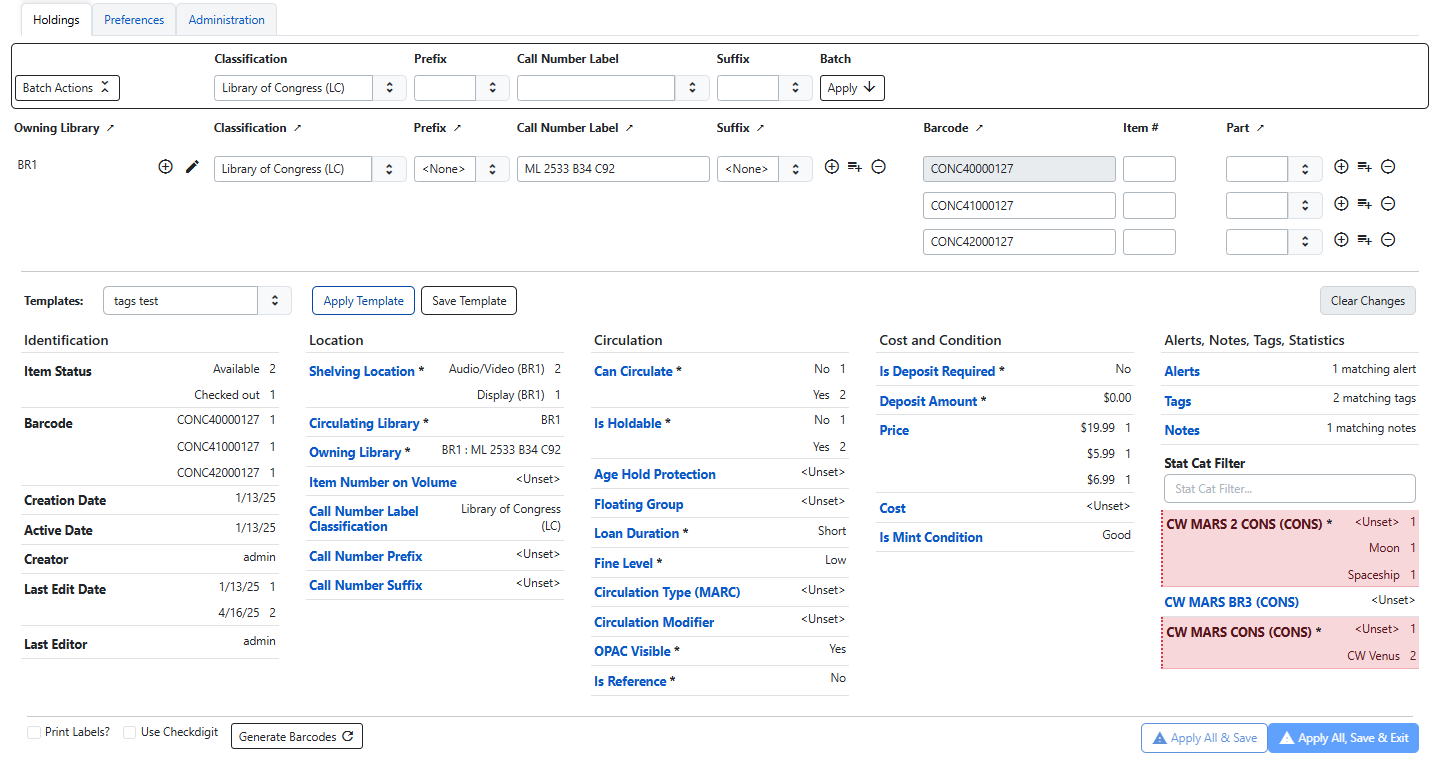
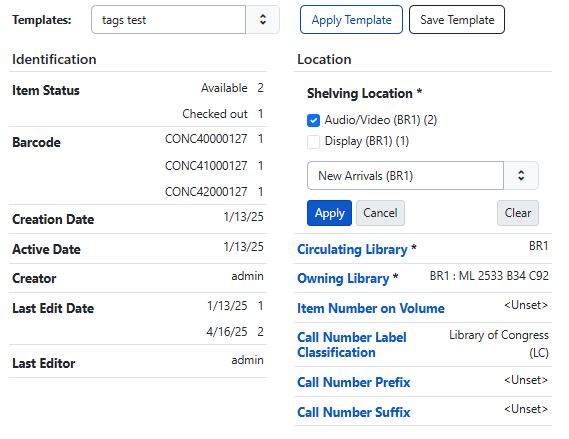
Since you are working in multiple items, you can choose whether to edit some or all items' values. To do this, select an element (in the example below, "Shelving Location") and select the values you wish to change using the checkboxes (in the example below, I unchecked "Display" because I don’t want to edit that value). Then enter the new value you wish to apply to the selected items (I chose the new shelving location "New Arrivals"). The result of this workflow is that the Display item will remain in Display, and the two items that were in Audio/Video will be moved to New Arrivals.
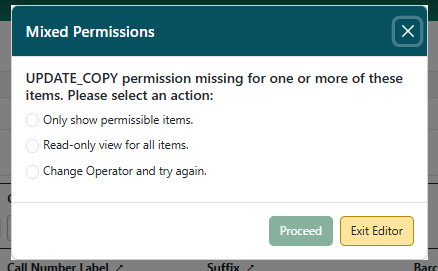
| If you do not have permissions to edit an item or items in your set, you will see a warning dialog that informs you of this when you open the editor. You will be given the option to only show items which you can edit, to show all items in read-only mode, or to enter higher credentials via Change Operator. You can also exit the editor to select a different set of items. |
To see how to use templates in the Holdings Editor, please see the Holdings Templates documentation.
Holdings Editor Preferences
Several groups of settings are available from the Preferences tab of the Holdings Editor. These are all saved as server workstation settings. Changes are applied automatically.
Holdings Display Preferences
There are several display preferences available.
| Display Preference | Description |
|---|---|
Hide Call Number Classification Column |
Select this to hide the call number classification column in the call number editor. |
Hide Call Number Prefix Column |
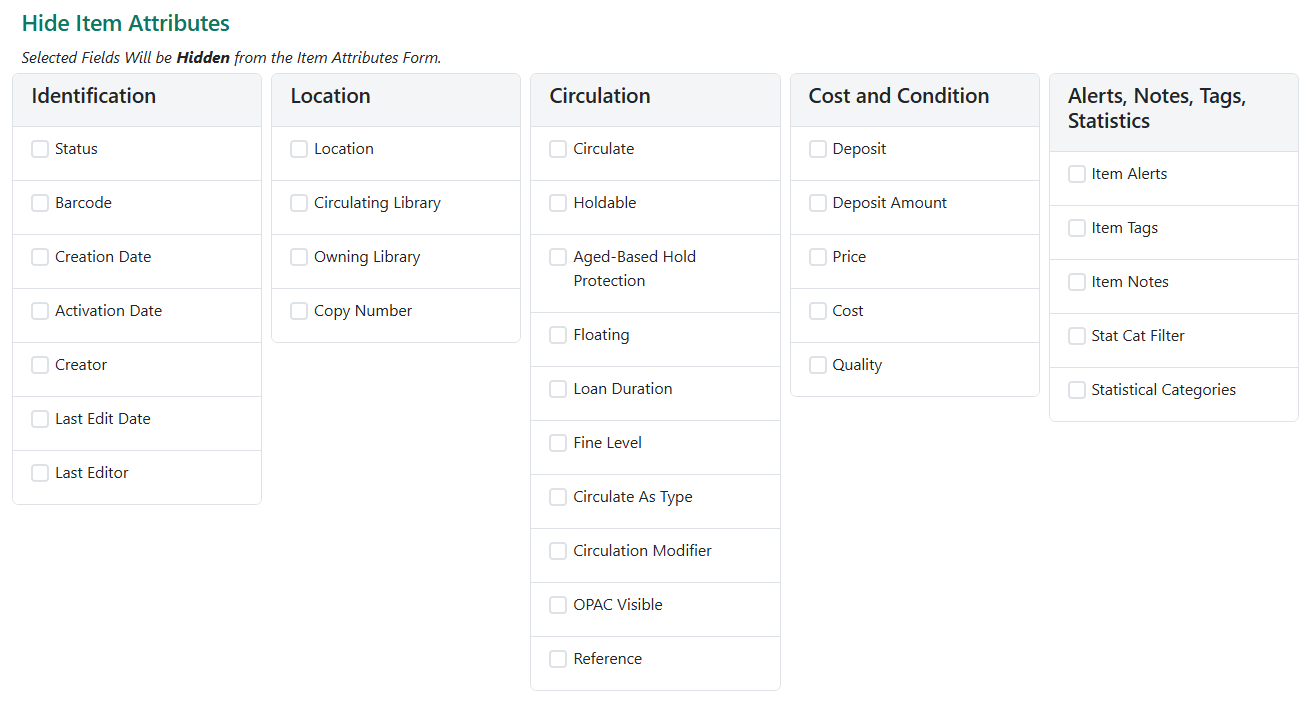
Select this to hide the call number prefix column in the call number editor. It will also hide the call number prefix field from the Item Attributes Editor. |
Hide Call Number Suffix Column |
Select this to hide the call number suffix column in the call number editor. It will also hide the call number suffix field from the Item Attributes Editor. |
Hide Generate Barcodes |
Select this to hide the Generate Barcodes button at the bottom of the Item Attributes Editor. If Generate Barcodes is selected in the Item Attributes Editor, barcodes will be automatically generated according to settings established by your Evergreen administrator. |
Hide Use Checkdigit |
Select this to hide the Use Checkdigit option at the bottom of the Item Attributes Editor. If Use Checkdigit is selected in the Item Attributes Editor, a non-Codabar barcode will turn outline of the barcode field red. |
Hide Item Part |
Select this to hide the part column in the call number editor. |
Unified Holdings and Item Attributes Display |
Select this to show the call number editor and item attributes editor in one unified display. |
Holdings Creation Defaults
There are three options for Holdings creation in this section.
Classification Scheme |
By default Evergreen will use the classification scheme specified by the library setting Default Classification Scheme. The holdings creation default lets you specify Generic, Dewey, Library of Congress which will override the library setting. |
Default Prefix |
If your library uses Prefixes select the one you’d like used as a default. All new holdings will be populated with this prefix. |
Default Suffix |
If your library uses Suffixes select the one you’d like used as a default. All new holdings will be populated with this suffix. |
Item Attributes Settings
There are three Item Attributes Settings in this section.
-
Change Circ Lib When Owning Lib Changes - selecting this checkbox will automatically update the Circulation Library field if the Owning Library field is changed.
-
Default Stat Cat Library Filter - selecting an Organizational Unit from the dropdown will default the displayed Item Statistical Categories to those owned by the selected Organizational Unit or its ancestors.
-
Default Item Alert Type - selecting an Item Alert Type from the dropdown will default any newly added item alerts to the selected type.