Load MARC Order Records
Introduction
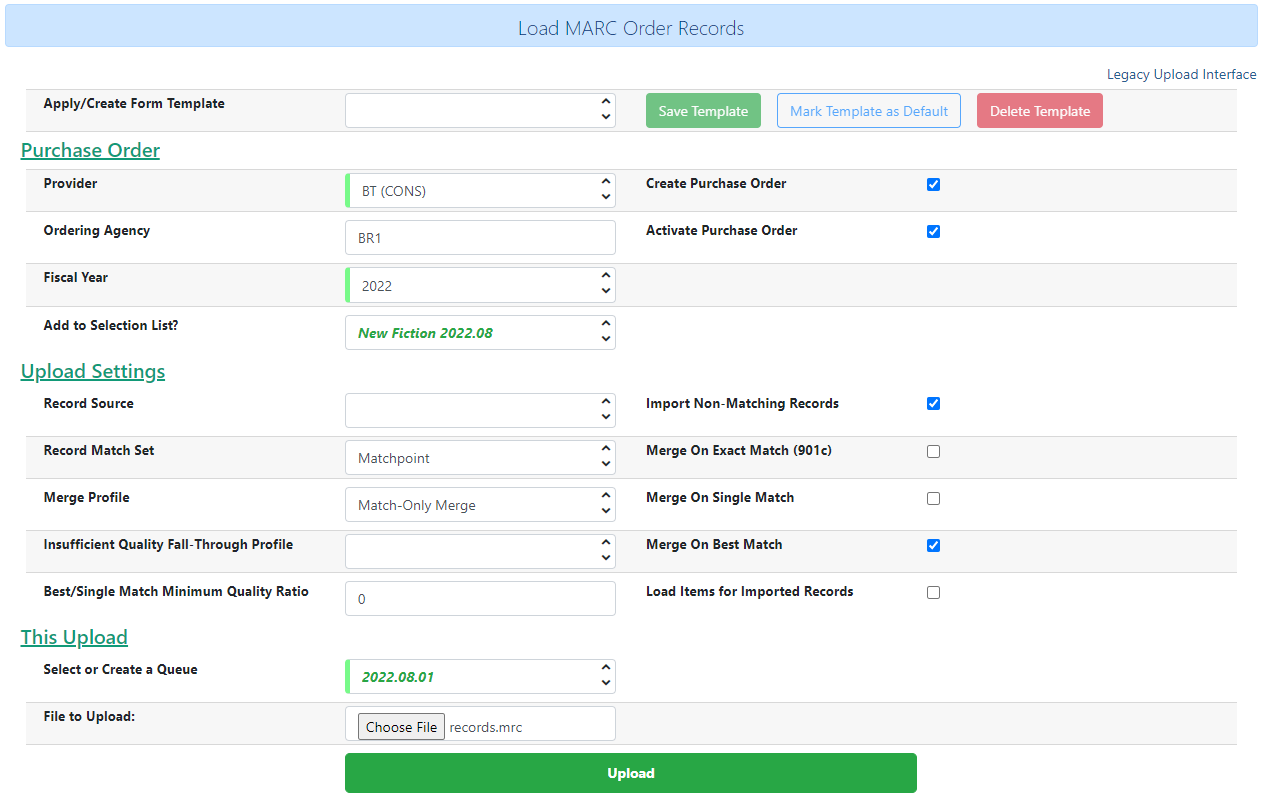
The Acquisitions Load MARC Order Record interface enables you to add MARC records to selection lists and purchase orders and upload the records into the catalog. You can both create and activate purchase orders in one step from this interface. You can also load bibs and items into the catalog.
Leveraging the match sets available in the cataloging MARC Batch Import interface, you can also utilize record matching mechanisms to prevent the creation of duplicate records.
Permissions to use this feature are:
-
IMPORT_MARC - Using batch importer to create new bib records requires the IMPORT_MARC permission. If the permission fails, the queued record will fail import and be stamped with a 'import.record.perm_failure' import error.
-
IMPORT_ACQ_LINEITEM_BIB_RECORD_UPLOAD - This allows interfaces leveraging the batch importer, such as Acquisitions, to create a higher barrier to entry. This permission prevents users from creating new bib records directly from the ACQ vendor MARC file upload interface.
-
CREATE_PICKLIST - if you wish to create a selection list from your upload, you need this permission.
-
CREATE_PURCHASE_ORDER - if you wish to create a purchase order from your upload, you need this permission.
Select Acquisitions → Load MARC Order Records to open the Load MARC Order Records interface.
Upload Defaults
You can set default upload values for certain organizational units by modifying the following settings in Administration → Local Administration → Library Settings Editor:
-
Upload Activate PO
-
Upload Create PO
-
Upload Default Insufficient Quality Fall-Thru Profile
-
Upload Default Match Set
-
Upload Default Merge Profile
-
Upload Upload Default Min. Quality Ratio
-
Upload Default Provider
-
Upload Import Non Matching by Default
-
Upload Load Items for Imported Records by Default
-
Upload Merge on Best Match by Default
-
Upload Merge on Exact Match by Default
-
Upload Merge on Single Match by Default
Upload Templates
You can create and save templates for later use. Templates are saved as a user setting. To save a template, set your desired values in the Load MARC Order Records interface, enter a name in the Apply/Create Form Template field, and then select Save Template. Templates are saved in a server workstation preference, eg.acq.picklist.upload.templates.
To set a previously saved template as the default, select your preferred template from the Apply/Create Form Template field, and then select Mark Template as Default. This default is saved as a workstation setting, and it will override any default settings established in the Library Settings Editor as described above.
To edit a previously saved template, select the template from the Apply/Create Form Template field, make your desired changes, and then select Save Template. This will overwrite the previous iteration of the template.
To delete a previously saved template, select the template from the Apply/Create Form Template field, and then select Delete Template.
Uploading Records
When uploading records, you can choose several different options related to purchase order creation, record matching, and more.
Purchase Order Options
-
Provider (this field is required) - the vendor associated with the purchase order.
-
You will see a list of providers available to you based on your permissions and assigned working locations.
-
-
Ordering Agency (this field is required) - the library organizational unit associated with the purchase order.
-
The context org unit is the org unit responsible for placing and managing the order. It defines what organizational unit settings (e.g. locations) are in scope, what fiscal year to use, who is allowed to view/modify the PO, where the items should be delivered and the EDI SAN.
-
In the case of a multi-branch system uploading records for multiple branches, choosing the system is probably best. Single branch libraries or branches responsible for their own orders should probably select the branch.
-
Note that while this field is not marked as required, it is actually required.
-
-
Fiscal Year (this field is required) - the fiscal year for this purchase order.
-
This should match the fiscal year of the funds that will be used for the order.
-
If no fiscal year is selected, the system will use the Ordering Agency’s default fiscal year stored in the database. If no fiscal year is set, Evergreen will default to the current calendar year.
-
-
Add to Selection List? - if you want to add the uploaded titles to an existing selection list, enter the selection list name here.
-
Create Purchase Order - select this checkbox if you want to immediately create a new purchase order with the uploaded records.
-
Activate Purchase Order - select this checkbox if you want to activate the purchase order at the time of creation.
Upload and Record Matching Options
Use these options for Evergreen to check for matching records before importing an order record.
-
Record Source - select a record source from the dropdown menu.
-
Record Match Set - Select a Record Match Set from the drop-down menu.
-
Match Sets are created via the MARC Batch Import/Export Interface
-
-
Merge Profile - Select a Merge Profile. Merge profiles enable you to specify which tags should be removed or preserved in incoming records.
-
Merge Profiles are created via the MARC Batch Import/Export Interface
-
-
If you want to automatically import records on upload, select one or more of the following options:
-
Import Non-Matching Records - import any records that don’t have amatch in the system. Matches are determined by the parameters of the Record Match Set that you choose.
-
Merge on Exact Match (901c) - use only for records that will match on the 901c field.
-
Merge on Single Match - import records that only have one match in the system.
-
Merge on Best Match - If more than one match is found in the catalog for a given record, Evergreen will attempt to perform the best match as defined by the match score.
-
-
Best/Single Match Minimum Quality Ratio - To only import records that have a quality equal to or greater than the existing record, enter a Best/Single Match Minimum Quality Ratio.
-
Divide the incoming record quality score, as determined by the match set’s quality metrics, by the record quality score of the best match that exists in the catalog.
-
If you want to ensure that the inbound record is only imported when it has a higher quality than the best match, then you must enter a ratio that is higher than 1, such as 1.1.
-
If you want to bypass all quality restraints, enter a 0 (zero) in this field.
-
-
Insufficient Quality Fall-Through Profile - Select an Insufficient Quality Fall-Through Profile if desired.
-
This field enables you to indicate that if the inbound record does not meet the configured quality standards, then you may still import the record using an alternate merge profile.
-
This field is typically used for selecting a merge profile that allows the user to import holdings attached to a lower quality record without replacing the existing (target) record with the incoming record.
-
-
Load Items for Imported Records - select this checkbox to load holdings information as live items that display in the catalog.
-
By default (i.e. if this checkbox is left unselected), Evergreen will load order records with holdings information as acquisitions items, which can be overlaid with real items during the MARC batch importing process.
-
Record Queue and Import
Once you have entered the above settings, you will need to create a new queue or add to an existing queue, and select your file for import.
-
In the Select or Create a Queue field, either select your existing queue from the dropdown or start typing in the field to search.
-
Searches in this field are neither case-sensitive nor left-anchored.
-
If you wish to create a new queue, type the queue name in the field.
-
Queue names must be unique.
-
-
In the File to Upload field, select the Choose File button to open a file browse window. Select the file you wish to upload and select Open.
-
Select the Upload button at the bottom of the interface in order toupload your file according to the parameters you set.
-
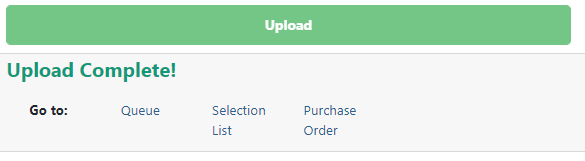
When the upload finishes, you will see Upload Complete at the bottom of the screen. You will see a link to open your queue, and depending on whether you created a selection list and/or a purchase order, you will also see link(s) to open those.
-
Select Queue to open a new tab and show your queue in the MARC Batch Import/Export interface.
-
If you created or added to a selection list as part of this upload, you will see the option for Selection List. This link will open a new tab and show you your selection list.
-
If you created a purchase order as part of this upload, you will see the option for Purchase Order. This link will open a new tab and show you your purchase order.
-
NOTE: Depending on the size of your upload file and selected match parameters, the upload may take some time to fully process.
Use Cases for Load MARC Order Records
You can add items to a selection list or purchase order and ignore the record matching options, or you can use both acquisitions and cataloging functions. In these examples, you will use both functions.
Use Case #1
Using the Acquisitions Load MARC Order Records interface, upload MARC records to a selection list and import queue, and match queued records with existing catalog records.
In this example, an acquisitions librarian has received a batch of MARC records from a vendor. She will add the records to a selection list and a record queue.
A cataloger will later view the queue, edit the records, and import them into the catalog.
-
Select Acquisitions → Load MARC Order Records.
-
Select the checkbox to create a purchase order if desired.
-
Select a Provider from the dropdown, or begin typing the code for the provider, and the field will auto-fill.
-
Select an Ordering Agency from the dropdown, or begin typing the code for the library organizational unit, and the field will auto-fill.
-
If you wish to add your records to an existing selection list, choose a Selection List from the dropdown, or begin typing the name of the selection list, and the field will auto-fill.
-
If you are creating a new selection list, enter a unique name for your list in this field.
-
-
Select a Record Match Set as well as other upload settings.
-
Make sure any Import and Merge checkboxes are NOT selected.
-
Select a record import queue from the dropdown, or begin typing the name of an existing queue, and the field will auto-fill.
-
If you are creating a new import queue, enter a unique name for your queue in this field.
-
-
Browse your computer to find the MARC file, and click Upload.
-
This will upload your records to a queue and, if you so chose, to a selection list and/or purchase order. These records are not yet in the catalog.
-
-
When the upload finishes, you will see Upload Complete at the bottom of the screen.
-
You can click the link(s) to access the purchase order, selection list, or the import queue. Click the link to go to the Selection List.
-
Look at the first line item. The line item has not yet been linked to the catalog, but it is linked to a record import queue.
-
To link a single record, select Link to Catalog on the line item to open a search dialog. This dialog will populate with bibliographic information from your line item. Select Submit to execute the search, and then select View MARC to see the MARC record in your catalog. Select Link to link this line item to your selected MARC record.
-
If you wish to import all records in the queue, select Import Queue on the line item. The batch import interface will open in a new tab. The bibliographic records appear in the queue. Records that have matches are identified in the queue. You can edit these records and/or import them into the catalog, completing the process. MARC Batch Import/Export documentation for more information.
-
Use Case #2
Using the Acquisitions Load MARC Order Records interface, upload MARC records to a selection list, and use the match options to import the records directly into the catalog. The Vandelay options will enable you to match incoming records with existing catalog records.
In this example, a librarian will add MARC records to a selection list, create criteria for matching incoming and existing records, and import the matching and non-matching records into the catalog.
-
Select Acquisitions → Load MARC Order Records.
-
Select the checkbox to create a purchase order if desired.
-
Select a Provider from the dropdown, or begin typing the code for the provider, and the field will auto-fill.
-
Select an Ordering Agency from the dropdown, or begin typing the code for the library organizational unit, and the field will auto-fill.
-
If you wish to add your records to a selection list, choose a Selection List from the dropdown, or begin typing the name of the selection list, and the field will auto-fill.
-
If you are creating a new selection list, enter a unique name for your list in this field .
-
-
Select a Record Match Set as well as other upload settings.
-
Select Merge Profile → Match-Only Merge.
-
Select the checkboxes for Import Non-Matching Records and Merge on Best Match.
-
Select a record import queue from the dropdown, or begin typing the name of an existing queue, and the field will auto-fill.
-
If you are creating a new import queue, enter a unique name for your queue in this field.
-
-
Browse your computer to find the MARC file, and click Upload.
-
When the upload finishes, you will see Upload Complete at the bottom of the screen.
-
You will see link(s) to access the purchase order, selection list, or the import queue.
-
Click the link to go to the Selection List.
-
Line items that do not match existing catalog records will show Link to Catalog. To link this line item to a catalog record, select Link to Catalog to open a search dialog. This dialog will populate with bibliographic information from your line item. Select Submit to execute the search, and then select View MARC to see the MARC record in your catalog. Select Link to link this line item to your selected MARC record.
-
Line items that do have matching records in the catalog will instead show Catalog on the line item. Select that link to view the catalog record that the line item is attached to.
-