Basket
The basket is used to temporarily collect bibliographic records. The basket can be used to place a hold on multiple records at once, print or email record details, add records to a record bucket, and export records.
You only have one basket in Evergreen. If you need to save a basket for later, or create a new basket, you will need to add the basket to a bucket, then empty the basket.
The basket is temporary.
Adding Records to the Basket
| The basket will empty if you log out of Evergreen. |
To add a record to the basket, first find the record by conducting a search in the Staff Catalog.
Then, check the checkbox that appears between the result number and the cover image of the desired result. The record is added to your basket, and the number next to the Basket Actions button in the search form increases.

To add all records on the page, check the checkbox between the search form and the search results. All results on the page are selected.
To add records from additional pages, navigate to the desired page and check the same checkbox between the search form and the search results.
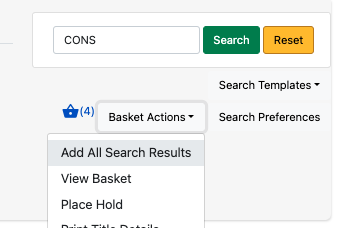
To add all search results, select Basket Actions in the search form below the Library Selector.
| If your search returned many results, this action may take a long time. |
Removing Records from the Basket
To remove a record from the basket, uncheck the checkbox between the result number and the cover image. You can do this from the search results page or from the basket. The record is removed from the basket.
To remove all records from the basket, select the Basket Actions button in the search form. Then, select Clear Basket. All records are removed from the basket.
Viewing the Basket
To view a basket, select the basket icon in the search form, located to the left of the Basket Actions button. The basket opens.
You may also select Basket Actions → View Basket. The basket opens.

Records appear in the basket exactly as they appear in the search results. However, Facets are unavailable in the basket.
Place Hold
To place a hold on every item in the basket, select Basket Actions → Place Hold. The Place Hold form appears. Place the hold the same way you place a hold for a single item.
This will be a title or part level hold. Make sure to select parts for each title as needed.
Print Title Details
To print the details of each record in the basket, select Basket Actions → Print Title Details. A printer-friendly version of the basket will appear.
Records will appear in the same order they appear in the basket. They will be numbered.
Each entry on the list will contain the bibliographic ID number, ISBN, title, author, publisher, publication date, and item type.
Email Title Details
To email a summary of the basket contents, select Basket Actions → Email Title Details. A plaintext summary of the basket will be emailed to the address associated with your Evergreen account.
The email will contain title, author, publisher, publication date, item type, bibliographic ID number, and ISBN.
Add Basket to Bucket
To add the basket to a bucket, select Basket Actions → Add Basket to Bucket. The Add # Items to Bucket window appears.
If you want to add the basket to an existing bucket, select the bucket name from the Name of existing bucket dropdown menu. Select Add To Selected Bucket. The window closes and the items are added to the bucket. A confirmation message appears at the bottom of the screen.
If you want to add the basket to a new bucket, select the New bucket tab. Enter a name and a description into the appropriate text boxes. Select Add To New Bucket. The window closes, the bucket is created, and the items are added to the bucket. A confirmation message appears at the bottom of the screen.
If you want to add the basket to a shared bucket, select the Shared bucket tab. Enter the ID of the shared bucket in the text box. Select Add To Shared Bucket. The window closes and the items are added to the bucket. A confirmation message appears at the bottom of the screen.
Export Records
To export the records in the basket, select Basket Actions → Export Records. The MARC Batch Import/Export page opens.
The Record Type may not be changed.
Select the desired Record Format from the dropdown menu. You may choose MARC21, UNIMARC, MARC XML, or Evergreen Record Entry.
Select the desired Record Encoding from the dropdown menu. You may select UTF-8 or MARC8.
If you wish to include holdings in the records export, check the checkbox.
Select Export. The file is downloaded.