Serials Module
The Serials Module can be used to create subscriptions, distributions, streams, and prediction patterns. As well as to generate predictions and receive issues as they come in to the library.
To access the Serials Module, go to a serials record in the catalog, and click on Serials→Manage Subscriptions. This will open the serials interface for that particular record. In this interface you can:
-
Create and manage subscriptions
-
Create and manage predictions
-
Create and manage issues
-
Create and manage MFHDs

Create a Subscription
-
From a bibliographic record, go to Serials→Manage Subscriptions, view the Manage Subscriptions tab.
-
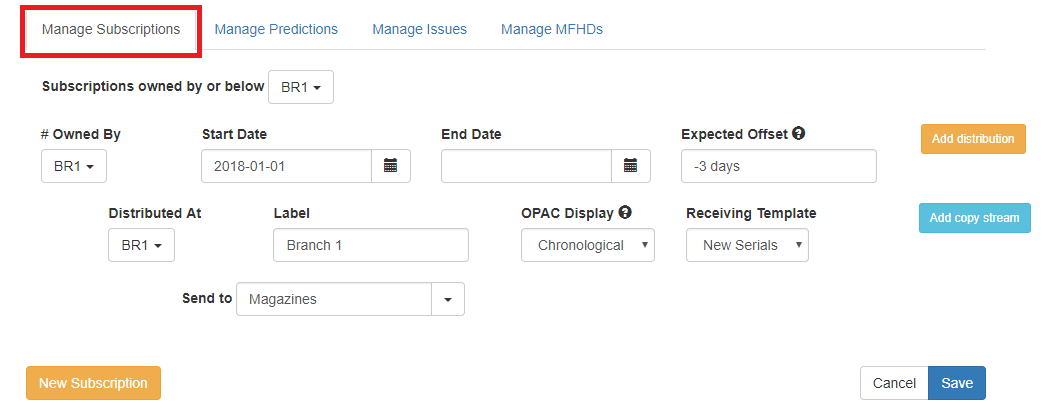
Within the Manage Subscriptions tab, create a new subscription by clicking New Subscription. The subscription editor will appear:
-
Select the Owning Library for the subscription. The owning library indicates the organizational unit(s) whose staff can use this subscription. The rule of parental inheritance applies to this list. For example, if a system is made the owner of a subscription, then users, with appropriate permissions, at the branches within the system could also use this subscription. This field is required.
-
Enter the date that the subscription begins in the Start Date field. This field is required.
-
An End Date for the subscription may also be entered, but it is not required.
-
Optionally, enter an Expected Offset. This is the difference between the nominal publishing date of an issue and the date that you expect to receive your copy. For example, if an issue is published the first day of each month, but you receive the copy two days prior to the publication date, then enter "-2 days" into this field.
-
Next, create a Distribution for the subscription by selecting the Library for the distribution. Distributions identify the branches that will receive copies of a serial.
-
Note: If the Owning Library of the subscription was set at the branch level, the Library will be the same as the Owning Library. If the Owning Library of the subscription was set at the system level, the Library will be set to the holdings library.
-
-
Enter a Label for the distribution. It may be useful to identify the branch to which you are distributing these issues in this field. This field is not publicly visible and only appears when an item is received. There are no limits on the number of characters that can be entered in this field.
-
Select the preferred OPAC Display for holdings: Chronological or Enumeration.
-
Select the Receiving Template that will be applied to items as they are received. The receiving templates are configured in Administration→Serials Administration→Serial Copy Templates.
-
Next, create a Stream by assigning a label to the stream in the Send to field. The stream indicates the number of copies that should be sent to the distribution library. You can click Add copy stream if the library will receive multiple copies of the serial.
-
-
After the subscription, distribution, and copy information is configured, click Save and go to the Manage Predictions tab to create the prediction pattern that will be used to generate predictions for this title.
| After creating a subscription, you can use the Actions menu to take a variety of actions with the subscription, such as adding Subscription or Distribution Notes, linking it to an MFHD record, or creating routing lists. |

Create and Manage Predictions
From the Manage Predictions tab you can create a new prediction pattern from scratch, use an existing pattern template, or use an existing pattern template as the basis for a new prediction pattern.
Predict Issues Using a New Prediction Pattern
-
Within the Manage Predictions tab, Select [a] subscription to work on from the drop down menu.
-
To create a new prediction pattern, click Add New.
-
The box next to Active will be checked by default.
-
Select the Type of pattern from the drop down menu and click Create Pattern. The Pattern Wizard will appear.
-
Follow the steps in the section Creating a Pattern Template in this documentation to create a new pattern using the wizard.
-

-
After creating the pattern in the wizard, click Create. The new prediction pattern will now appear under Existing Prediction Patterns.
-
To create predictions, click Predict New Issues.
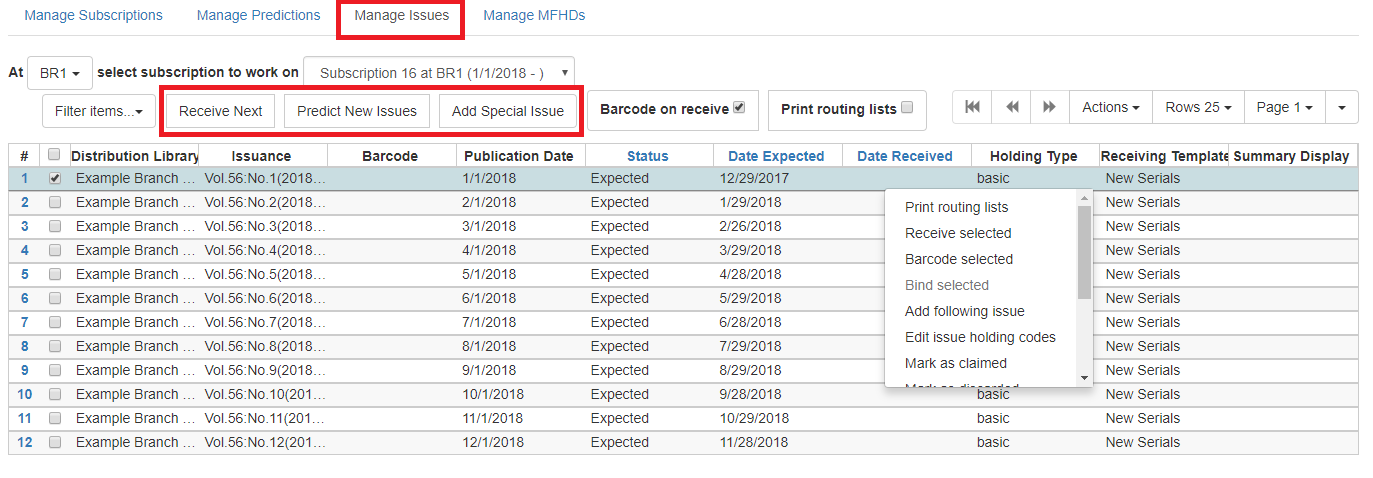
| You can also predict new issues from the Manage Issues tab. |

-
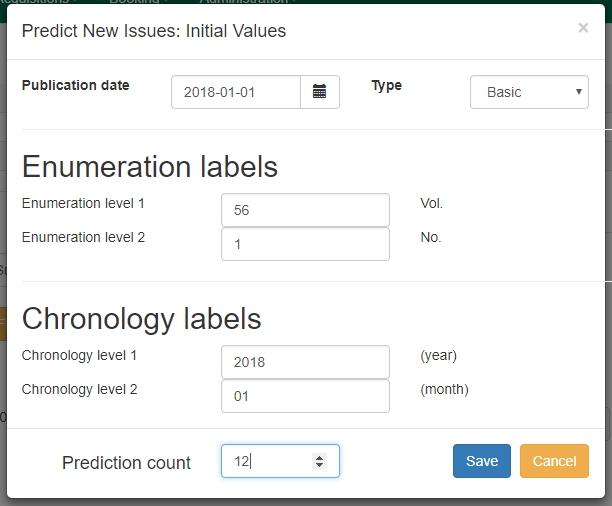
A dialog box called Predict New Issues: Initial Values will appear.
-
Select the Publication date for the subscription. This will be publication date of the first issue you expect to receive.
-
The Type will correspond to the type of prediction pattern selected.
-
Enter any Enumeration labels for the first expected issue.
-
Enter any Chronology labels for the first expected issue.
-
Enter the Prediction count. This is the number of issues that you want to predict.
-
-
Click Save.
-
Evergreen will generate the predictions and bring you to the Manage Issues tab to review the predicted issues.

Predict Issues Using a Prediction Pattern Template
-
Within the Manage Predictions tab, Select [a] subscription to work on from the drop down menu.
-
Select a template from the drop down menu that appears under the Add New button and click Create from Template. The pattern information will appear below the drop down menu.

-
If you want to use the pattern "as is" click Create.
-
If you want to review or modify the pattern, click Edit Pattern. The Pattern Wizard will appear.
-
The Pattern Wizard will be pre-populated with the pattern template selected. Follow the steps in the section Creating a Pattern Template in this documentation to modify the template or click Next on each tab to review the template.
-
After modifying or reviewing the pattern in the wizard, click Create. The prediction pattern will now appear under Existing Prediction Patterns.
-
-
To create predictions, click Predict New Issues.
-
Note: you can also predict new issues from the Manage Issues tab.
-
-
A dialog box called Predict New Issues: Initial Values will appear.
-
Select the Publication date for the subscription. This will be publication date of the first issue you expect to receive.
-
The Type will correspond to the type of prediction pattern selected.
-
Enter any Enumeration labels for the first expected issue.
-
Enter any Chronology labels for the first expected issue.
-
Enter the Prediction count. This is the number of issues that you want to predict.
-
-
Click Save.
-
Evergreen will generate the predictions and bring you to the Manage Issues tab to review the predicted issues.
Predict Issues Using a Prediction Pattern from a Bibliographic and/or MFHD Record
Evergreen can also generate a prediction pattern from existing MFHD records attached to a serials record and from MFHD patterns embedded directly in the bibliographic record.
-
Within the Manage Predictions tab, Select [a] subscription to work on from the drop down menu.
-
Click Import from Bibliographic and/or MFHD Records.

-
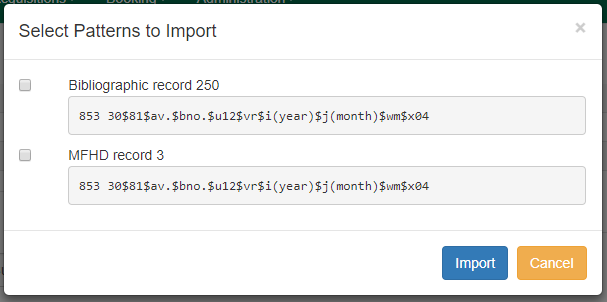
A dialog box will appear that presents the available MFHD records and the prediction pattern that will be imported.
-
Check the box adjacent to the MFHD record that you would like to import and click Import. The new prediction pattern will now appear under Existing Prediction Patterns.

-
If you want to review or modify the pattern, click Edit Pattern. The Pattern Wizard will appear.
-
The Pattern Wizard will be pre-populated with the pattern from the MFHD selected. Follow the steps in the section . Creating a Pattern Template. in this documentation to modify the template or click Next on each tab to review the template.
-
-
To create predictions, click Predict New Issues.
-
Note: you can also predict new issues from the Manage Issues tab.
-
-
A dialog box called Predict New Issues: Initial Values will appear.
-
Select the Publication date for the subscription. This will be publication date of the first issue you expect to receive.
-
The Type will correspond to the type of prediction pattern selected.
-
Enter any Enumeration labels for the first expected issue.
-
Enter any Chronology labels for the first expected issue.
-
Enter the Prediction count. This is the number of issues that you want to predict.
-
-
Click Save.
-
Evergreen will generate the predictions and bring you to the Manage Issues tab to review the predicted issues.
