Link Checker
The Link Checker enables you to verify the validity of URLs stored in MARC records. In Link Checker, you can construct a search (a Session) that will specify a set of records from which to extract URLs. Each session also has sets of verification attempts (a Batch) where these URLs are tested & reported on as functional or nonfunctional. Each Session can have many Batches.
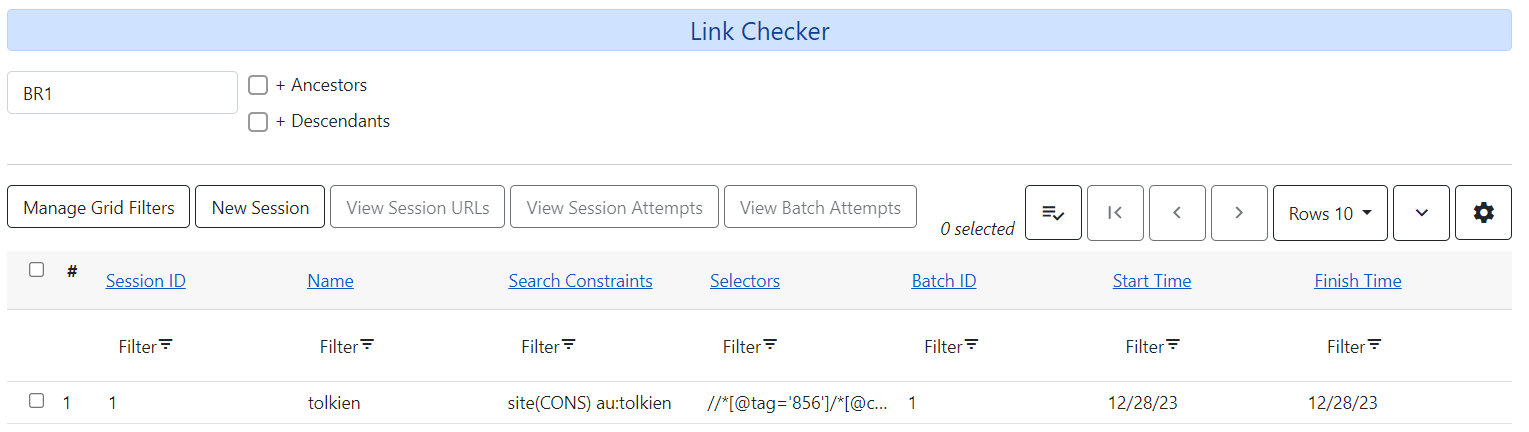
The Link Checker interface defaults to scoping at the workstation organizational unit but you can change this as well as select ancestors or descendants of the selected location.
This feature is located at Cataloging → Link Checker and using it requires the URL_VERIFY permission.
Search for URLs
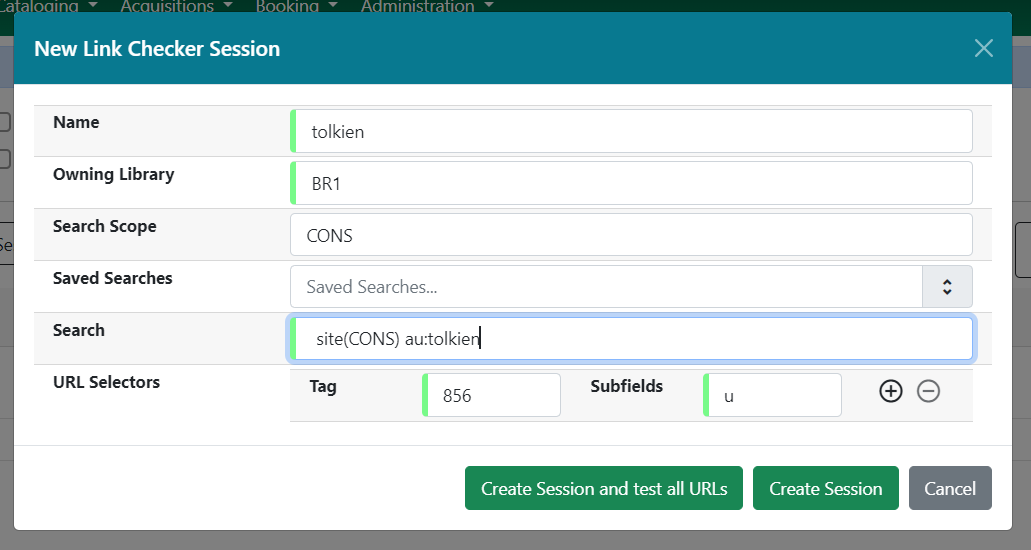
To search for MARC records that contain URLs that you want to verify, select New Session. A modal will open.
-
Name (required) - The name of your Link Checker Session. Names must be unique.
-
Owning Library (required) - This will default to the library of your workstation registration.
-
Search Scope - This is the location where you want your search to look for bibs. Link Checker will look for locations of physical copies as well as 856$9 designations.
-
Records that would be retrieved by searching Example Branch 1 (BR1) in an OPAC search will be retrieved here.
-
For example, a record that describes an electronic resource with a URL in the 856$u and an organizational unit code, such as BR1, in the 856$9, would be retrieved by a search of relevant keywords.
-
Records that contain a URL without the $9 subfield, but also have physical copies at BR1, would be retrieved.
-
This search will honor the
opac.located_uri.act_as_copyglobal flag when determining whether a bib should be retrieved. If this flag is false, bibs with located URIs (856$9) will only be retrieved if the specific organizational unit is specified in the search. If this flag is true, child organizational units will also be considered in the search. -
Note that you can skip this step if you enter the organizational unit code of the location that you want to search in the Search field below.
-
-
Saved Searches - these are saved search strings that will include a bib-level audience search parameter. They can be edited at the database level.
-
Children’s Materials - audience(a,b,c)
-
Young Adult Materials - audience(j,d)
-
General/Adult Materials - audience(e,f,g)
-
-
Search - This is your search string. It will include the search scope set above. This search string uses the same advanced search syntax as record buckets.
-
See Record Buckets documentation for more information on the search syntax.
-
-
Enter search terms to retrieve records with URLs that you want to verify. You can also add a location filter, such as BR1.
-
Search examples:
-
site(CONS) au:tolkien
-
site(CONS) kw:cello
-
site(BR1) ti:cello concertos
-
site(BR2) kw:concerto au:brahms
-
-
-
URL Selectors (required) - This tells your search in which MARC field/subfield set to look for URLs. It defaults to MARC tag 856 and subfield u, but you can change this or add additional tag/subfield combinations to search.
-
Once you have established your search parameters, select Create Session and Test All URLs to create the session and batch. Evergreen will search for records that match your search terms, and then, from the set that it retrieves, it will extract any URLs from all of the tag/subfield locations you have specified for the session.
-
You will see a confirmation of the Session ID, the number of record hits, the number of URLs extracted, and the number of URLs verified.
If you wish to create the session and test URLs later, select Create Session. You can later go back and select the session to create a batch and test URLs. Select Cancel to exit without saving.
View Your Results
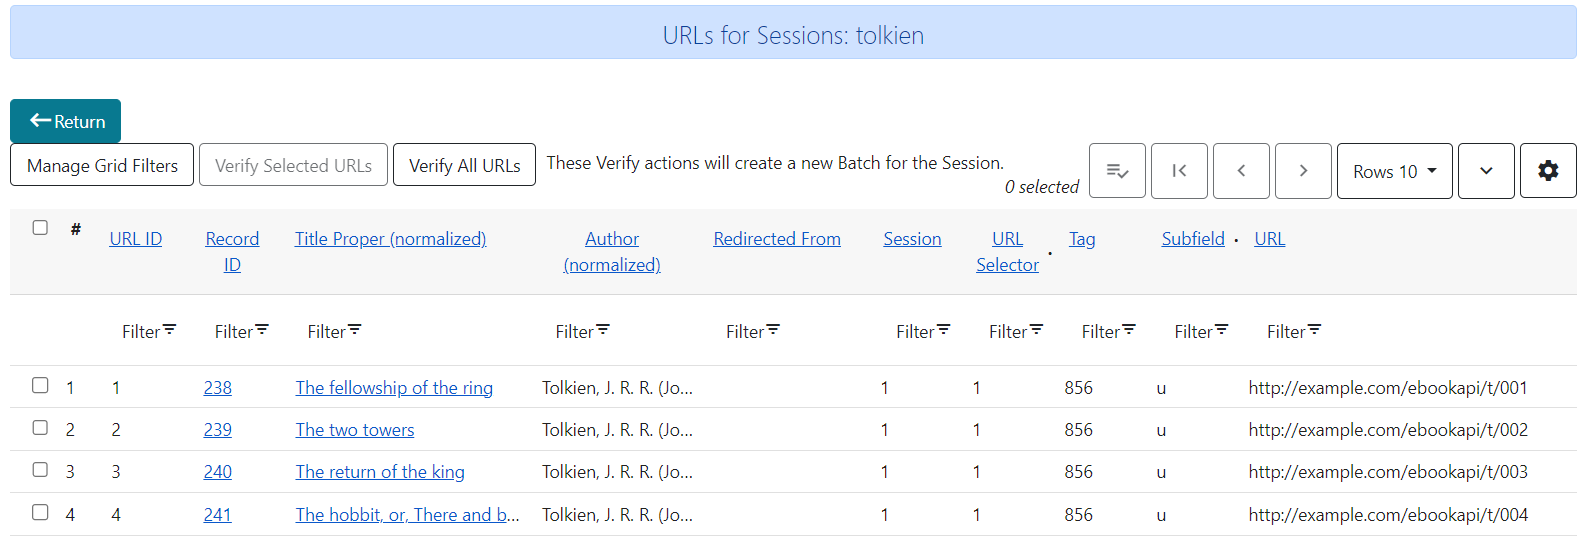
View Session URLs will take you to a list of URLs pulled from the bibs identified in your searches for selected sessions. From this interface you can select all or a subset of URLs and select Verify Selected URLs to create a new batch and verify (or re-verify) the URLs.
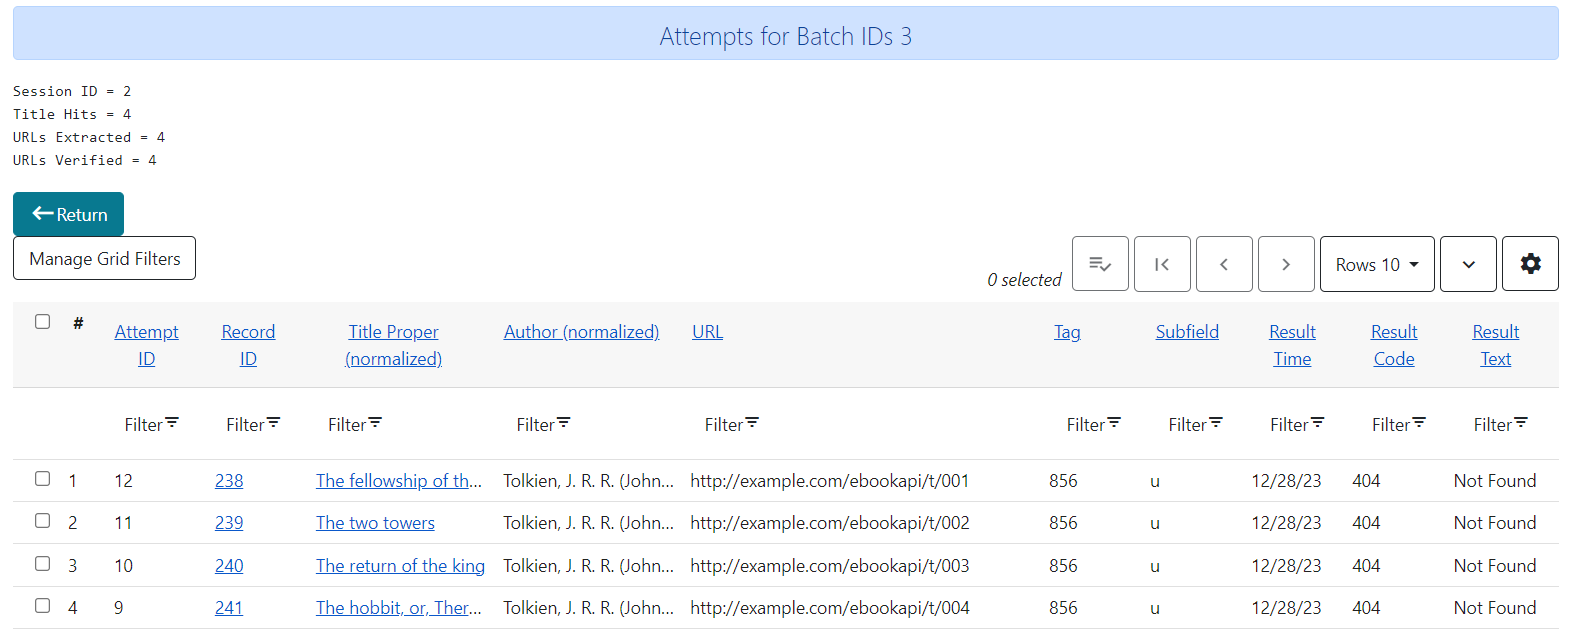
View Session Attempts will take you to a list of all verification attempts for selected sessions. This will include verification attempts from different batches.
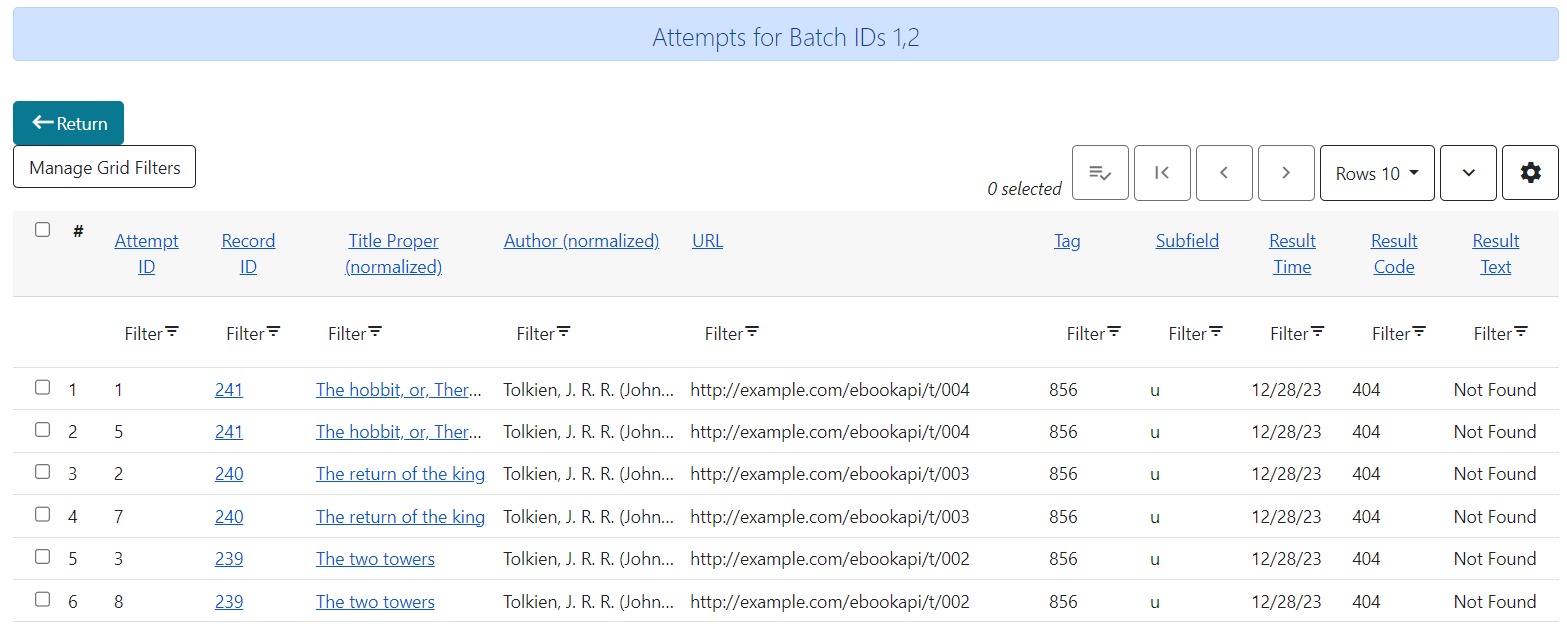
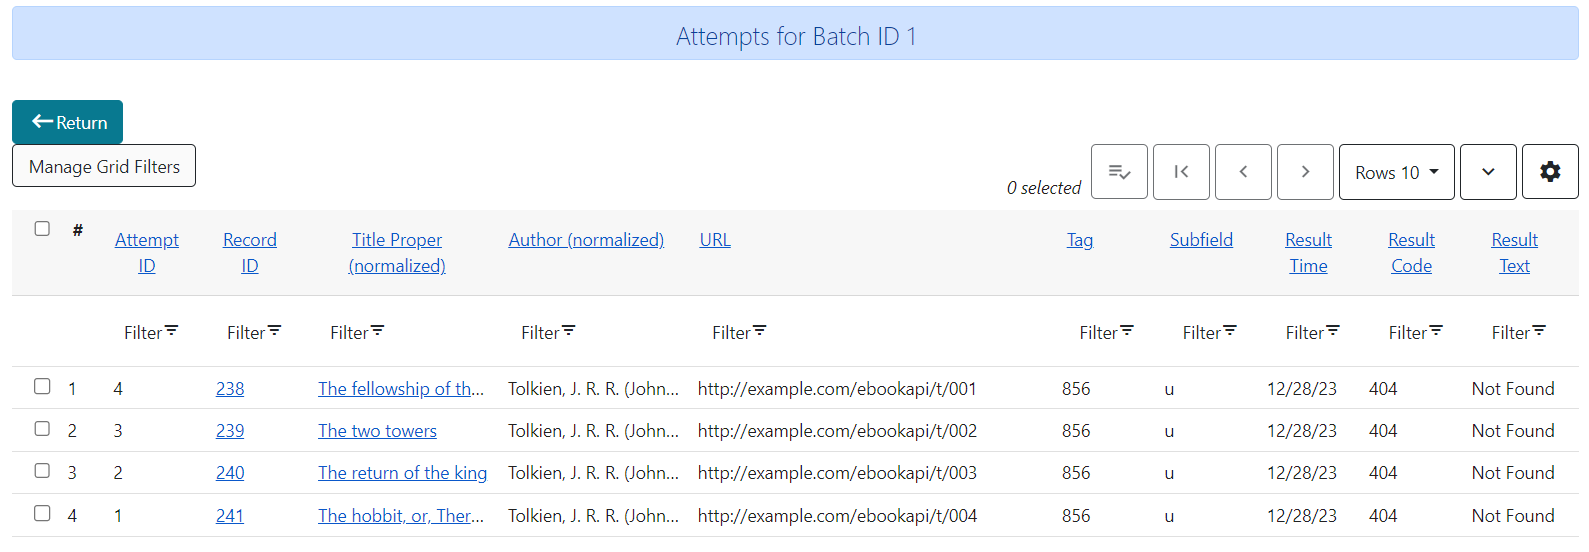
View Batch Attempts will take you to a list of verification attempts for selected batches. This grid shows the tags that you searched, the URLs that Evergreen retrieved, the Bib Record ID, the request and result time, and the result code and text, among other information. If a URL is redirected, Evergreen will verify the redirect as well and will record the URL ID of the redirect in the Redirected To column.
Manage Your Sessions
Actions Menu
Actions in the main Actions Menu include Copy to Clipboard, Clone Selected Session, and Delete Selected Sessions. You can select multiple sessions to delete. Deleting a session will delete all of its associated information including batches and verification attempts. As is standard in eg2 grids, there are also options to manage column display, column widths, and download grid CSV, among others.
Edit Columns
You can use the Column Picker to add and remove columns on any of the Link Checker interfaces. To access the Column Picker, select the gear icon in the upper right of the grid.
Manage Filters
Manage Filters opens a modal with a new filter groups feature. This feature lets you save and load sets of one or many column filters. Manage Filters is available on all Link Checker grids.
For example, if you want to create a filter set on the main Link Checker grid for Sessions searching CONS and run in 2023, you would apply the following two column filters:
-
Start Time between 2023-01-01 and 2023-12-31
-
Search Constraints contains CONS
Then, you would select Manage Filters, enter a name in the box labeled Save As, and then click Save Active Filters. This will save your filter set for future use.
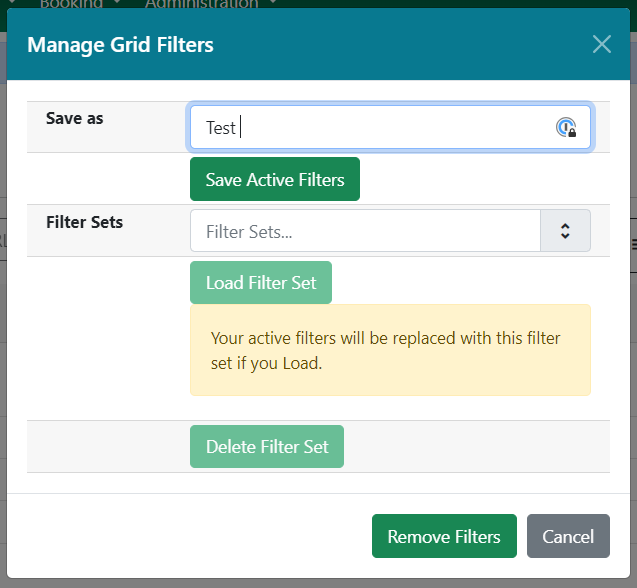
From the same modal you can also use Remove Filters to clear any current filter selections, Load Filter Set to load a previously saved filter set, and Delete Filter Set to delete a previously saved filter set.
All filter sets for a grid are saved as a server workstation preference.