Creating Report Templates
Introduction
Once you have created a folder, the next step in building a report is to create or clone a template. Templates allow you to run a report more than once without building it anew every time, by changing definitions to suit current requirements. For example, you can create a shared template that reports on circulation at a given library. Then, other libraries can use your template and simply select their own library when they run the report.
It may take several tries to refine a report template to give the output that you want. It can be useful to plan out your report on paper before getting started with the reporting tool. Group together related fields and try to identify the key fields that will help you select the correct source.
It may be useful to create complex queries in several steps. For example, first add all fields from the table at the highest source level. Run a report and check to see that you get results that seem reasonable. Then clone the template, add any filters on fields at that level and run another report. Then drill down to the next table and add any required fields. Run another report. Add any filters at that level. Run another report. Continue until you’ve drilled down to all the fields you need and added all the filters. This might seem time consuming, and you will end up cloning your initial template several times. However, it will help you to check the correctness of your results and will help to debug if you run into problems because you will know exactly what changes caused the problem. Also consider adding extra fields in the intermediate steps to help you check your results for correctness.
Creating a Template
Before creating a completely new template, it is recommended that you check for shared templates to see if there is a template that can be modified to give you the information you need. The template search can be used to find and identify potential templates. Please note that the search does not provide the folder name where the template is stored. Be sure to leave out any special characters or punctuation in your search.
See Cloning Report Templates for more information.
Creating a template can be complex and requires some understanding of the Evergreen database and how Evergreen handles various records when performing tasks in the staff interface. It can be useful to plan out your template before getting started with the reporter. Think about what type of records you will be reporting on (circulation, item, bibliographic, patron, etc.) and what information you want to see displayed in your report output. You also want to think about what filters should be used so the report output contains only the records you’re interested in.
-
Navigate to Administration → Reports.
-
In the My Folders section, select the caret beside the Templates folder to see your template folders. Use the carets to expand the folder tree until you find the folder where you’d like to create the new template.

-
Select the folder name.
-
In the folder, select New Template.

-
The New Template editor will open. See Report Template Editor for information on using the editor.

-
Add a Template Name.
-
Choose a source using the Select Source drop-down menu. See Report Source for more details.
-
Add Display Fields. See Adding a Display Field for more details.
-
Add Filters. See Adding a Filter for more details.
All report templates MUST have at least one filter to choose a specific library. This filter is important as it allows staff to restrict the data in the report output to only data relevant to their library.
-
Add hardcoded filter values for any filters that should always use the same value. See Reporter Basics for a list of filters that are commonly hardcoded.
-
Make adjustments to the Report Layout. See Template Report Layout for more details.
-
Select Save.
-
Your new template can now be found in the folder you saved it to.
-
Run a report from the new template to see if the desired output is generated.
If the path for one of your display fields or filters is incorrect, you will get an error instead of the expected report output. Sometimes the error text will give you a clue about what isn’t working.

You can modify your template and try again.
-
Repeat the above steps until your template works as desired.
|
It is not unusual to create multiple versions of a template when working to modify a template. Once you have a template that works as desired, it is recommended that you delete the interim versions of the template. See Deleting Report Templates. |
Report Template Editor
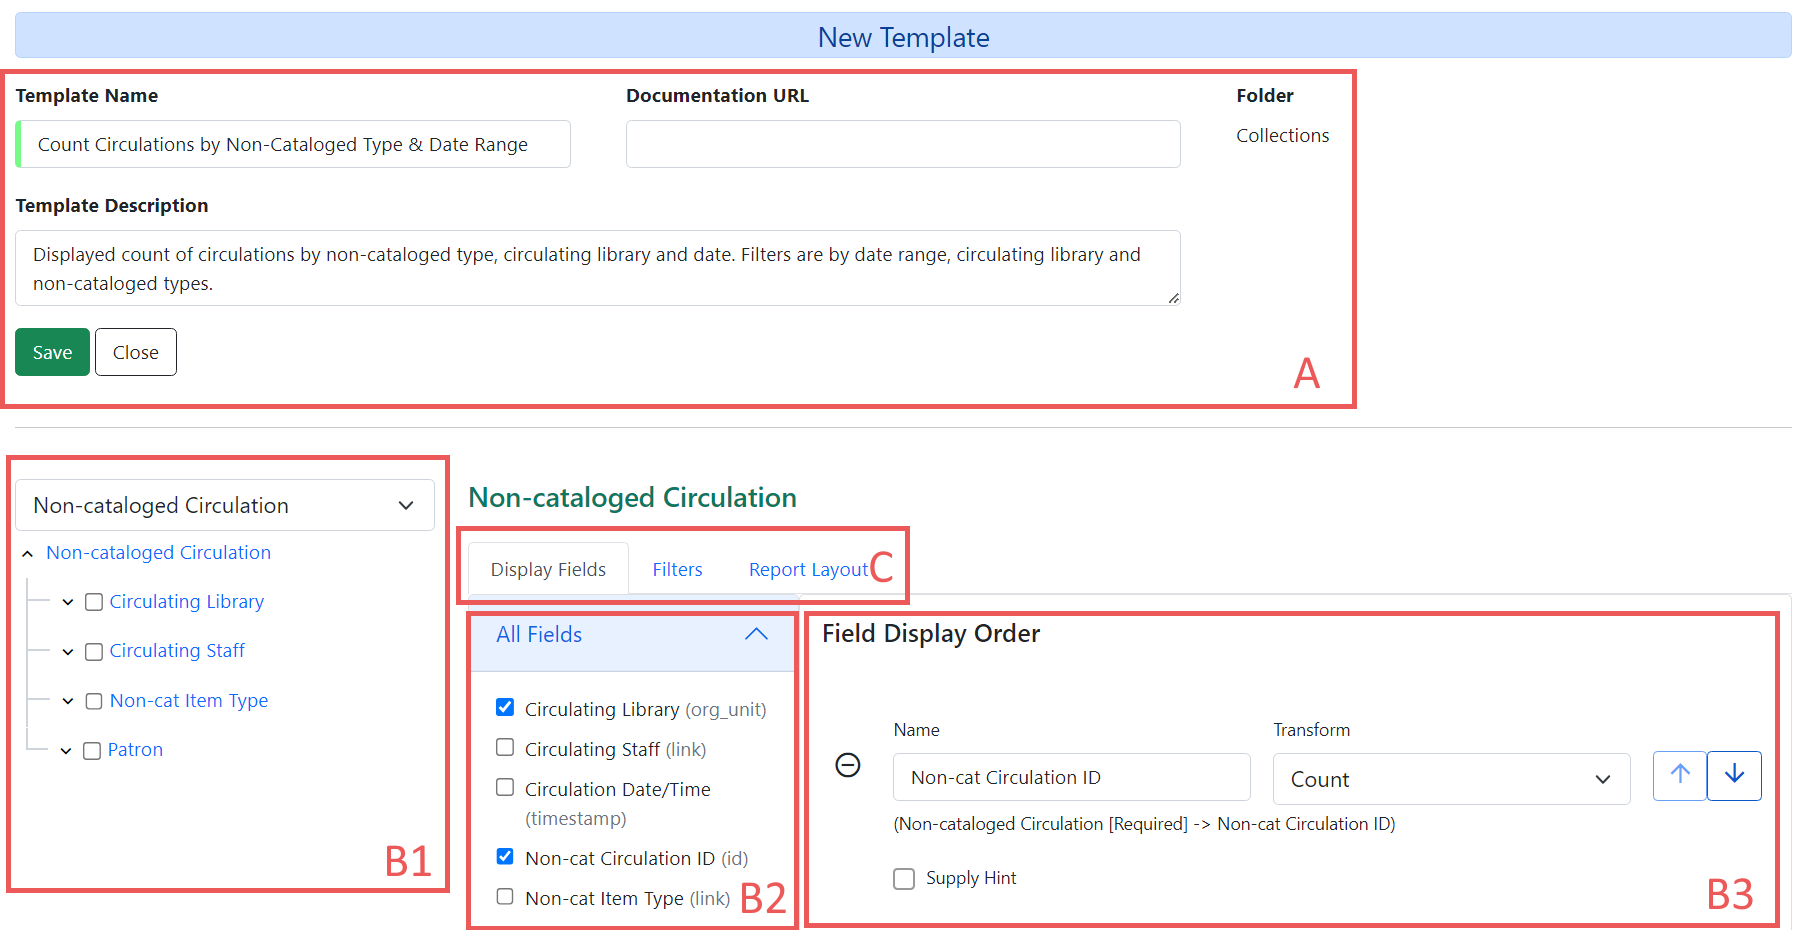
The report template editor is made up of three sections:
-
Section A: Basic information
-
Section B: Display field and filter options and selections.
-
B1: Source.
-
B2: Available fields from selected Source.
-
B3 Fields selected for inclusion in template and modifying information.
-
-
Section C: Display Fields, Filters, and Report Layout tabs
Basic Information Section
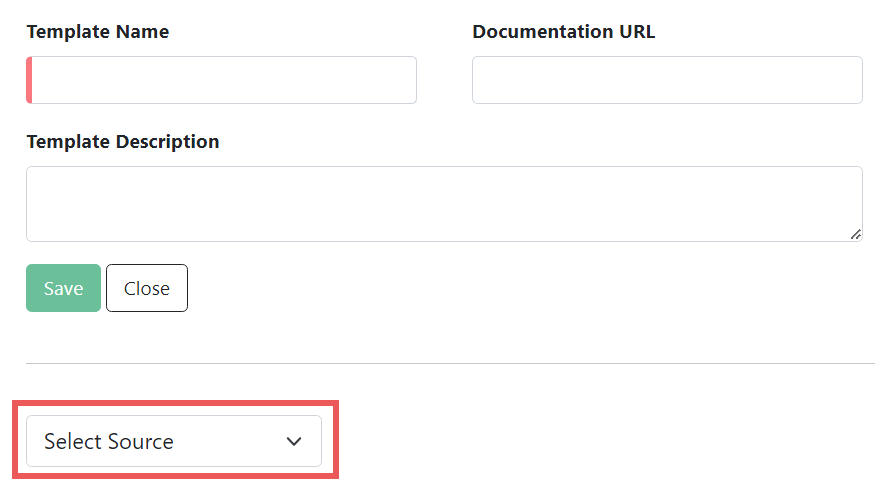
The basic information section of the report template editor is where you can add or update the Template Name, Template Description, and Documentation URL.
|
The names of templates in a folder must be unique. Evergreen will not allow a template using an identical name to be saved into the same folder. |
If you have local documentation online that pertains to a report template, you can add it in the Documentation URL field, and it will be included as a link in the report output.
|
Best practice for your Template Description is to include a brief summary of the report purpose, a list of display fields, and a list of filters. As you make new iterations of the template you can keep track of your changes in the description field. |
Display Field and Filter Selector
The Display Field and Filters selection area is where you build and modify the template columns, data filters, and report layout.
Report Source
Every report template starts with a Source. This is the database table from which your template is built. The drop-down menu displays as Select Source when a new template is first created. Selecting a Source will cause the rest of the display field and filter selections area to populate.
|
When modifying an existing template, NEVER change the source. This will scrap your existing template and you will have to start again from scratch. |
When creating a new template, the first thing you need to do is figure out which source makes the most sense for the data you want to see in your report output. If you need information from other tables, you’ll follow the table tree to those tables when adding display fields and filters. Sources are divided in the drop-down menu into Core sources and Other sources. Most standard statistics reports will be created with Core Sources as these represent the primary database tables. The Other sources are less frequently used tables or specially created data views.
The three most commonly used Core sources are Circulation, Item, and ILS User. Templates for monthly circulation statistics and templates for tracking overdue items use the Circulation source. Templates about the state of your collection use the Item source. Templates containing counts or lists of your patrons use the ILS User source. More information can be found in Commonly Used Tables.
You can link to other database tables to include information contained in those tables but not every table links directly. For example, patrons and items aren’t directly linked to each other. Information about items checked out to a patron is held in the circulation table while information about items on hold is found in the hold request table. More information can be found in documentation about the Evergreen Database.
Nullability
You may wish to use nullability if your report output includes null values that you don’t want included. A NULL value in a field means that there is no value in that field.
Nullability in Action
By default, Evergreen will include data that matches your query, even if there is a null value for one of your fields. If you do not want the null values to display in your results, use the nullability checkbox that can be found on the left of each potentially linked source.
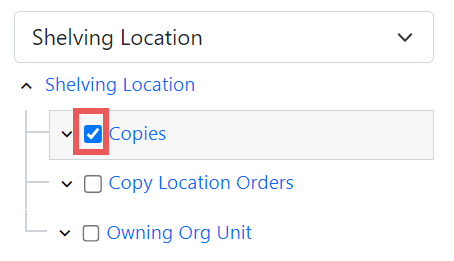
Selecting the nullability checkbox tells the template NOT to include data from that joined source if the field on the child, or right-side source, is null.
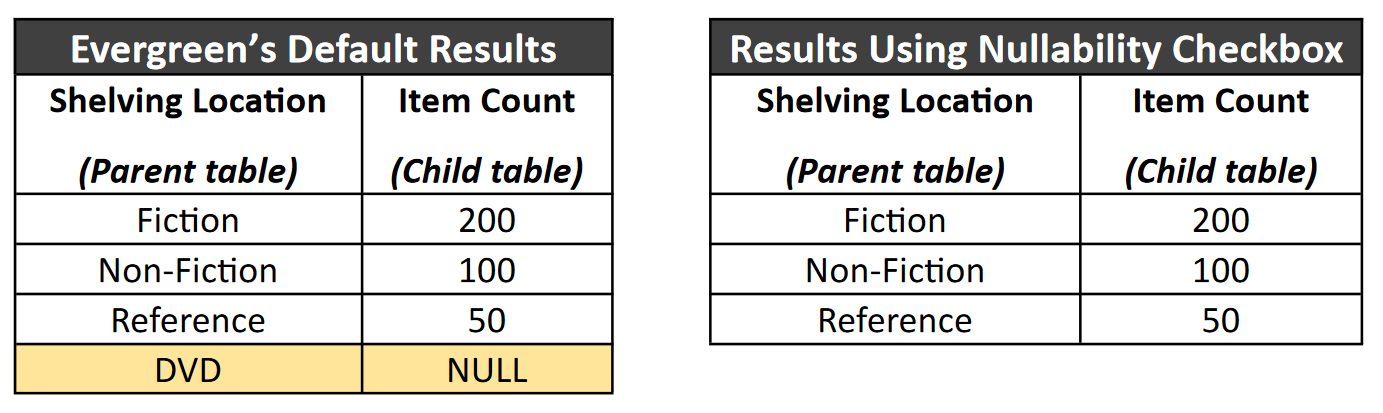
The simplified set of outputs below show the same results of a count of items by shelving location, with and without using the nullability checkbox. The first chart includes a line for DVDs, even though no items have been assigned to that shelving location. This would be the default provided by Evergreen. To get the result in the second chart, we would select the nullability box next to the Copies table as we built the report; just like you see in the image above.
|
The default behavior can be a great way of catching possible data issues. |
Details on Nullability in Evergreen
Nullability allows you to have more control over whether null values in fields are included in your report output. Once you have selected a source, you will see a tree on the far left showing the sources which can be linked (joined) to the selected source. The type of join determines what data can show up with a null value in your results: inner joins will only show non-null results; outer joins will allow null results.
The default behavior in Evergreen is now a left outer join; the parent can have a null value in the linking field to the child, in which case the parent will contribute a row but all the child fields for that row will be null. If there is a value in the parent’s linking field, then rows from the child (but only where the linking field matches!) will come in.
However, if we use the new nullability checkboxes we can create an inner join which will tell Evergreen to not include results where either parent or child are null.
To learn more about nullability, see the Evergreen conference presentation Thanks for Nothing: Nullability Selection in Evergreen Reports. While the Advanced Reports interface has changed since this presentation, the conceptual discussions of nullability are still applicable.
Display Fields
Display fields are the columns of information that will display on your report output. The Display Fields tab is the active tab by default in the Report Template Editor.
Adding a Display Field
Display fields are the columns which will be displayed in your report output.
-
Ensure the Display Fields tab is the active tab in the Display Field, Filters, and Report Layout tabs section of the Report Template Editor.
-
Select the top of the tree in the Source pane. A list of available fields will be displayed in the All Fields pane to the right under the Display Fields tab.

-
The word in parentheses beside the field name indicates the data type. If the field you want to use is a link, you need to expand the tree in the Source pane to find it and then select it. This will open a new list of options under the All Fields heading. In the screenshot below, we have selected Call Number/Volume in the tree as this was displaying as a link when we were at the Item level. The current selection can be confirmed at the top next to the Source drop-down. Now that we are at the call number level, we can see that there are three different options related to call number. To display call numbers in an understandable way we will need to use Call Number Label.

-
Select the field in the All Fields pane you would like to add as a display field.
For display fields, you generally want to pick a text field over an ID or org unit field. For example, to add call number as a display field, you will select Call Number Label rather than Call Number/Volume ID.
-
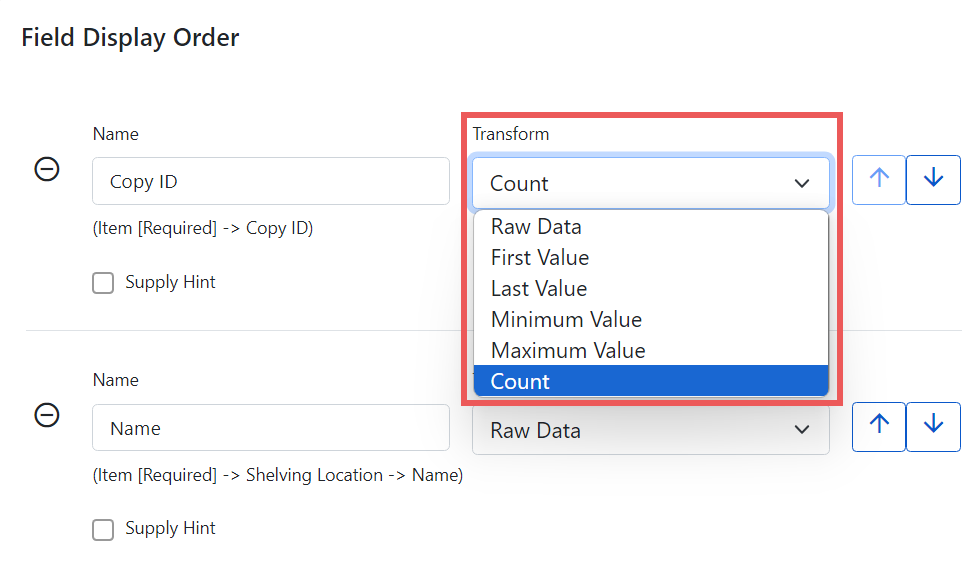
In the Field Display Order pane, select the transform you would like to use. The transforms available in the list will vary depending on the data type of the selected field.
-
The transform will determine how Evergreen processes the data when generating the report. Raw Data is the most commonly used transform for display fields except when it’s a timestamp, in which case Date is more commonly used. More information on the available transforms can be found in Field Transforms.

The action Supply Hint on the Display Fields tab can generally be ignored. The column documentation will appear next to the column name in the Report Columns section of the template, but it does not appear next to the column name in the report output.
-
Reordering Display Fields
-
You can use the arrows on the right to move fields up and down the list. The list order top to bottom here on the Display Fields tab will determine the order of column display from left to right. Sorting is controlled separately, in the Report Layout tab.

-
Repeat until your fields are in the order you desire.
Renaming a Display Field
You can adjust the display name of any field by clicking in the Name box and typing in a new name. The original field name will show below the Name box along with the path you took to field the field starting at your source.
|
It is best practice to include qualifiers in the field names for fields like barcode and library so that staff know what data they are looking at in the report output. For example, for multi-branch libraries and libraries participating in reciprocal borrowing, it is not uncommon for the Circulating Library and Owning Library of an item to be different. In this case, it is important to specify in the field name which type of library is being presented in the report output data. |
Changing a Transform
For information on specific transforms, see Field Transforms.
You can adjust the way data will display in your output by using the Transform dropdown on each selected field. Transform options will vary depending on the fields you have selected, and in some cases will default to a specific recommended transform value (e.g., fields that total payments will default to a transform of “Sum”).
Removing a Display Field
|
Removing display fields usually does not affect the result set for the report output, but it can, especially when the report output displays a count of records (whether item, patron, circulation, hold, or bibliographic). When removing fields, be mindful of whether or not it will still be clear in the report output what your results mean. |
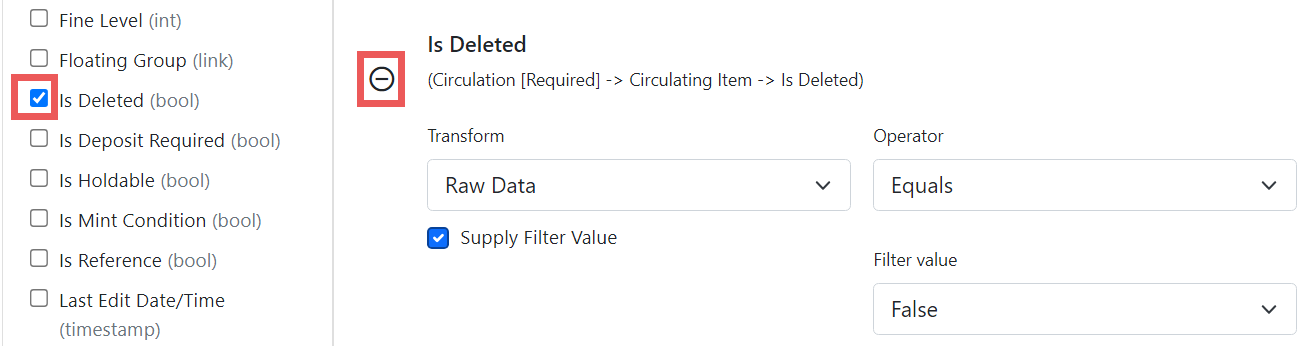
You can remove a field by clicking the minus button on the left of this area. You can also remove a field by unchecking it from the options under the All Fields header.

Filters
Adding a Filter
Filters allow you to set up the criteria so that Evergreen returns the information you are looking for. Once the criteria have been added to the template, the value for the filter can be hardcoded in at the template level or entered when the report is run.
-
Select the Filters tab as the active tab in the Display Fields, Filters, and Report Layout tabs section of the Report Template Editor.
-
As you did when selecting the display fields, select the top of the tree in the Source pane. A list of available fields will be displayed under All Fields.

-
The word in parentheses beside the field name indicates the data type. If the field you want to use is a link, you need to expand the tree in the Source pane to find it and then select it. This will open a new list of options under the All Fields heading.
-
-
Select the field in the All Fields pane you would like to add as a display field.
For filters you generally want to pick an ID, or Org unit field over a text field. For example, to add circulating library as a filter you will select Circulating Library which is labeled as an Org unit.
-
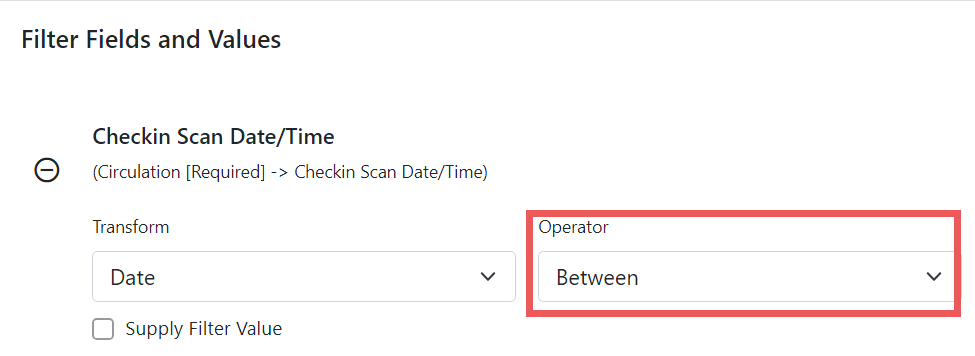
In the Filter Fields and Values area, select the transform you would like to use. The transforms available in the list will vary depending on the data type of the selected field.
-
The transform will determine how Evergreen processes the data when generating the report. Raw data is the most commonly used transform for filters except when it’s a timestamp in which case Date or Month + Year is more commonly used. More information on the available transforms can be found in Field Transforms.
-
-
Next, select the Operator. See Report Operators.

-
If desired, you can hardcode the value of the filter into the template. See Hardcoded Filters for more information.

Changing an Operator
For information on specific operators, see Report Operators.
-
On the Filter tab, locate the field on which you would like to change the operator.
-
Use the Operator drop-down on the field to select the new operator from the list.
Updating a Filter Value
Filter values can be hardcoded into a template or left blank to be filled in when the report is run. Information on commonly hardcoded filters can be found in Reporter Basics.
Hardcoding a filter is recommended when the value of the filter will not change. For example, hardcoded filters are often used when filtering out deleted items.
Filter values can also be hardcoded into templates to make it easier for staff with less reporter experience to run certain reports. For example, you can set up a report with an Item Status filter with a hardcoded value of Missing so that staff can run a report to get a list of all missing items without having to enter filter information.
It is recommended that you balance the reusability of templates that comes when staff enter filter values at the time of running a report versus the ease of use for staff with less experience with the reporter. For example, when no value is entered in the template for a filter on Item Status, staff can pick the relevant status from the list of existing statuses. When a value is hardcoded for Item Status, a new template must be created every time you wish to filter on a different item status.
-
On the Filter tab, locate the field you would like to add, update, or remove the filter value for.
-
To add a value,
-
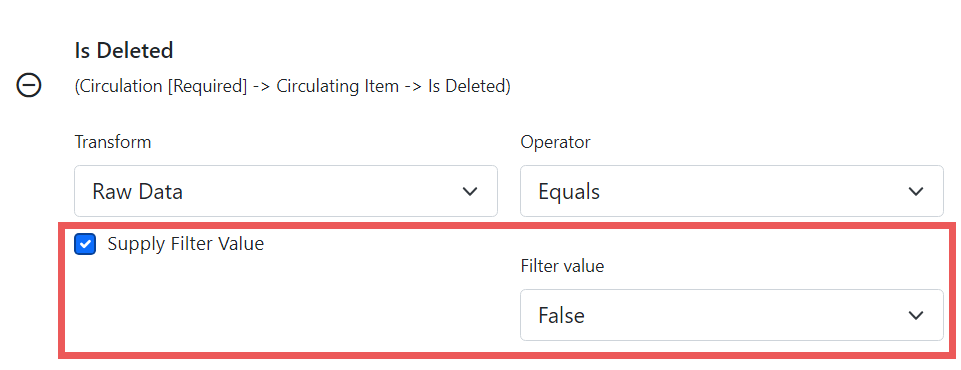
Select the Supply Filter Value checkbox beneath the field’s Transform field. A new set of options for Filter value will be displayed under the Operator field. The particular filter mechanism will vary depending on your selected Transform and Operator. See Filter Values for details on exactly how different values must be entered.
-
Select or enter your desired value.
-
-
To edit a preexisting value, overwrite the current Filter Vale with your desired value.
-
To remove an existing hardcoded value, deselect the Supply Filter Value checkbox. Filter values will instead need to be added at the report definition level.
-
Removing a Filter
|
Removing a filter WILL affect what results are included in your report output. Ensure you don’t need to filter on a particular field before removing it. It is recommended that reports have at least one filter to choose a specific library. This filter is important as it allows staff to restrict the data in the report output to only data relevant to their library. |
You can remove a field by clicking the minus button on the left of this area. You can also remove a field by unchecking it from the options under the All Fields header.
Changing the Column Documentation
When running a report, the filter can include text which gives information on how to use the particular filter and, in some cases, how to enter the filter value. In the Report Template Editor, this is referred to as column documentation or a field hint.
-
On the Filter tab, locate the field you would like to add column documentation to.
-
Select the Supply Hint box.
-
Enter the hint text in the newly displayed field.

-
When running a report, the hint will display under the filter path.

Template Report Layout
Select the Report Layout tab to adjust the organization of the data on your final output. On the left side, under Field Display Order, you can rename columns, adjust transforms, and reorder your columns in this tab in the same way you can in the Field Display tab.
On the right side, under Field Sort Order, you can independently set sort orders on each column as well as determine which column should sort first, second, third, etc. The sorting is independent of the column display order.
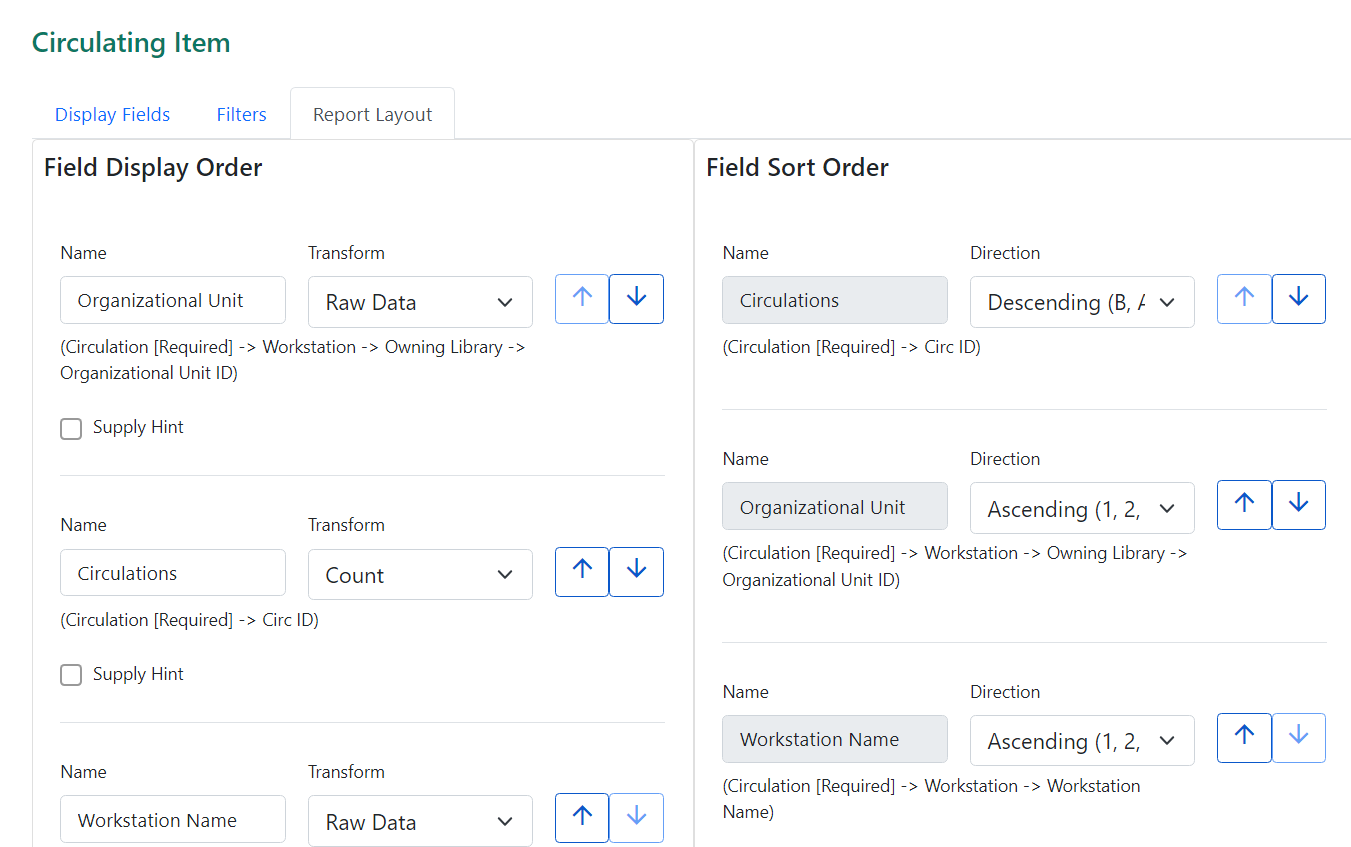
In the example above, the first three columns to display will be Organizational Unit, Circulations, and then Workstation Name, but the report will sort first by Circulations, then by Organizational Unit, and then by Workstation Name.
Troubleshooting Report Templates
If the path for one of your display fields or filters is incorrect, when you try to run a report you will get an error instead of the expected report output. Sometimes the error text will give you a clue about what isn’t working. You can modify your template and try again.
image::reporter_create_templates/output_error["Screenshot from the Outputs folder. A line is selected. In the Output column, where you would normally see HTML and CSV button links, it says Error running report. The cursor is hovering over the Error text column to show the full error text. The text begins 'DBD::Pg::st execute failed: ERROR'."]
If you continue to run into difficulties creating or modifying a template, you may need to contact your system administrator for assistance.
Before contacting your system administrator, ensure the applicable template folder is shared with your library so your system administrator is able to view the template in question.
When contacting your system administrator, include the following information:
-
Username of the staff account where the template has been created.
-
Folder where the template has been created.
-
Name of the template in question.
-
Desired end result for the template (what do you want it to report on?).
-
Specific display fields or filters you are having difficulties modifying or adding.
-
Links to your current report output from the template if relevant.