Simple Reports
Simple Reports implements a new reporting system focused on ease of use. The Simple Reports interface guides a user through a streamlined reports creation wizard and intentionally curtails the extensive options available in the main Reports interface.
The Simple Reports interface is intended to provide an alternate access point for running reports in Evergreen and is not intended to replace the main Reports interface. In particular, users in need of complex reports should still make use of the main Reports interface.
Simple Reports Interface
To access the Simple Reports interface, select Administration → Simple Reports. You will see an interface with two tabs, My Reports and My Outputs.
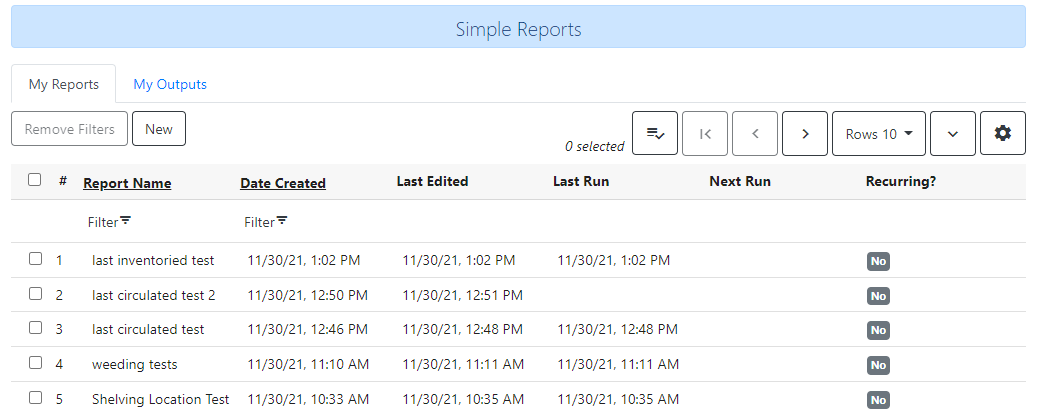
My Reports
The My Reports tab shows reports that you have created. Reports created in this interface are tied to user accounts regardless of workstation, and cannot be shared at this time. Actions available from this tab include:
-
New - creates a new Simple Report
-
Clone - clones a Simple Report. You will need to save the new report with a new name. This will clone the report format including basic scheduling and output options. When you use the Clone action, your cloned report will open in the Report editor.
-
Delete - deletes a Simple Report and all of its associated outputs. You can select and delete multiple reports.
-
Edit - edits a Simple Report. This will overwrite the original report but not change any existing outputs. Exception: if you edit the Report name, this name change will be reflected on past outputs as well.
-
If you edit the report recurrence interval, all report runs from that point forward will use the new recurrence interval.
-
The My Reports tab defaults to sorting by Date Created (descending). To sort differently, click on either the Report Name or Date Created column header. Filters are also available for the Report Name and Date Created columns. Filters are case-sensitive.
The My Reports tab includes these columns:
-
Report Name (displayed by default) - the name given to a report when it was created or edited
-
Date Created (displayed by default) - the date and time a report was created
-
Last Edited (displayed by default) - the date and time of the most recent edit to a report
-
Last Run (displayed by default) - the date and time of the most recent run of the report
-
Next Run (displayed by default) - the date and time of the next scheduled run of the report (recurring reports only)
-
Recurring? (displayed by default) - whether or not a report is recurring
-
Simple Report Template ID (not displayed by default) - the database ID associated with the Simple Report.
My Outputs
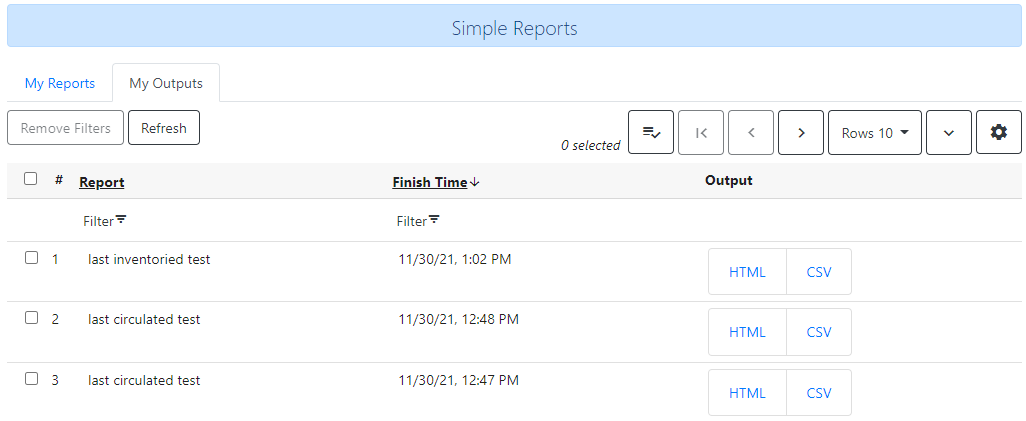
The My Outputs tab shows outputs from your reports. Outputs are tied to user accounts regardless of workstation. Actions available from this tab include:
-
Refresh - manually refreshes the tab to check for new report outputs
-
Delete Output - deletes the selected output(s)
The My Outputs tab defaults to sorting by Finish Time (descending). To sort differently, click on either the Report or Finish Time column header. Filters are also available for the Report Name and Finish Time columns. Filters are case-sensitive.
The My Outputs tab includes these columns:
-
Report (displayed by default) - the name given to a report when it was created or edited
-
Finish Time (displayed by default) - the date and time a report output was completed
-
Output (displayed by default) - shows hyperlinked button(s) which will fetch the report output. Output options are chosen during report creation.
-
Output types CSV and Excel will download a file containing the output.
-
Output types HTML, Line Chart, and Bar Chart will open a new browser tab displaying the report output.
-
HTML output will generate a table. Column headers can be clicked to change sorting of the table. The table can be printed via your browser’s printing options.
-
Line Chart and Bar Chart outputs will generate an image that can be downloaded by right-clicking and saving the image.
-
-
-
Error Text (not displayed by default) - the full text of a report error. This information can help an administrator track down the source of a report error. Hover over the error text to see the full error. Sorting and filtering are available on this column.
-
Run ID (not displayed by default) - the database ID associated with the Simple Report’s output.
Types of Simple Reports
The Simple Reports interface intentionally only has a shortened list of report types. It is possible to add report types in future development, but the initial set was selected as representative of what most frontline staff would need.
Simple Report types are as follows:
-
Circulation - reports focusing on library circulation
-
Collections - reports focusing on library collections (both bibs & items)
-
Weeding - reports for weeding and collection maintenance which include fields related to circulation, collection, and inventory
-
Patrons - reports focusing on library patrons. Note that patron type reports will only display results for locations at which the staff user has VIEW_USER permission.
-
Billings and Payments Transaction Summary - reports focusing on monetary transactions
Creating a Simple Report
To create a new Simple Report, click the New button from the My Reports tab.

You will be prompted to select a report type (report types are described above):
-
Circulation
-
Patrons
-
Collections
-
Weeding
-
Billings and Payments Transaction Summary
The Simple Reports interface will walk you through the process of creating a report. You can save an in progress report at any time by clicking Save and Close, and then go back to finish it later. You must give your report a unique name in order to save it. Reports will not run until output options are set and Save and Schedule Report is selected.
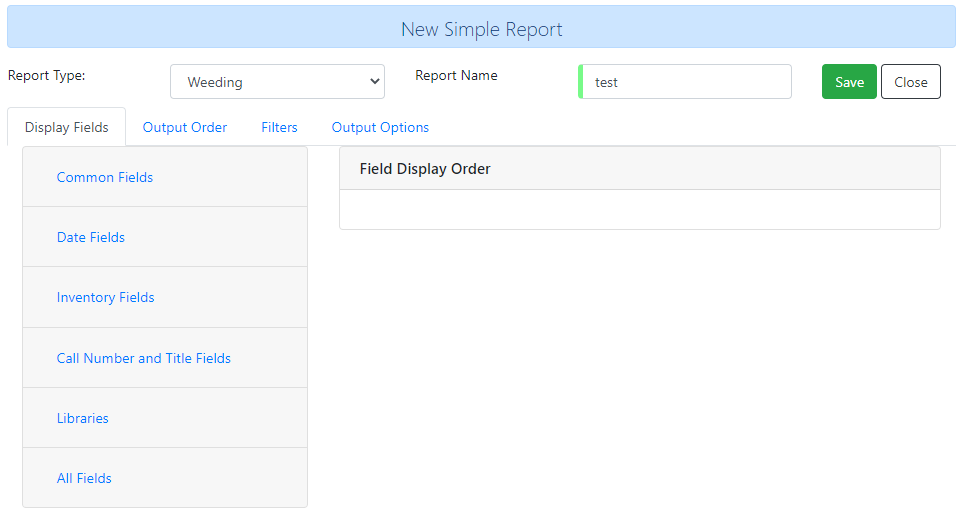
The Display Fields tab lets you select the fields and their display order (i.e., column order) for your report. Depending on which report type you select, a specified set of fields will be available to add to the report.
|
If you are familiar with the way the regular Reporter works in Evergreen, you will notice that there are several fields that are new in the Simple Reports interface. Some of these include:
|
On the left is an accordion menu which groups types of fields. All report types have menu options for Common Fields and All Fields, as well as groups of fields relevant to each report type. Select an option from the left-hand menu to expand its list of fields, and select the checkbox next to each field that you want to display as a column in your report.
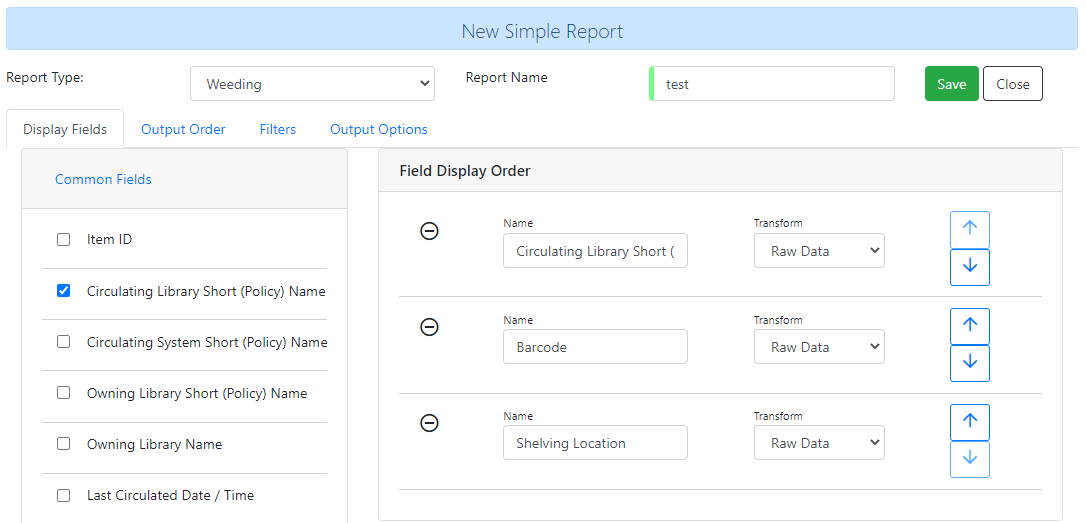
As you select fields from the left, they will appear on the right under Field Display Order.
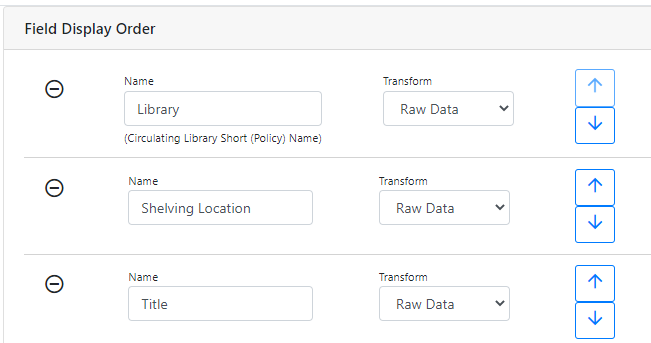
-
You can remove a field by clicking the minus button on the left of this area. You can also remove a field by unchecking it from the accordion menu on the far left.
-
You can adjust the display name of a field by clicking in the Name box and typing in a new name. The original field name will show below the Name box.
-
You can adjust the way certain data will display by using the Transform dropdown. Transform options will vary depending on the fields you have selected, and in some cases will default to a specific recommended transform value (e.g., fields that total payments will default to a transform of “Sum”). Many fields are constructed to avoid needing to use a transform, in particular date-related fields.
-
You can use the arrows on the right to move fields up and down the list. In tabular outputs, the list order top to bottom will determine the order of column display from left to right. Sorting is controlled separately, in the Output Order tab.
Once you have selected your display fields, click on the Output Order tab. This tab allows you to assign individual column sort orders.
On the left side of the screen you can rename columns, adjust transforms, and reorder your columns in this tab in the same way you can in the Field Display Order tab.
On the right side of the screen you can independently set sort orders on each column as well as determine which column should sort first, second, third, etc. The sorting is independent of the column display order, which is an important difference from the standard Evergreen Reports interface.
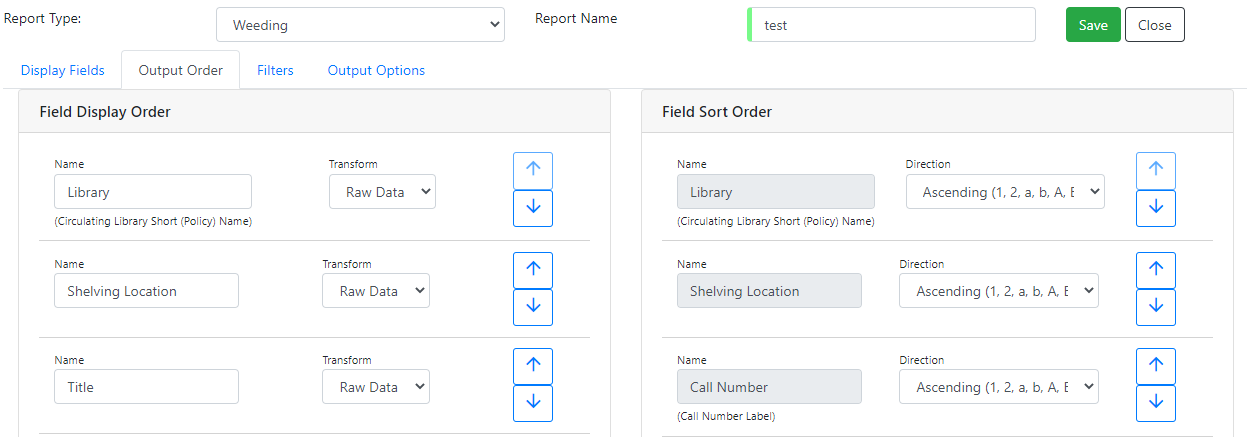
In the example above, the first three columns to display will be Library, Shelving Location, and then Title, but the report will sort first by Library, then by Shelving Location, and then by Call Number.
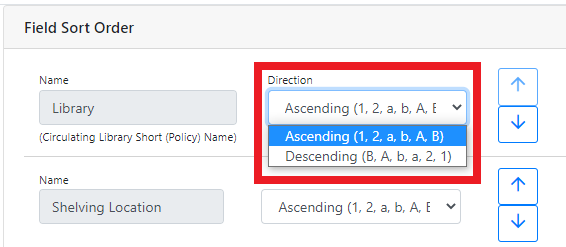
To set sort order on a column, select the Direction dropdown. Choose Ascending or Descending for each column. Sort order will typically default to Ascending.
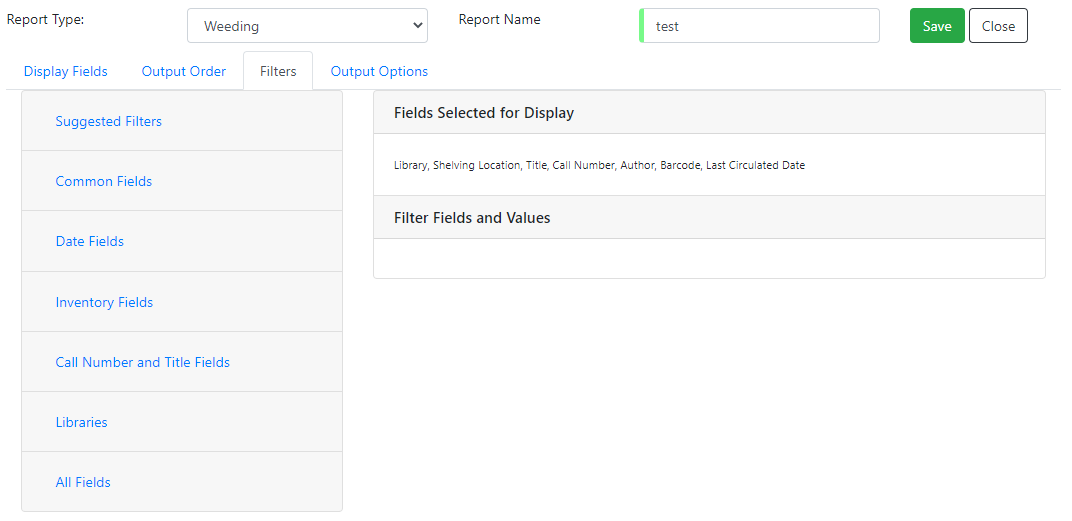
Once you have established your sort orders, select the Filters tab. This tab allows you to apply filters to your report. Note that some fields are hidden from display but available for filtering, and vice-versa; and there may be multiple display fields for the same data (i.e. various names, shortnames, etc.) but only one field for filtering.
As in the Display Fields tab, the Filters tab has an accordion menu on the left which groups types of fields. Note that Suggested Filters are those suggested for the report type generally, not the specific columns you selected. Select an option from the left-hand menu to expand its list of fields, and select the checkbox next to each field that you want to use as a filter.
On the right, the columns you have selected for display in your report will show under Fields Selected for Display, and your filter choices will show under Filter Fields and Values.
-
You can remove a filter field by clicking the minus button on the left of this area. You can also remove a field by unchecking it from the accordion menu on the far left.
-
You can adjust the way certain data will filter by using the Transform dropdown.
-
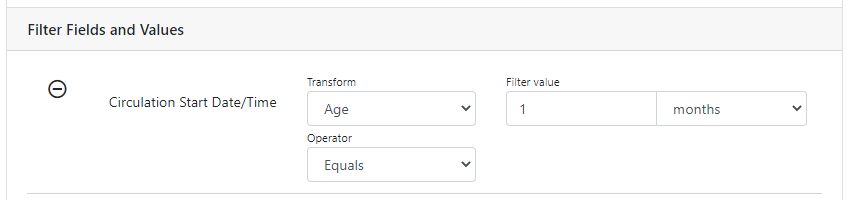
An example of using a filter transform is using the “Age” transform on a Date field. Using this filter transform will give you a widget to enter a number and select a time interval
-
-
You can choose a filter operator using the Operator dropdown. Operator values can vary for different filter fields, but common operators include:
-
Equals - the report output will include rows exactly matching the filter value
-
Does Not Equal - the report output will exclude rows exactly matching the filter value
-
Is Null - the report output will include rows for which the filter value is null (empty)
-
In List - the report output will include rows which are selected and added to a list
-
Certain In List filter options, such as Library Short Names, will populate a dropdown for selection
-
-
Contains Matching Substring - the report output will include rows matching the substring listed in the filter value.
-
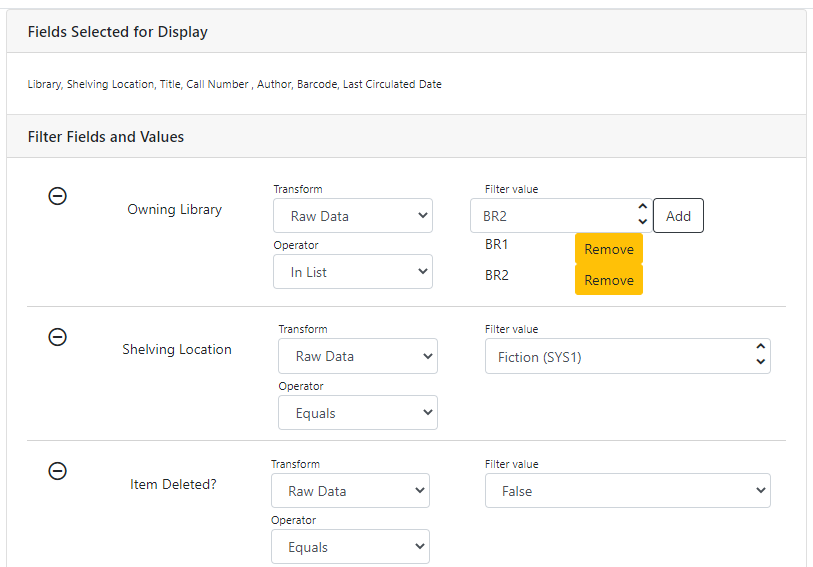
In the example above, there are three filters on the report:
-
Owning Library | In List | BR1, BR2 - the report will only show items owned at BR1 and BR2
-
Shelving Location | Equals | Fiction (SYS1) - the report will only show items with the Fiction (SYS1) Shelving Location
-
Item Deleted? | Equals | False - the report will exclude all deleted items
Some other notes on filters in Simple Reports:
-
Where possible, filters and filter values will show user-friendly names rather than database IDs.
-
If you are filtering on an Organizational Unit-related field like Shelving Location, you will only see options which are visible to your workstation location and its ancestors and descendants.
-
Some Boolean filters (TRUE / FALSE) include a “Both” option which will return results containing either value.
-
To use a relative date filter (“X days ago”), select a date field with Date/Time in its name, use the Age transform, and then choose you interval (hours, days, weeks, months, years):
Once you have chosen your filters, select the Output Options tab.
The Output Options tab contains the familiar Evergreen options for report output, including recurrence and scheduling options, as well as an option to email report output. Schedule times default to 15-minute intervals but can be typed over if a different time is desired.
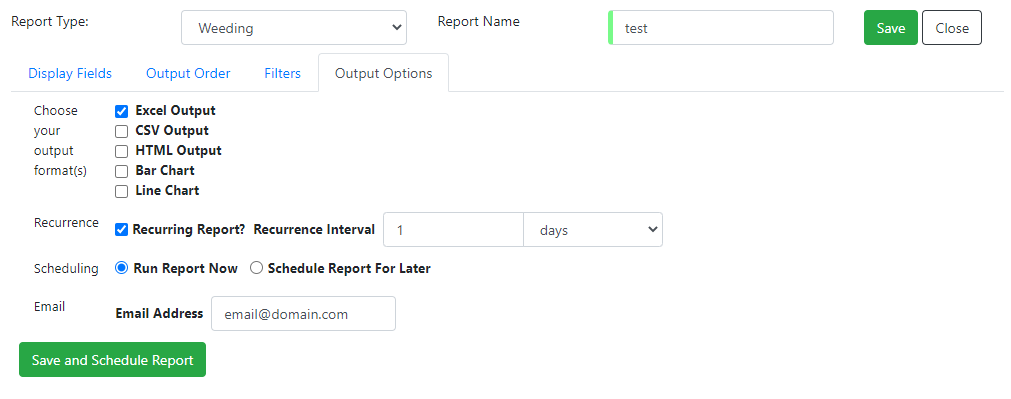
Once you click Save and Schedule Report, your report will be saved and either run immediately or scheduled to be run, and you will be taken back to the main Simple Reports interface.
If you choose Run Report Now, your report output will be available in the My Outputs tab once the report is completed. Scheduled report output will be available in the My Outputs tab
Editing a Simple Report
To edit a report, select a report from My Reports and choose Edit from the Actions Menu, or double-click on the report you want to edit. Make changes as needed and select Save and Schedule Report once you’ve made all of your changes.
|
The edited report will not run (or be scheduled to run) if you just select Save. You must select Save and Schedule Report in order to execute the report. |
Editing a report will overwrite the old report and generate new report output, but you will still be able to see your old pre-edit report output in the My Outputs tab.
-
If you edit the Report name, this name change will be reflected on past outputs as well - however, the name change may not be reflected on any HTML outputs.
-
Due to extant Reports architecture, it’s possible for the report name and output names to drift if you re-run reports or change their names after the fact.
-
If you edit the report recurrence interval, all report runs from that point forward will use the new recurrence interval.
Administration
Permissions
New permission: RUN_SIMPLE_REPORTS
Access to Simple Reports is granted through a new RUN_SIMPLE_REPORTS permission. This is a separate permission than the main RUN_REPORTS permission and one is not required for the other.
Note that Patron type reports will only display results for locations at which the staff user has the VIEW_USER permission.
Data Sources
Simple Reports defines Simple Reporter-specific data sources for its reports that are defined as Evergreen IDL views. Here is some additional information about these sources:
-
Circulation (IDL class="srcirc"): Based on the
action.all_circulation(Combined Aged and Active Circulations) view-
There is no link from this view to user details, so there is no concern that different staff could build the same report and get differing results because of VIEW_USER permissions. However, it does include user post code, profile, birth year, and home library so that certain demographic information can be included.
-
-
Patrons (IDL class="srusr"): Based on the core patron record and includes card, address, statistical category, select notification settings, and summary circulation counts.
-
Collections (IDL class="srcp": Based on the item record and includes call number and title information. It joins in the
action.all_circulation(Combined Aged and Active Circulations) view for the purpose of counting circulation activity andaction.all_inventoryto include inventory status information. -
Weeding (IDL class name = "srwd"): Based on the item record and includes call number and title information. It joins in the
action.all_circulation(Combined Aged and Active Circulations) view for the purpose of counting circulation activity. -
Billings and Payments Transaction Summary (IDL class name = "srbps"): based on the
money.billable_xact(billable transactions) view and joins inmoney.all_billing`s and `money.all_paymentsto aggregate billings and payments.
New IDL Attributes
Several new IDL attributes are part of the Simple Reports backend. These allow an administrator many customization options for the Simple Reports interface and its generated reports.
-
Field groups are assigned with the
field_group="comma,separated,list"attribute on the<field>element, defined in<group>elements inside the<field_groups>element. -
Fields are listed under the Suggested Filters group by adding the
sr:suggest_filter="true"attribute to a field. -
Suggested transforms are applied with an
sr:suggest_transform="transform_name"on individual field elements.-
Transforms can be forced by applying the
sr:force_transformattribute instead
-
-
The
force_filterattribute is how permissions verification works, combined with a Simple Reporter-aware database function and the attributes below -
The
sr:hide_from="comma,separated,list"attribute accepts the values:-
filter - hides a field from the Filters tab; used for textual names when an id is better for filtering
-
display - hides a field from the Display Fields tab; normally used for ids when a name is available for display
-
Both together - completely hides the field from the user; usually when using
force_filter
-
-
When forcing a filter, the
sr:force_filtervalues="freetext"attribute allows you to specify the value to be filtered on.
The goal with these attributes is that Evergreen administrators can heavily customize the interface of Simple Reports without affecting its backend functionality, i.e., the extremely large SELECT statements that make up the source definitions.
Administrators are encouraged to make these kinds of changes for their end users, up to and including removing fields entirely. So long as the SELECT statements are not altered the inner workings of the Simple Reports installation are not changed and only the interface would be different.