Reports Folders
The folders pane in the reporter is divided into two sections:
-
My Folders which contains the folders created with your Evergreen account.
-
Shared Folders which contains folders shared with you by other users.
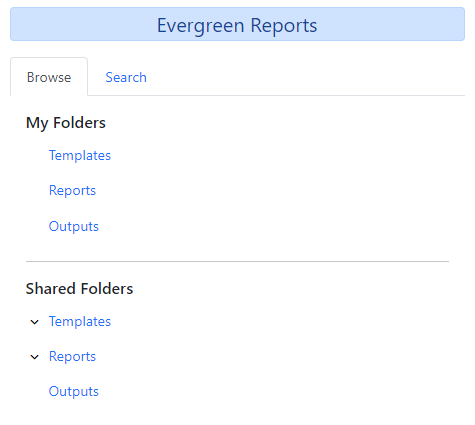
There are three main components used by the reporter which each must be stored in a separate folder:
-
Templates which tell Evergreen what fields to offer as filters and what columns to display in the results file.
-
Reports which tell Evergreen what values to filter on, how often to run the report, and what file formats to output the results in.
-
Outputs which is the final results file from Evergreen with the information from the database.
To work with templates, reports, and outputs in the reporter you must have at least one folder created under each component.
Creating Folders
|
It is recommended to use a parallel naming scheme for folders in Templates, Reports, and Outputs to help keep your reports organized and easier to find, i.e., you might create a folder named 'Monthly Statistics' under Templates and then make matching 'Monthly Statistics' folders under Reports and Outputs. |
To create a folder within Templates, Reports, or Outputs:
-
Navigate to Administration → Reports.
-
In the My Folders section click on the folder you would like to create a subfolder in. You may need to click on the caret(s) to expand the relevant folder tree.

-
Select the button Add Subfolder.

-
Enter a name for the folder.
-
Select the Confirm button.
-
The folder can now be seen in the appropriate folder tree.

|
When creating folders at the top level (directly under Templates, Reports, or Outputs) Evergreen will only display a button to add a top-level folder. 
|
Managing Folders
|
Clicking the blue text of a folder name displays the contents of the folder in the righthand pane. Clicking the caret in front of a folder name displays its subfolders. |
Once a folder has been created, you can change the name, delete the folder, create a new subfolder, or change the sharing settings.
-
Navigate to Administration → Reports.
-
In the My Folders section select the name of the folder that you wish to manage.
-
Use the buttons at the top of the righthand pane to perform actions.

-
You can:
-
Remove filters
-
Create a new template
-
Rename the folder
-
Create a new subfolder (see above)
-
Share or hide the folder (see below)
-
Sharing Folders
Templates, Reports, and Outputs folders can be private (accessible only to the user who created the folder) or shared with other staff at the library or other libraries within your system or consortium who have reporter permissions. Templates in a shared folder are searchable using the Search Templates feature by anyone with permissions to see that folder.
Sharing Your Folders
Folders can be shared at any time after they are created.
-
Navigate to Administration → Reports.
-
In the My Folders section select the name of the folder that you wish to share.
-
Select the Share Folder button.
-
Select the Org Unit for the level at which you would like to share your folder, e.g., other staff at your branch, your whole system, anyone in your consortium. All users with reports permissions at the selected level will be able to access and search for templates in your shared folder.
-
Select Save.
-
The folder will now show under My Folders with the library code of the organizational unit it is shared within parentheses.

-
If you wish to change the sharing scope for the folder, you must first unshare the folder and then re-share it with the new share scope. See below for information on unsharing folders.
|
A subfolder may be shared even if the parent folder is not shared. The shared subfolder will act as a floating folder for other users and will attach itself under the parent group, e.g., Templates. |
Hiding Your Folders
Folders are hidden (unshared) by default. Folders that have been shared can be unshared later.
-
Navigate to Administration → Reports.
-
In the My Folders pane select the name of the folder that you wish to hide.
-
Select the Unshare Folder button.
-
The folder will now show under My Folders without a library code in parentheses.
Viewing Shared Folders
Folders that are shared with your org unit display in the Shared Folders section.
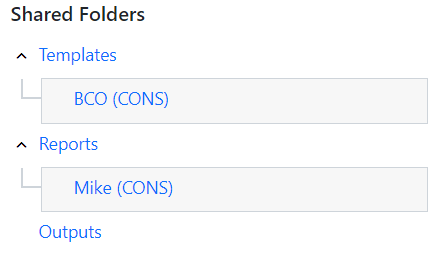
The top level of shared folders displays the username of the account that has shared the folder.
While it is most common for users to share template folders, reports and outputs folders can be shared as well.
You can only view the contents of the shared folders. To make edits, you must clone the templates into your own folders.