Record Buckets
Introduction
Record buckets are containers for bibliographic records. Once records are in a bucket, you can take various types of actions on the records, including:
-
Deleting all (or selected) records in the bucket.
-
Merging all (or selected) records in the bucket.
-
Transferring title holds among records in the bucket.
-
Creating an OPAC Carousel from bucket members.
-
Exporting the files for all (or selected) records in the bucket, so you can edit the records in another program like MARCEdit.
-
Moving or adding all (or selected) records from the current bucket to another bucket.
Record Buckets Interface

The Angular version of the record buckets interface features a header with a New Buckets button beside it.
Beneath the header are shortcuts to display different sets of buckets:
-
My buckets shows all buckets that you created or that you own directly
-
Favorites shows the buckets that you have marked as a favorite
-
Recent shows buckets that you have recently viewed
-
Shared with others shows buckets that you have shared with other staff users or organizational units
-
Shared with me shows buckets that have either been directly shared with you, or shared with you via organizational unit membership, for which you have editing permissions
You can have permissions to edit record buckets via your working location (organizational unit), and/or have directly assigned edit permissions for specific bucket(s). -
Visible to me shows buckets that have either been directly shared with you, or shared with you via organizational unit membership, for which you have view-only permissions.
Beneath these shortcuts is a grid to display individual buckets. You can search this grid by bucket ID, as well as use column filters and sorting to change which buckets are displaying.
Grid columns for this interface are:
-
Favorite - select or deselect the star icon to add a bucket to your Favorites list. Favorited buckets will populate your Favorites view in the buckets interface, as well as in the staff catalog buckets tab.
-
Bucket ID - this is the internal database ID for the record bucket.
-
Name - this is the name for the record bucket. This is a hyperlink, and clicking on this will open the individual bucket.
-
Description - this is the (optional) description for the record bucket.
-
# of entries - this tells you the number of entries in the record bucket, which can include duplicates of individual bibs if you’ve added duplicates to your bucket.
-
Bucket Type - this tells you what type of bucket this is. Typically this will be staff_client, meaning it is only available to staff members (as distinct from patron-created buckets in the OPAC).
-
Public - indicates if the bucket is publicly visible. Use this to create buckets that you would like to be publicly viewable in the OPAC.
-
Created On - the date the bucket was created.
-
Owner - the staff user that owns the bucket.
-
Owning Lib - the owning library of the bucket. This field is read-only and will only have a value if the bucket is used for a Carousel.
-
Actions - this column has 4 buttons that are shortcuts to bucket actions:
-
Edit bucket - represented by a pencil icon, this will allow you to edit bucket details like name, description, and whether or not the bucket is public.
-
Create Carousel - represented by a picture icon, this will prompt you to create an OPAC Carousel from your bucket. For more information, see the Carousels documentation.
-
Share bucket - represented by a person icon, this will open a modal allowing you to share a bucket with specific users and/or organizational units.
-
Delete bucket - represented by an X icon, this will delete the bucket. You will be asked to confirm the delete.
-
-
# of org shares - this shows a count of the number of organizational units with whom the bucket is shared.
-
# of user edit shares - this shows a count of the number of users with edit permissions, with whom the bucket is shared directly (i.e. not via an organizational unit share).
-
# of user view shares - this shows a count of the number of users with view-only permissions, with whom the bucket is shared directly (i.e. not via an organizational unit share).
Actions in this interface include:
-
Add to Favorites - adds the selected bucket to your Favorites list. Favorited buckets will populate your Favorites view in the buckets interface, as well as in the staff catalog buckets tab.
-
Create Carousel From Bucket - prompts you to create an OPAC Carousel from the selected bucket. For more information, see the Carousels documentation.
-
Delete Bucket(s) - prompts you to confirm deletion of one or several buckets. You can only delete buckets that you own, or for which you have editing permissions.
-
Edit Bucket - allows you to edit bucket details like name, description, and whether or not the bucket is public.
-
Export Records - exports all records in the selected bucket as a csv file.
-
MARC Batch Edit - opens the bucket in the MARC Batch Edit interface.
-
Remove from Favorites - removes the selected bucket from your Favorites list.
-
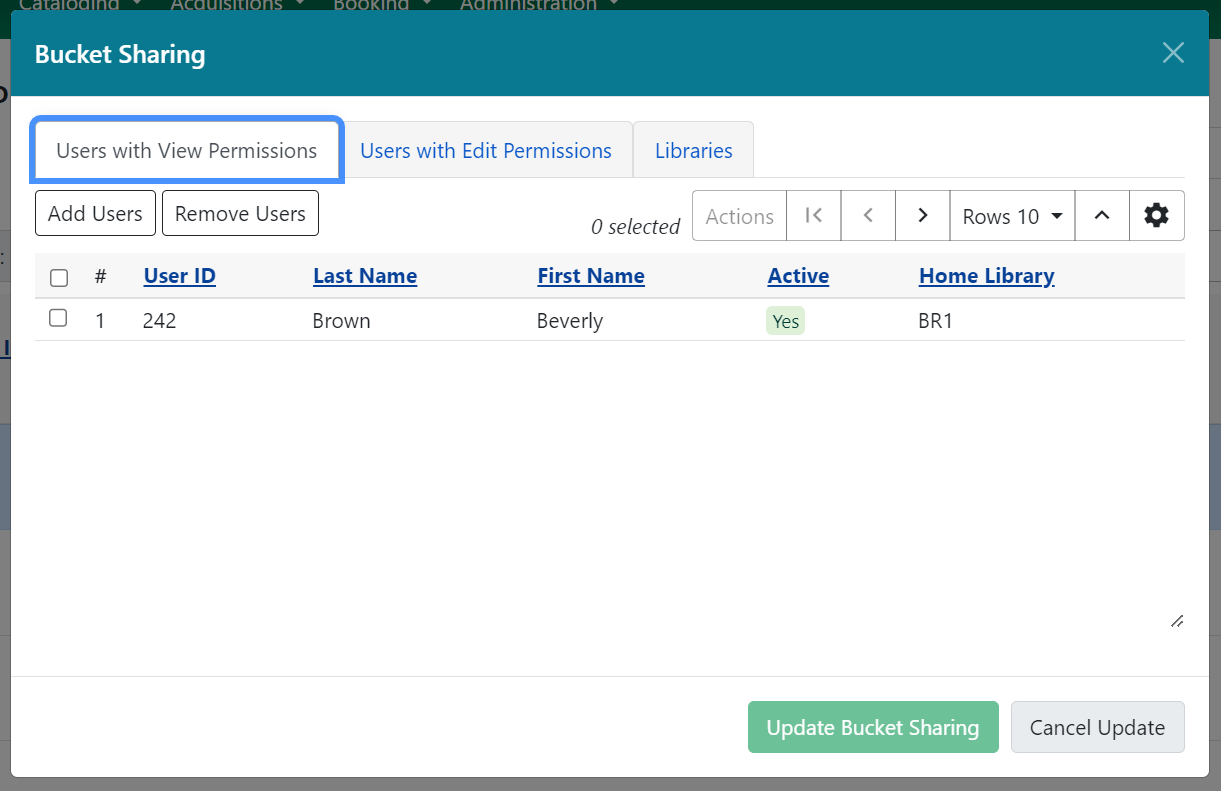
Share Bucket - this opens a modal which will allow you to share the bucket with specific users and/or organizational units. You can separately add users with view-only permissions and users with view and edit permissions. All buckets shared with an organizational unit will be editable by those with bucket editing privileges at that location
-
To add a user, navigate to either the Users with View Permissions or Users with Edit Permission tab. You will see a list of the current users with whom the bucket is shared.
-
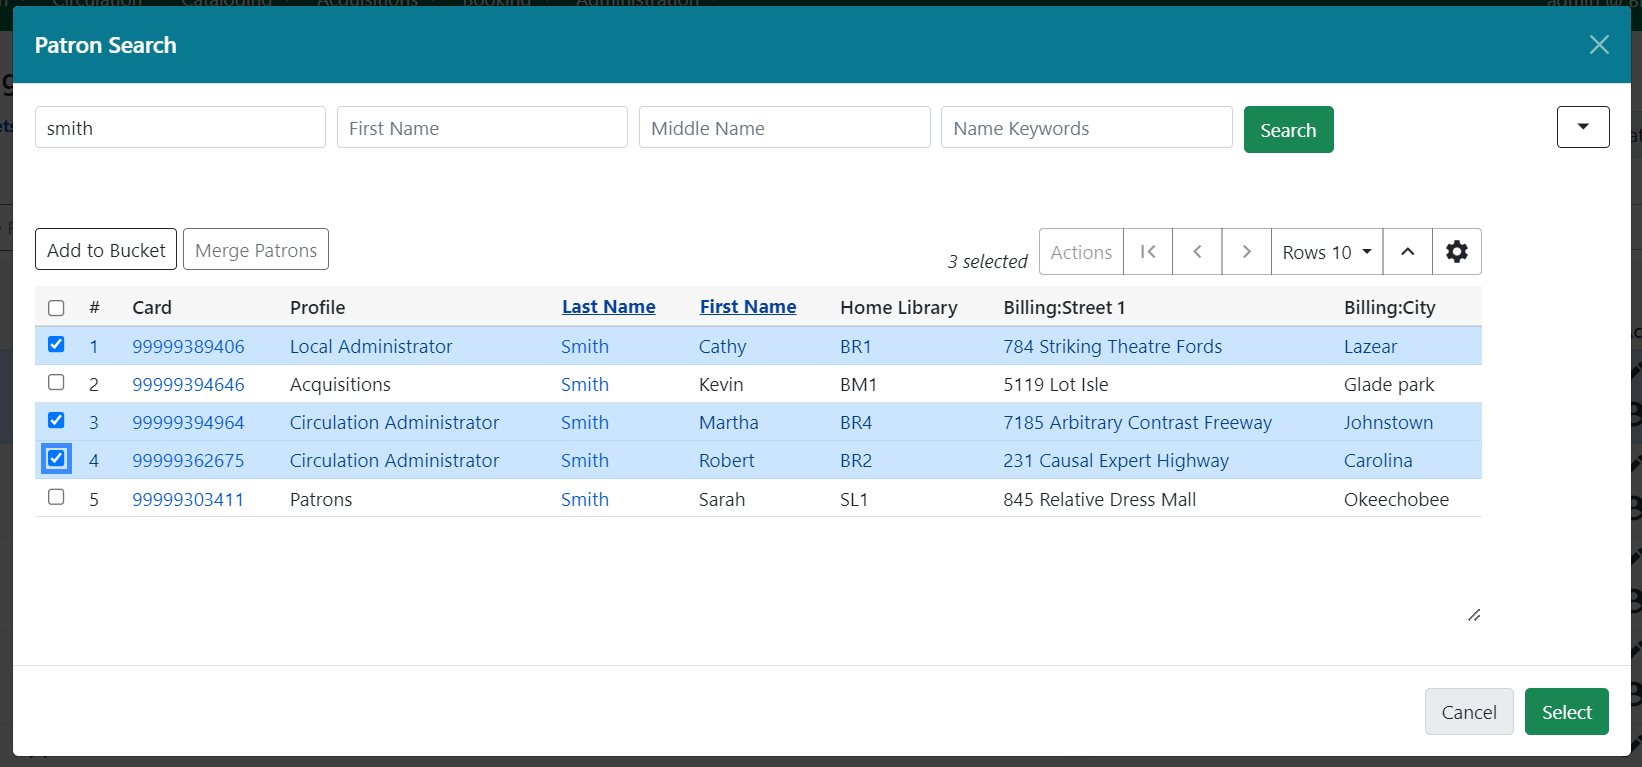
Select Add Users which will open a user search modal. Search for users and select one or several users with the checkbox. Use the Select button to add these users to your share list. You may only share buckets with staff users.
-
Do not use the Add to Bucket action, as in this context that is to add users to User Buckets.
-
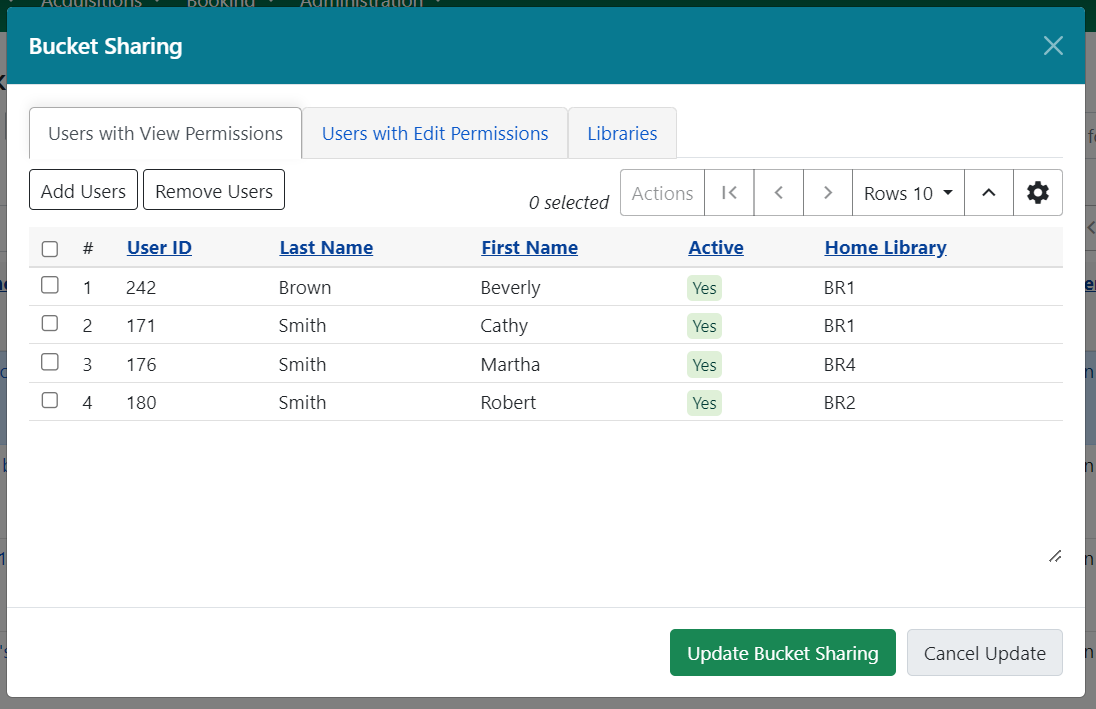
You will see your share list updated with the new share users. To complete your updates, select Update Bucket Sharing.
-
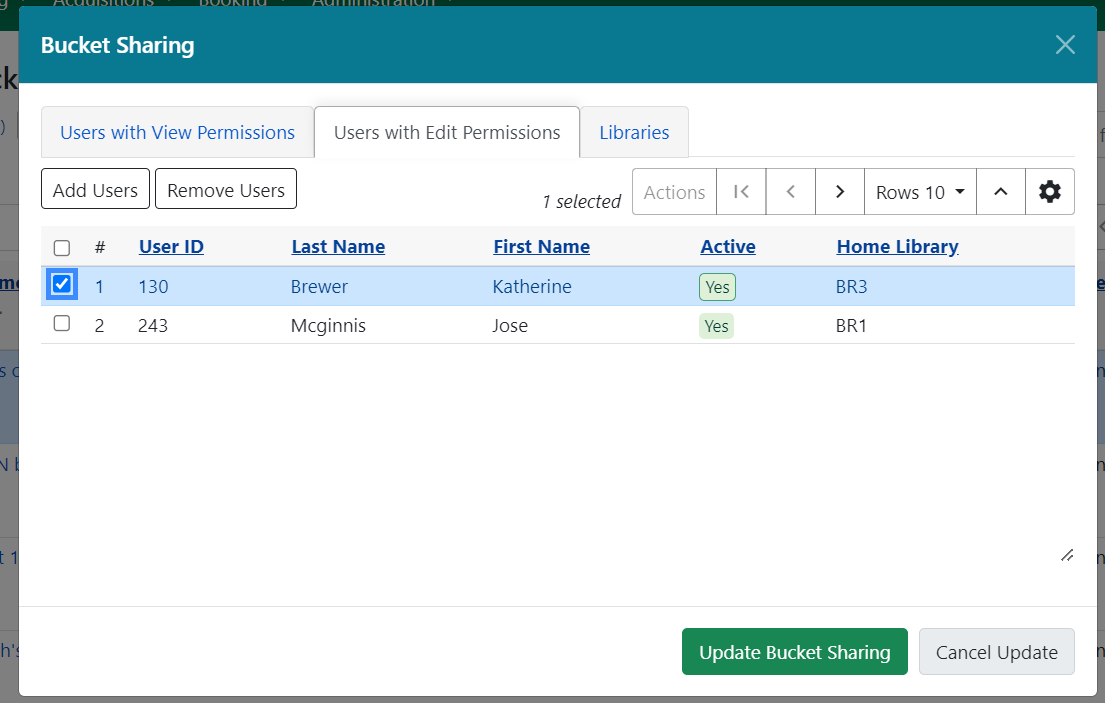
To remove a user, navigate to either the Users with View Permissions or Users with Edit Permission tab. You will see a list of the current users with whom the bucket is shared. Select one or several users from the list.
-
Select Remove Users and the user will be removed from the share list.
-
To complete your updates, select Update Bucket Sharing.
-
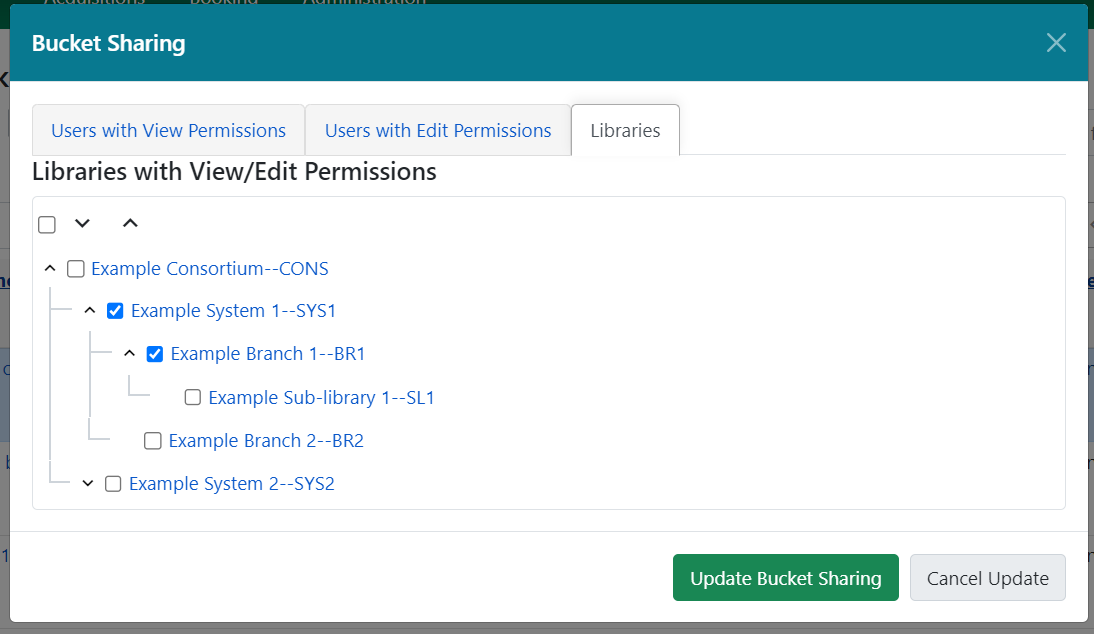
To share a bucket with all staff members of an organizational unit, select the Libraries tab in the sharing modal. Select one or several organizational units from the tree. You will need to select or remove organizational units individually - shares do not inherit.
-
To complete your updates, select Update Bucket Sharing.
-
-
Transfer Bucket Ownership - this opens a modal which will prompt you to enter a barcode, or search for a user, to transfer bucket ownership. Depending on your permissions, once you transfer a bucket you may lose editing or viewing privileges for that bucket. Administrators can transfer buckets for other users, even if the administrator doesn’t directly own the bucket.
-
Upload Records - this opens a modal which will allow you to either upload or copy/paste bibliographic IDs or TCNs to the selected bucket. This is described in detail below in
Creating Record Buckets
-
Navigate to Cataloging → Record Buckets.
-
Next to the Bibliographic Record Buckets heading, select New Bucket.
-
Give the bucket a name and (optionally) a description.
-
Select Create New Bucket to close the modal and create your bucket.
Adding Records to a Bucket
Bibliographic records can be added to a new or existing bucket via several means, including:
-
Directly in the record bucket interface
-
From the staff catalog search results page
-
From a staff catalog basket
-
From the Item Status interface
-
From within the bibliographic record details interface
-
Directly via one-time or recurring reports output(s).
From the Record Bucket Interface
Navigate to Cataloging → Record Buckets. The view will default to show your buckets. You can also select other sets of buckets to view, described above.
There are two ways to add records via the record bucket interface:
-
Via the Search Catalog box on the upper right. This can take either simple keyword input or more advanced searching, described in the section below. Results will open in a new tab.
-
Via the Upload Records action
The Upload Records action is available in the Actions menu. Choose a bucket by selecting its checkbox, and then navigate to the actions menu and select Upload Records. When selected, this will open a modal:
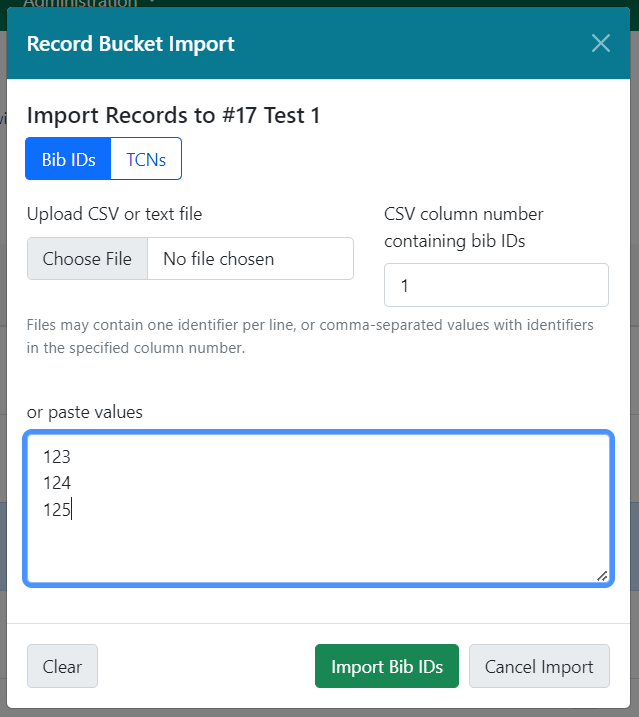
From here, you can select whether you want to upload Bib IDs or TCNs. You can select a file from your computer using the Choose file button. You can also, as shown in the screenshot above, paste values into the text box in this modal. You should have 1 value per line.
When ready, select Import Bib IDs (or Import TCNs) to complete the upload.
| Precat (Bib ID = -1) or invalid values will be rejected, and the error message will note which values were not imported. Blank lines either in the paste or in the text file will be ignored. |
Advanced record queries
The Search Catalog input allows some advanced search functionality through the use of search keys, which can be combined with one another.
| Search key | Abbreviated version | Usage example | Description |
|---|---|---|---|
author: |
au: |
au:Bartok |
An author, creator, or contributor |
keyword: |
kw: |
kw:Cello |
A keyword |
lang: |
lang:Spanish |
A language |
|
series: |
se: |
se:columbia masterworks |
A series title |
subject: |
su: |
su:concertos |
A subject |
subject|geographic: |
subject|geographic:Italy |
A geographic subject |
|
title: |
ti: |
ti:arias for bass |
Title proper or alternate title |
title|proper: |
title|proper:arias for bass |
Title proper taken from 245 |
You can combine these in the same query, e.g. ti:cello au:bartok However, with the exception of the lang search key, you should not repeat the same search key twice.
Search terms are automatically combined with a Boolean AND operator, but you can also specify other operators similar to what can be used in the OPAC:
-
&& (double ampersand) for Boolean AND
-
|| (double pipe) for Boolean OR
-
- (minus sign) for Boolean NOT
Limiting Results by Item Type or Search Format
You can narrow results using search_format or item_type functionalities by entering search_format(formattype) or item_type(type) to the end of your search query.
Search Formats Examples:
-
electronic - Electronic Resources
-
playaway - Playaways
-
blu-ray - Blu-ray
-
dvd - DVD
-
cdaudiobook - CD audiobooks
-
casaudiobook - Cassette audiobooks
The item_type filter will allow you to filter directly from the MARC Leader/06 value.
For example, if you search for: ti:Outlander au:Gabaldon item_type(i) your results will be limited to nonmusical sound recordings.
| MARC Item Type | Description |
|---|---|
a |
Language material |
c |
Notated music |
d |
Manuscript notated music |
e |
Cartographic material |
f |
Manuscript cartographic material |
g |
Projected medium |
i |
Nonmusical sound recording |
j |
Musical sound recording |
k |
Two-dimensional nonprojectable graphic |
m |
Computer file |
o |
Kit |
p |
Mixed materials |
r |
Three-dimensional artifact or naturally occurring object |
t |
Manuscript language material |
From Reports Output
Buckets can also be populated directly from reports output.
| The report template will need to have a column containing numeric Bib ID data in order to populate a bucket. |
When creating a report, there are two new options on the output tab under the label Bibliographic Record Bucket Options. You are also directed to select the column containing the Bib ID data in your report.
-
New Record Bucket - select this checkbox if you wish to create a new record bucket with your report output. The new bucket will be given the same name as your report title, and its description will read "Generated by report #<report ID>." You can change either of these after the bucket is created using the Edit Bucket action.
-
Existing Record Bucket - select this checkbox if you wish to add your report output to an existing record bucket. Enter the bucket’s ID in the Destination Record Bucket ID field. You will need to have edit permissions for the selected bucket.
Note that you can select both options on a single report.
| If you are running a recurring report and wish to have a single bucket that collects the report’s output each time the recurring report is run, you will need to have an existing bucket to point the output to. Each run of the report will append new output to the bucket. |

From Catalog Search
You can add records to buckets directly from the staff catalog search results, or from a basket. In either case, you perform a catalog search and then select one or several records from the results list using the checkbox on each result.
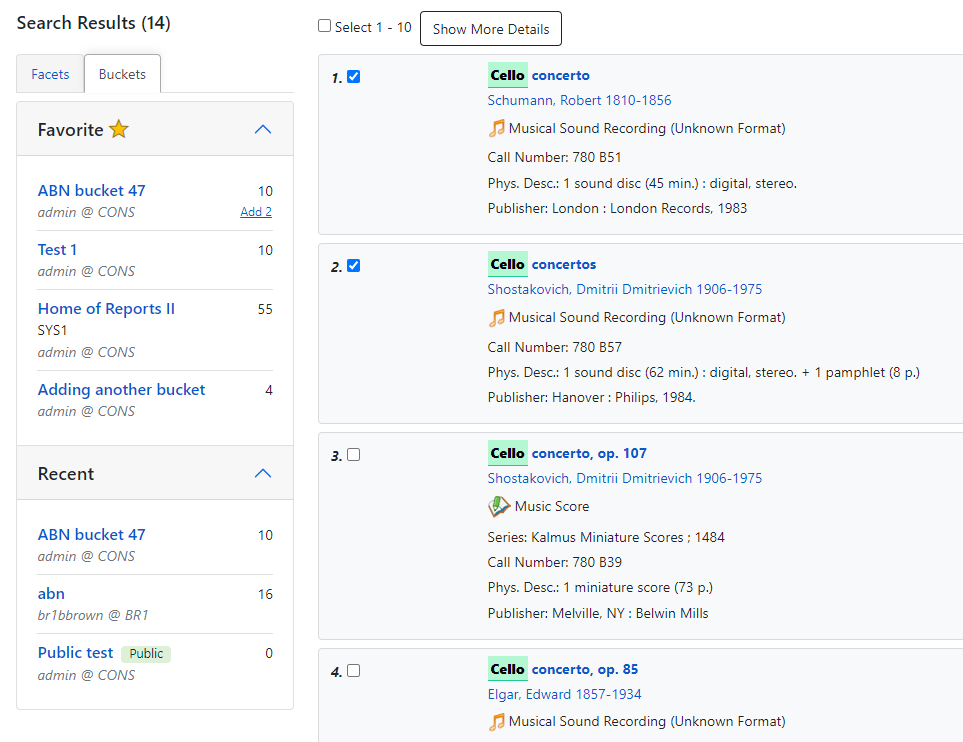
There is a buckets subtab to the left of the catalog search results, which will show your favorites as well as your recently-viewed buckets in two collapsable accordions. Each set displays the bucket name, any organizational unit sharing in place, the bucket owner and organizational unit, and the count of records in the bucket. If you hover over the record count, and have selected records in the results list, you will see an option to add those records to a bucket.
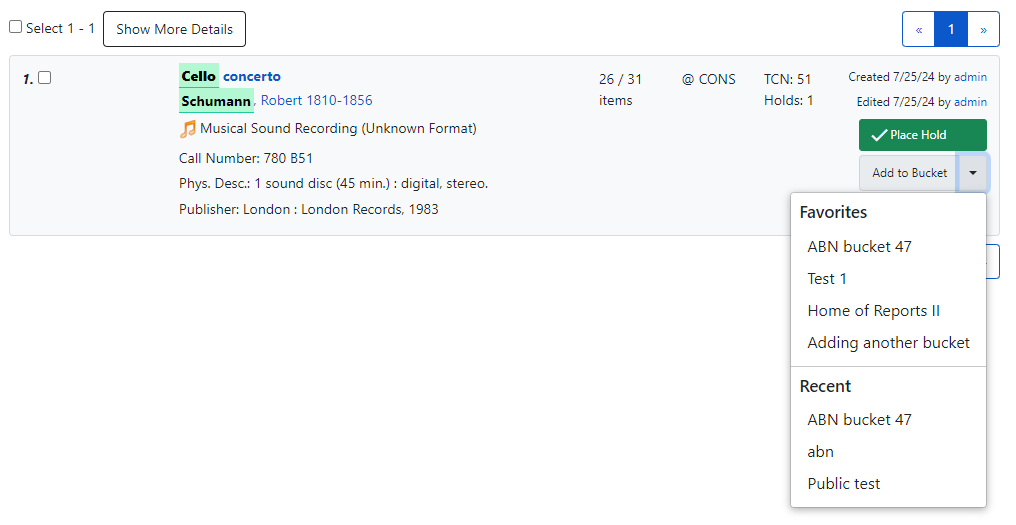
Additionally, you can add a record directly to a bucket from its place in the search results lists. There is a button on the lower right of each result that says Add to Bucket. Select this button to see a list of your favorite buckets and recently viewed buckets. Select a bucket from this list to add a record to your bucket.
| once you navigate into a bucket from the staff catalog, there is no shortcut back to your search results and you will need to use the back button to return to search results. |
Individual Record Bucket Actions
To access an individual bucket, click on its title in the main buckets interface. This will take you to the Bibs in a Bucket view, where you can see all members of the record bucket and perform actions on them. This grid has filters and sort options available on each column, and as with other grids you can save your grid view.
This interface has several actions available, some via buttons and some via the actions menu.
Buttons include:
-
Remove Filters - this will remove all grid filters that are in place.
-
Show in Catalog Results - this will open all selected records in a staff catalog search results page. This will open in a new tab.
-
Open Selected in New Tabs - this will open each selected record in its own tab, and show you the record detail view for each record.
You may need to disable your browser’s pop up blocker to allow multiple tabs to be opened in one action. -
Upload - this opens the Upload Records modal described above.
-
Export All - this exports all members of the bucket in either USMARC or MARCXML format. If you select this option you will see a modal with export options and the ability to confirm before you process the export.
For more information on the Search Catalog box on the right of the interface, see the above description.
Additional actions are available in the actions menu, and all may be performed on one or several records, with the exception of Merge Selected Records, which is explained in greater detail below.
Additional actions include:
-
Add Selected Records to a Different Bucket - this will copy selected records from the current bucket into a new or existing bucket for which you have edit permissions
-
Delete Selected Records from Catalog - if you have appropriate delete permissions you can delete records from the catalog. Note that this will only work for 'empty' records - any records with holdings or items attached will be blocked from deletion.
-
Export Selected Records - this functions the same as Export All described above, but allows you to select specific records for export.
-
Merge Selected Records - this is described in detail in the next section.
-
Move Selected Records to a Different Bucket - this will move selected records from the current bucket into a new or existing bucket for which you have edit permissions
-
Transfer Title Holds - this will transfer all title-level holds from the selected record to a pre-selected holds transfer destination record. For more information on setting a holds transfer destination, please see the Holds Management documentation.
Columns in this view include:
-
Bucket Entry ID - a unique identifier related to the record + bucket combined. The presence of this ID uniquely identifies each record as a bucket member, even if a record is added to the bucket twice. This allows users to add or remove duplicate records from the bucket.
This is new behavior, and duplicate records are no longer 'folded' or deduplicated within the bucket. -
Title Proper (normalized) - the title of the bibliographic record. It is a hyperlink, and clicking it will take you to the record detail view for that bibliographic record. This will open in the same tab.
-
Record ID - the system bibliographic record ID
-
Relative Position - the position of the record in a bookbag
-
Is Deleted? - indicates if the bibliographic record is deleted or not
-
Merge Date - the date a bibliographic record as merged
-
Author (normalized) - the author of the bibliographic record
-
Bucket ID - the ID of this bucket
-
Date Added to Bucket - the date the bibliographic record was added to this bucket
-
TCN Source - the source of the bibliographic record’s TCN (Title Control Number)
-
TCN Value - the bibliographic record’s TCN (Title Control Number)
-
Record Creation Date/Time - the creation date of the bibliographic record
-
Last Edit Date/Time - the date the bibliographic record was last edited
-
Is Active? - indicates if a bibliographic record is active or not
-
Merged To - if the record has been merged, this will show the Record ID of the bibliographic record which was the merge destination (AKA Lead Record). This is hyperlinked and clicking on it will take you to the lead record.
-
Overall Record Quality - the calculated quality score of the bibliographic record
Bibliographic Record Merging and Overlay
You can merge or overlay records in record buckets, either as a way to resolve catalog duplicates or by using a set of records from an external service like Z39.50.
Merge Records in Record Buckets
-
Navigate to Cataloging>Record Buckets.
-
Create and/or select a record bucket.
-
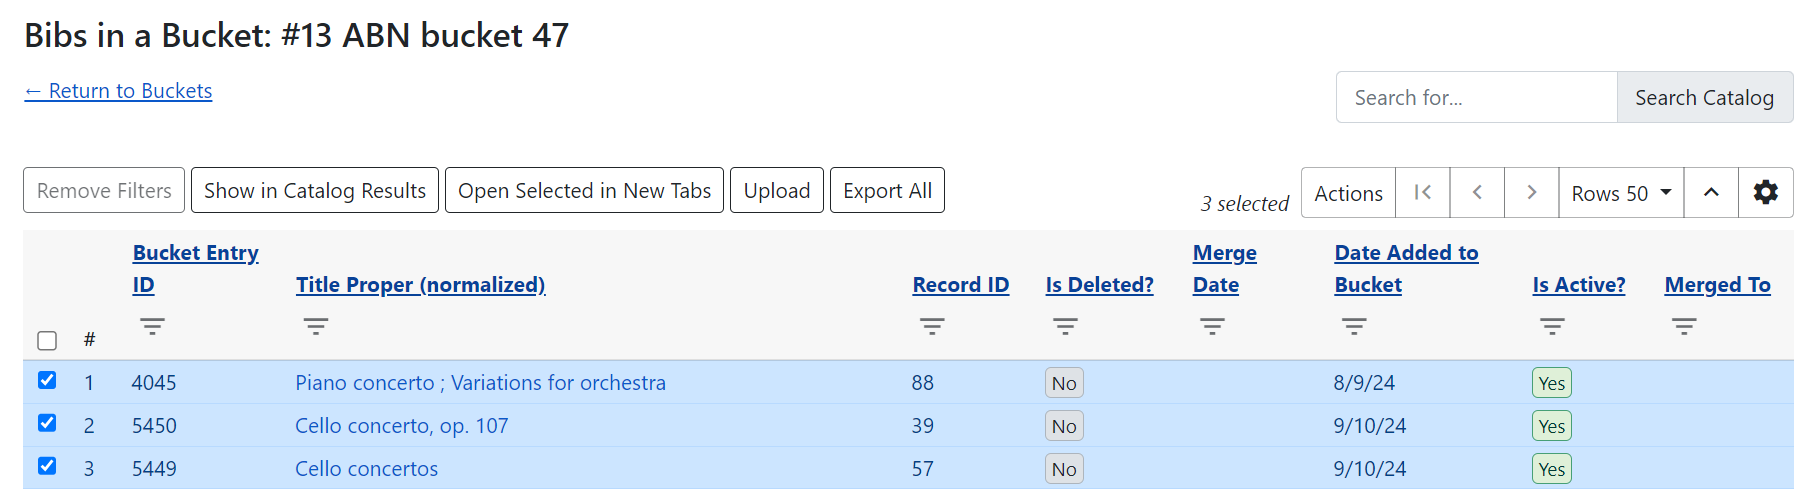
Select the records that you want to merge, and click Actions → Merge Selected Records.
-
This will open a new tab showing the Merge Records modal.
-
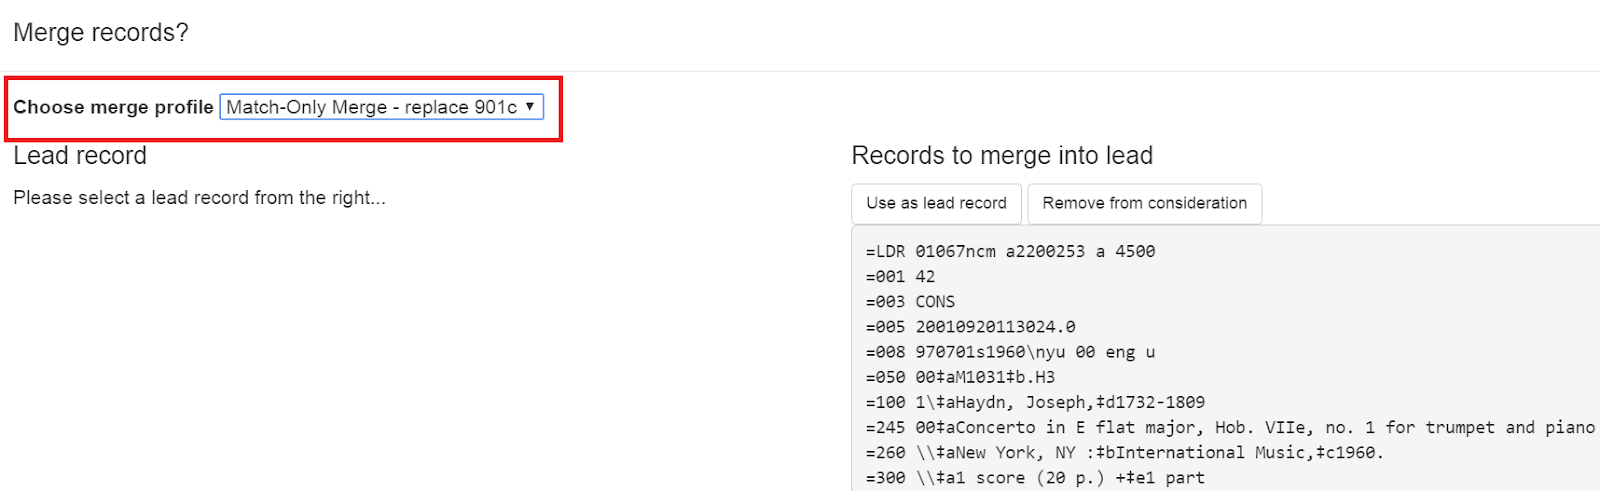
The records to be merged appear on the right side of the screen. Select Use as Lead Record to select a lead record from those that need to be merged.

-
Select a merge profile from the drop down box.
-
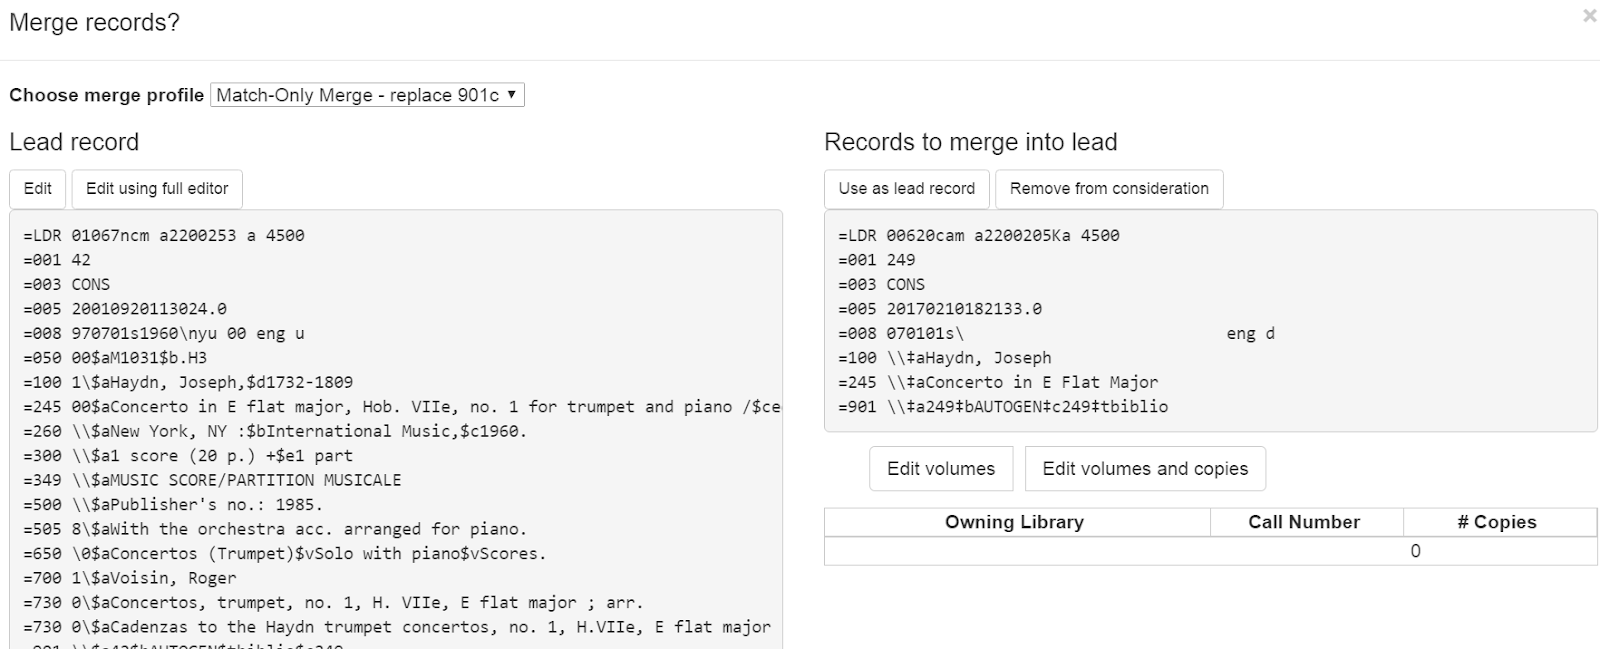
After you select the profile, you can preview the changes that will be made to the record.
-
You can change the merge profile at any time; after doing so, the result of the merge will be recalculated. The merge result will also be recalculated after editing the lead record, changing which record is to be used as lead, or removing a record from consideration.
-
When you are satisfied that you have selected the correct merge profile, select the Merge button in the bottom right corner.
-
Note that merge profiles that contain a preserve field specification are not available to be chosen in this interface, as they would have the effect of reversing which bibliographic record is considered the target of the merge.
After the merge is complete, you will be returned to your record bucket. You will see that the record(s) participating in the merge have an updated Merge Date value. All non-lead records will be marked as deleted = yes, active = no, and will have the lead record’s ID in the Merged To field.
Track Record Merges
When two or more bibliographic records are merged in a record bucket, all records involved are stamped with a new merge_date value. For any bibliographic record, this field indicates the last time it was involved in a merge. At the same time, all subordinate records (i.e. those deleted as a product of the merge) are stamped with a merged_to value indicating which bibliographic record was the lead record in the merge.
In the staff catalog bibliographic record display, a warning alert now appears along the top of the page below the Deleted alert indicating when a record was used in a merge, when it was merged, and which record it was merged with, rendered as a link to the lead record.
Merge Records Using Z39.50
-
Search for a record in the catalog that you want to overlay.
-
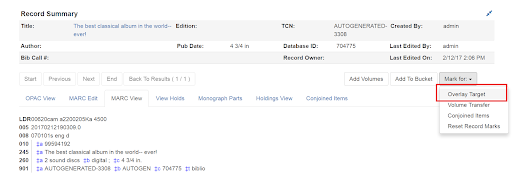
Select the record, and select MARC View.
-
Select Mark for: Overlay Target.
-
Navigate to Cataloging → Import Record from Z39.50.
-
Search for the lead record that you want within the Z39.50 interface.
-
Select the desired lead record, and select Overlay.
-
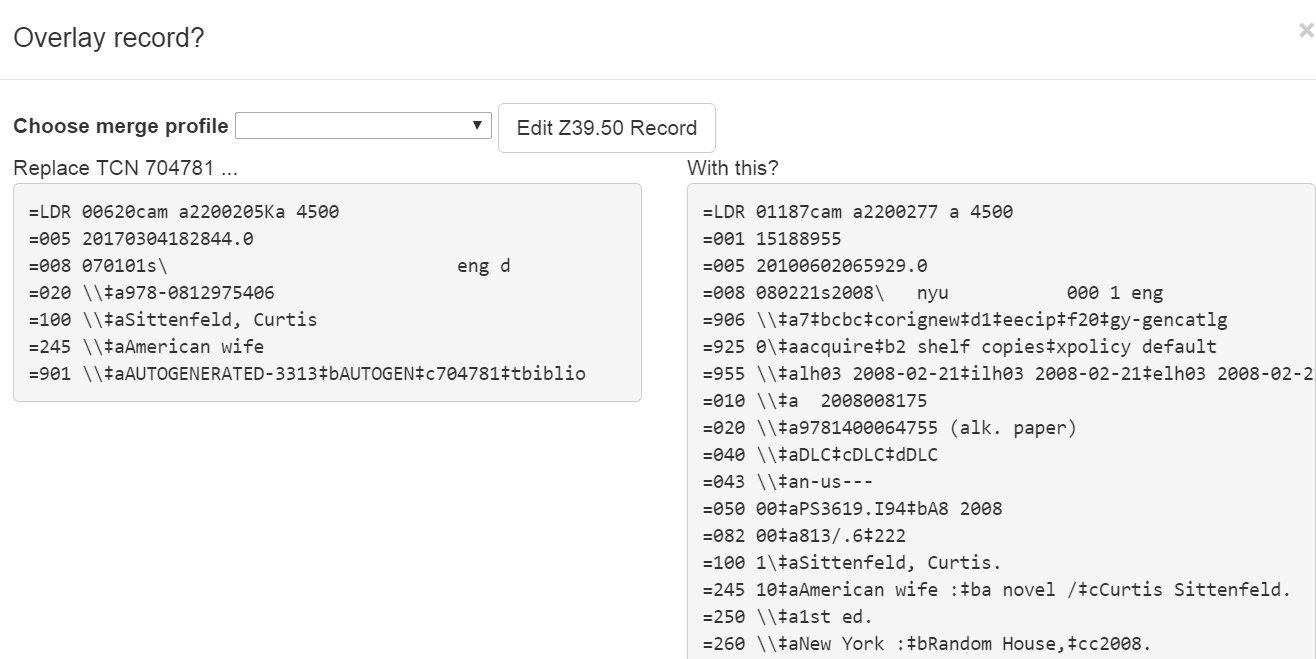
The record that you have targeted to be overlaid, and the new record, display side by side.
-
You can edit the lead record before you overlay the target. To edit the record, select Edit Z39.50 Record above the lead record.
-
The MARC editor will open. You can make changes in the MARC editor, or you can select the Flat Text Editor to make changes. After you have edited the record, select Modify in the top-right corner, and then Use Edits in the bottom-right corner. Note that the record you are editing is the version from the Z39.50 server not including any changes that would be made as a result of applying the selected merge file.
-
You will return to the side-by-side comparison of the records and then can proceed with the overlay.
-
Once you are satisfied with the record that you want to overlay, select a merge profile from the drop down box.
-
Select Overlay. The overlay will occur, and you will be taken back to the Z39.50 interface.
-
Note that the staff client remembers the last merge overlay profile that you selected, so the next time that you open the interface, it will default to that profile. Simply change the profile to make a different selection.
-
Also note when the merge profile is applied, the Z39.50 record acts as the target of the merge. For example, if your merge profile adds 650 fields, those 650 fields are brought over from the record that already exists in the Evergreen database (i.e., the one that you are overlaying from Z39.50).
-
Also note that merge profiles that contain a preserve field specification are not available to be chosen in this interface, as they would have the effect of reversing which bibliographic record is considered the target of the merge.
Administrative Settings for Record Merging
-
Navigate to Administration → Local Administration → Library Settings Editor → Default Merge Profile (Z39.50 and Record Buckets).
-
Select a context organizational unit and a default merge profile, and select Update Setting. The merge profiles that appear in this drop down box are those that are created in MARC Batch Import/Export. Note that catalogers will only see merge profiles that are allowed by their organizational unit and permissions.