SIP Server
About the SIP Protocol
SIP, standing for Standard Interchange Protocol, was developed by the 3M corporation to be a common protocol for data transfer between ILS' (referred to in SIP as an ACS, or Automated Circulation System) and a third party device. Originally, the protocol was developed for use with 3M SelfCheck (often abbreviated SC, not to be confused with Staff Client) systems, but has since expanded to other companies and devices. It is now common to find SIP in use in several other vendors' SelfCheck systems, as well as other non-SelfCheck devices. Some examples include:
-
Patron Authentication (computer access, subscription databases)
-
Automated Material Handling (AMH)
-
The automated sorting of items, often to bins or book carts, based on shelving location or other programmable criteria
-
Installing the SIP Server
This is a rough intro to installing the SIP server for Evergreen.
Getting the code
Current SIP server code lives at in the Evergreen git repository:
cd /opt
git clone git://git.evergreen-ils.org/SIPServer.git SIPServer
Configuring the Server
-
Type the following commands from the command prompt:
$ sudo su opensrf $ cd /openils/conf $ cp oils_sip.xml.example oils_sip.xml -
Edit oils_sip.xml. Change the commented out <server-params> section to this:
<server-params min_spare_servers='1' max_spare_servers='2' min_servers='3' max_servers='25' /> -
max_servers will directly correspond to the number of allowed SIP clients. Set the number accordingly, but bear in mind that too many connections can exhaust memory. On a 4G RAM/4 CPU server (that is also running evergreen), it is not recommended to exceed 100 SIP client connections.
Setting the encoding
SIPServer looks for the encoding in the following places:
-
An encoding attribute on the account element for the currently active SIP account.
-
The encoding element that is a child of the institution element of the currently active SIP account.
-
The encoding element that is a child of the implementation_config element that is itself a child of the institution element of the currently active SIP account.
-
If none of the above exist, then the default encoding (ASCII) is used.
Option 3 is a legacy option. It is recommended that you alter your configuration to move this element out of the implementation_config element and into its parent institution element. Ideally, SIPServer should not look into the implementation config, and this check may be removed at some time in the future.
Datatypes
The msg64_hold_datatype setting is similar to msg64_summary_datatype, but affects holds instead of circulations.
When set to barcode, holds information will be delivered as a set of copy barcodes instead of title strings for
patron info requests. With barcodes, SIP clients can both find the title strings for display (via item info requests)
and make subsequent hold-related action requests, like holds cancellation.
Adding SIP Users
-
Type the following commands from the command prompt:
$ sudo su opensrf $ cd /openils/conf -
In the <accounts> section, add SIP client login information. Make sure that all <logins> use the same institution attribute, and make sure the institution is listed in <institutions>. All attributes in the <login> section will be used by the SIP client.
-
In Evergreen, create a new profile group called SIP. This group should be a sub-group of Users (not Staff or Patrons). Set Editing Permission as group_application.user.sip_client and give the group the following permissions:
COPY_CHECKIN
COPY_CHECKOUT
CREATE_PAYMENT
RENEW_CIRC
VIEW_CIRCULATIONS
VIEW_COPY_CHECKOUT_HISTORY
VIEW_PERMIT_CHECKOUT
VIEW_USER
VIEW_USER_FINES_SUMMARY
VIEW_USER_TRANSACTIONS
CANCEL_HOLDS
OR use SQL like:
INSERT INTO permission.grp_tree (name,parent,description,application_perm)
VALUES ('SIP', 1, 'SIP2 Client Systems', 'group_application.user.sip_client');

INSERT INTO
  permission.grp_perm_map (grp, perm, depth, grantable)
SELECT
  g.id, p.id, 0, FALSE
FROM
  permission.grp_tree g,
  permission.perm_list p
WHERE
  g.name = 'SIP' AND
  p.code IN (
    'COPY_CHECKIN',
    'COPY_CHECKOUT',
    'RENEW_CIRC',
    'VIEW_CIRCULATIONS',
    'VIEW_COPY_CHECKOUT_HISTORY',
    'VIEW_PERMIT_CHECKOUT',
    'VIEW_USER',
    'VIEW_USER_FINES_SUMMARY',
    'VIEW_USER_TRANSACTIONS',
    'CANCEL_HOLDS'
  );
Verify:
SELECT * FROM permission.grp_perm_map pgpm INNER JOIN permission.perm_list ppl ON pgpm.perm = ppl.id INNER JOIN permission.grp_tree pgt ON pgt.id = pgpm.grp WHERE pgt.name = 'SIP'; -
For each account created in the <login> section of oils_sip.xml, create a user (via the staff client user editor) that has the same username and password and put that user into the SIP group.
|
The expiration date will affect the SIP users' connection so you might want to make a note of this somewhere. |
Running the server
To start the SIP server type the following commands from the command prompt:
$ sudo su opensrf
$ oils_ctl.sh -a [start|stop|restart]_sip
Logging-SIP
Syslog
It is useful to log SIP requests to a separate file especially during initial setup by modifying your syslog config file.
-
Edit syslog.conf.
$ sudo vi /etc/syslog.conf # maybe /etc/rsyslog.conf -
Add this:
local6.* -/var/log/SIP_evergreen.log
-
Syslog expects the logfile to exist so create the file.
$ sudo touch /var/log/SIP_evergreen.log -
Restart sysklogd.
$ sudo /etc/init.d/sysklogd restart
Syslog-NG
-
Edit logging config.
sudo vi /etc/syslog-ng/syslog-ng.conf -
Add:
# +SIP2+ for Evergreen filter f_eg_sip { level(warn, err, crit) and facility(local6); }; destination eg_sip { file("var/log/SIP_evergreen.log"); }; log { source(s_all); filter(f_eg_sip); destination(eg_sip); }; -
Syslog-ng expects the logfile to exist so create the file.
$ sudo touch /var/log/SIP_evergreen.log -
Restart syslog-ng
$ sudo /etc/init.d/syslog-ng restart
Testing Your SIP Connection
-
In the root directory of the SIPServer code:
$ cd SIPServer/t -
Edit SIPtest.pm, change the $instid, $server, $username, and $password variables. This will be enough to test connectivity. To run all tests, you’ll need to change all the variables in the Configuration section.
$ PERL5LIB=../ perl 00sc_status.tThis should produce something like:
+
1..4
ok 1 - Invalid username
ok 2 - Invalid username
ok 3 - login
ok 4 - SC status
-
Don’t be dismayed at Invalid Username. That’s just one of the many tests that are run.
More Testing
Once you have opened up either the SIP OR SIP2 ports to be accessible from outside you can do some testing via telnet. In the following tests:
-
Replace $server with your server hostname (or localhost if you want to skip testing external access for now);
-
Replace $username, $password, and $instid with the corresponding values in the <accounts> section of your SIP configuration file;
-
Replace the $user_barcode and $user_password variables with the values for a valid user.
-
Replace the $item_barcode variable with the values for a valid item.
-
Start by testing your ability to log into the SIP server:
$ telnet $server 6001If successful, the SIP server returns a 941 result. A result of 940, however, indicates an unsuccessful login attempt. Check the <accounts> section of your SIP configuration and try again.
-
Once you have logged in successfully, replace the variables in the following line and paste it into the telnet session:
2300120080623 172148AO$instid|AA$user_barcode|AC$password|AD$user_password
If successful, the SIP server returns the patron information for $user_barcode, similar to the following:
24  Y           00120100113    170738AEFirstName MiddleName LastName|AA$user_barcode|BLY|CQY
|BHUSD|BV0.00|AFOK|AO$instid|
The response declares it is a valid patron BLY with a valid password CQY and shows the user’s $name.
-
To test the SIP server’s item information response, issue the following request:
1700120080623 172148AO$instid|AB$item_barcode|AC$password
If successful, the SIP server returns the item information for $item_barcode, similar to the following:
1803020120160923    190132AB30007003601852|AJRégion de Kamouraska|CK001|AQOSUL|APOSUL|BHCAD
|BV0.00|BGOSUL|CSCA2 PQ NR46 73R
The response declares it is a valid item, with the title, owning library, permanent and current locations, and call number.
SIP Communication
For full protocol details and all message types, see: SIP Communication and Message Types Reference.
Patron privacy and the SIP protocol
SIP traffic includes a lot of patron information, and is not encrypted by default. It is strongly recommended that you encrypt any SIP traffic.
SIP server configuration
On the SIP server, use iptables or etc/hosts to allow SSH connections on port 22 from the SIP client machine. You will probably want to have very restrictive rules
on which IP addresses can connect to this server.
SSH tunnels on SIP clients
SSH tunnels are a good fit for use cases like self-check machines, because it is relatively easy to automatically open the connection. Using a VPN is another option, but many VPN clients require manual steps to open the VPN connection.
-
If the SIP client will be on a Windows machine, install cygwin on the SIP client.
-
On the SIP client, use
ssh-keygento generate an SSH key. -
Add the public key to /home/my_sip_user/.ssh/authorized_keys on your SIP server to enable logins without using the UNIX password.
-
Configure an SSH tunnel to open before every connection. You can do this in several ways:
-
If the SIP client software allows you to run an arbitrary command before each SIP connection, use something like this:
ssh -f -L 6001:localhost:6001 my_sip_user@my_sip_server.com sleep 10 -
If you feel confident that the connection won’t get interrupted, you can have something like this run at startup:
ssh -f -N -L 6001:localhost:6001 my_sip_user@my_sip_server.com -
If you want to constantly poll to make sure that the connection is still running, you can do something like this as a cron job or scheduled task on the SIP client machine:
#!/bin/bash
instances=`/bin/ps -ef | /bin/grep ssh | /bin/grep -v grep | /bin/wc -l`
if [ $instances -eq 0 ]; then
  echo "Restarting ssh tunnel"
  /usr/bin/ssh -L 6001:localhost:6001 my_sip_user@my_sip_server.com -f -N
fi
-
SIP Filters
When sending SIP messages from Evergreen to a third party, an Evergreen administrator may wish to remove or overwrite certain kinds of sensitive information. The SIP Filters tool allows an administrator to choose to redact and / or overwrite the values in any SIP field with a field identifier.
For the purposes of the SIP Filter tool:
-
Redaction means that the field is not included in the outgoing SIP message.
-
Overwriting means that the contents of the field in the outgoing message will be a string specified by the Evergreen administrator.
-
Redaction or overwriting will apply to a given field regardless of which message it appears in.
-
Please refer to the SIP Specification for a full list of SIP codes.
-
This tool does not address fixed-length fields without field identifiers, which are position sensitive and follow the SIP command identifier.
| This tool does not try to interpret SIP semantics. Administrators should exercise caution when configuring SIP filters to ensure they do not accidentally strip required SIP fields or pass invalid values in outgoing SIP messages. |
This feature is governed by the SIP_ADMIN permission.
SIP Server
For SIP Server, this configuration can be found in the oils_sip.xml file. Here is an example:
	<filters>
		<!--
			Filters allow SIPServer to strip or modify specified fields inline from outgoing SIP messages.  Currently, these
            rules apply to all message types and only work for variable-length fields, but the config layout leaves room for
            future enhancement.

			Examples:

			<field identifier="AE" replace_with="John Doe" />
            <field identifier="BE" remove="true" />
        -->
            <field identifier="AE" remove="true" />
    </filters>
SIP2 Mediator
For SIP2 Mediator, there is a new administrative interface available under Administration → Server Administration → SIP Filters. This is a grid which will show existing redactions & overwrites as well as allow the administrative user to create new ones as needed.
To create a new SIP2Mediator Filter:
-
Select New SIP Filter.
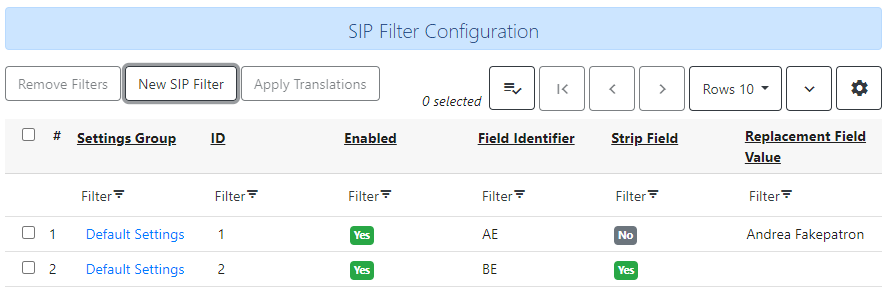
-
Use the Enabled checkbox to specify whether the redaction or overwrite is actively in use.
-
Specify the SIP field using Field Identifier. This field is required.
-
If you wish to specify an overwrite value for the field, enter that in Replacement Field Value.
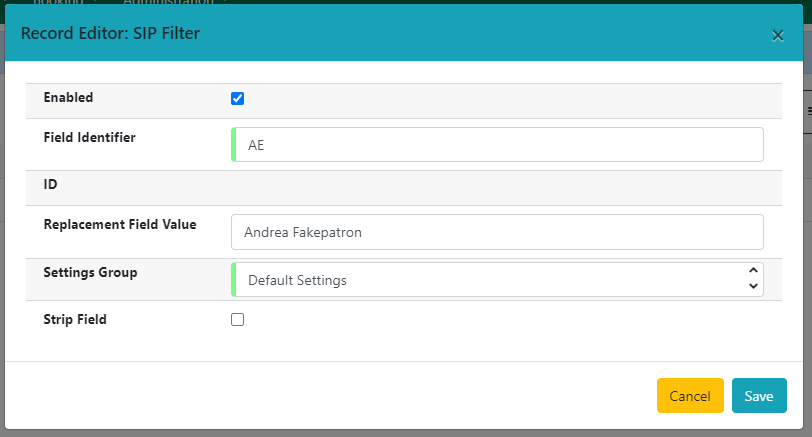
-
Identify the Settings Group for the SIP field (this is analogous to the SIPServer concept of Institutions). This field is required.
-
If you wish to strip the values of this field from a SIP message, select the Strip Field checkbox.

-
Select Save to save your SIP filter, or select Cancel to discard changes and close the modal.
To edit an existing SIP filter, double click on the row you wish to edit (or use the actions menu, accessible at the top right of the grid as well as via right-click in the row). Make your changes and select Save to save your filter, or select Cancel to discard changes and close the modal.