Working with Holdings Templates
Setting up holdings templates can save a lot of time when creating items, and they also improve consistency and accuracy. Any time you find yourself creating multiple items with the same item-level data, you may wish to create a holdings template to automate that process.
You can access the template editor from Local Administration, or directly from the Holdings Editor interface.
Navigate to Administration →Local Administration →Holdings Template Editor.
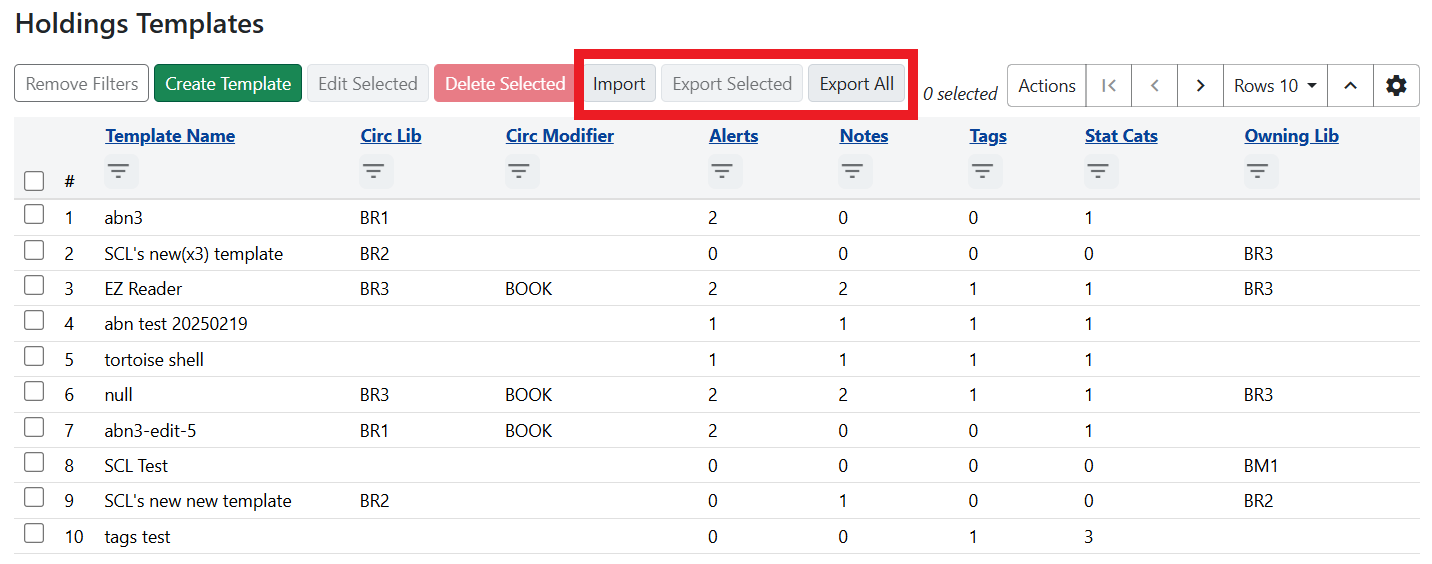
You will be presented with a grid of all templates available to your logged-in user. This grid can display values or counts for all template fields. This grid is filterable and sortable.

From this grid, you can create a new holdings template, delete selected holdings template(s), and edit a holdings template; as well as export selected template(s) or import templates from a previously saved file.
| There is no direct sharing of item templates without database manipulation. Contact your Evergreen administrator if you have questions. |
Creating a new Holdings Template
From the Holdings Template grid, select the Create Template button. The template editor will open in a new tab.
| You may need to configure your browser to allow Evergreen to open new tabs. |
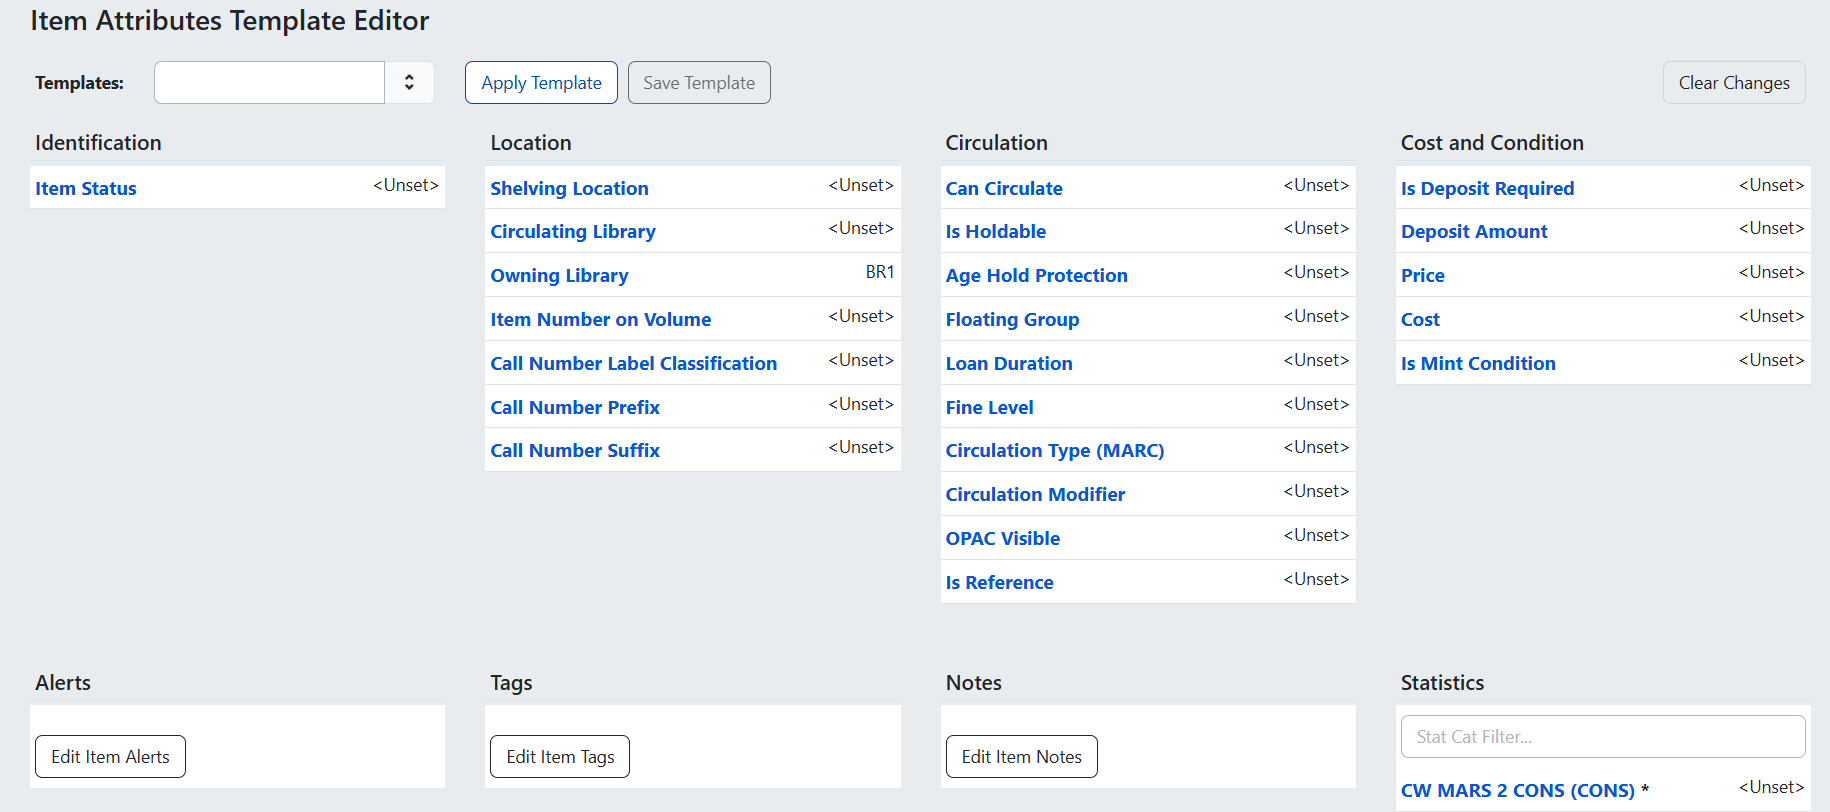
Select the desired template attributes by moving through the fields in the editor. The attributes you’ve changed will appear in green, and a line will appear to the left of the field. Asterisks indicate required fields. If you want to start this process over, you can click the Clear Changes button in the top-right corner of the screen. Scroll down to see all item attributes.
For statistical categories, you will only have access to item statistical categories available at your workstation’s organizational unit.
Once you have completed your template, enter a name for your template in the dropdown and select Save as New Template, then exit the template editor.
Editing a Holdings Template
From the Holdings Templates grid, select the template(s) you wish to edit. You can double click the template to open the editor; right-click on the template’s row and select Edit Selected Templates; use the Edit Selected button at the top of the grid; or navigate to the Actions menu in the upper-right of the grid and select Edit Selected Templates.
Selecting more than one template for editing will open one browser tab per selected template.
Select the desired template attributes by moving through the fields in the editor. The attributes you’ve changed will appear in green, and a line will appear to the left of the field. Asterisks indicate required fields. The attributes you’ve changed will appear in green, and a line will appear to the left of the field. Asterisks indicate required fields. If you want to start this process over, you can click the Clear Changes button in the top-right corner of the screen which will clear all changes, including the applied template. If you wish to re-load the template, select the Apply Template button.
Scroll down to see all item attributes.
If you wish to save your changes as part of the original template, select Save Template.
If you wish to save the edited template as a new template, enter a new template name in the dropdown in the upper right. Select Save as New Template. This will save a new template with your changes, and not make changes to the original template.
Deleting Holdings Templates
From the Holdings Templates grid, select the template(s) you wish to delete. You can use the button at the top of the grid labeled Delete Selected; right-click on the template’s row and select Delete Selected Templates; or navigate to the Actions menu in the upper-right of the grid and select Delete Selected Templates.
You will get a confirmation dialog asking if you are sure you wish to delete the selected templates. Click OK to proceed with the delete, or Cancel to proceed without deleting.
Exporting and Importing Holdings Templates
Templates are associated with a login; and will be available to all users of that login. To share templates with other users, you can export one, several, or all templates into a JSON file which can then be imported elsewhere.
To export templates, navigate to the holdings template grid. This can be accessed via either Administration → Local Administration → Holdings Template Editor, or from within the Holdings Editor by selecting the Administration tab.
Select one or several templates, and then click the Export Selected button at the top of the grid. The exported templates will be saved to your browser’s default download location.
To export all templates, click the Export All button at the top of the grid. The exported templates will be saved to your browser’s default download location.
A set of templates can be imported from a previous export.
From the holdings template grid, select the Import button at the top of the grid. You will be prompted to select a file from your operating system’s file system. You will get a dialog confirming new templates added or updated from the import. If there are templates in the import with the same name as templates you already have, the imported templates will overwrite the existing templates.
| Due to changes in data modeling over the years, very old templates may not be able to be imported into modern versions of Evergreen.Additionally, old templates may be missing data elements used in modern versions of Evergreen. Always check your imported templates for accuracy. |
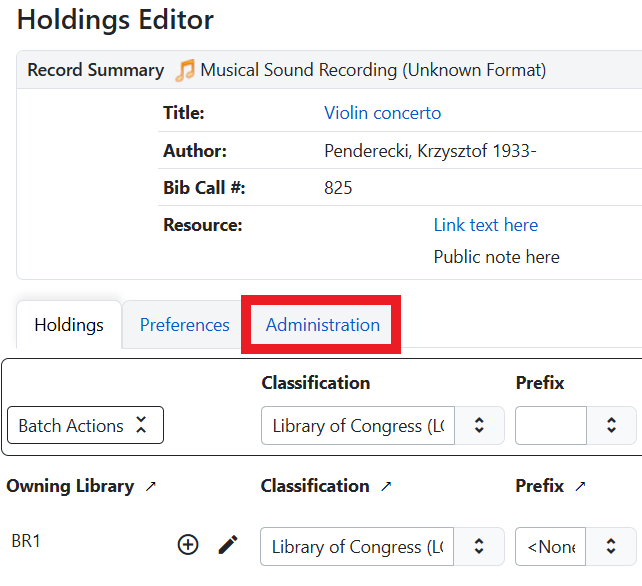
Accessing the Template Editor from the Holdings Editor
To access the admin template editor from the Holdings Editor, there is a new tab labeled Administration visible in the Holdings Editor. Select this tab to see a grid of all templates available to your login.
From this grid, you can create, edit, delete, import, or exporttemplates. If you select create or edit tem plate, a new tab or tabs willopen with the template editor.
There are two new library settings associated with using templates in the Holdings Editor interface. By default both are false if unset.
-
Show "Save Template" in Holdings Editor - if set to TRUE, the Save Template action will be available in the Holdings Editor. If you do not want a user to be able to save templates directly from the Holdings Editor, this should be set to FALSE.
-
Hide the entire template bar in Holdings Editor - if set to TRUE, the entire template actions bar will be hidden from the Holdings Editor. This will prevent users from using templates in the Holdings Editor.
Assuming the the settings allow full use of templates in the Holdings Editor, a user in this interface will see a bar which includes a dropdown of all available templates, as well as buttons for the following actions:
-
Apply Template will apply the selected template to all items in the edit set.
-
Save Template will take any changes made in the Holdings Editor and save them to the selected template.
-
If you wish to save the edited template as a new template, enter a new template name in the dropdown in the upper right. Select Save as New Template. This will save a new template with your changes, and not make changes to the original template.
-
Using a Holdings Template
In the Template bar, select the template you wish to use from the dropdown and then click Apply Template.
Make any other necessary changes to your item(s) and then select either Apply All & Save if you wish to make more changes, or Apply All, Save & Exit if you wish to save and close the Holdings Editor.
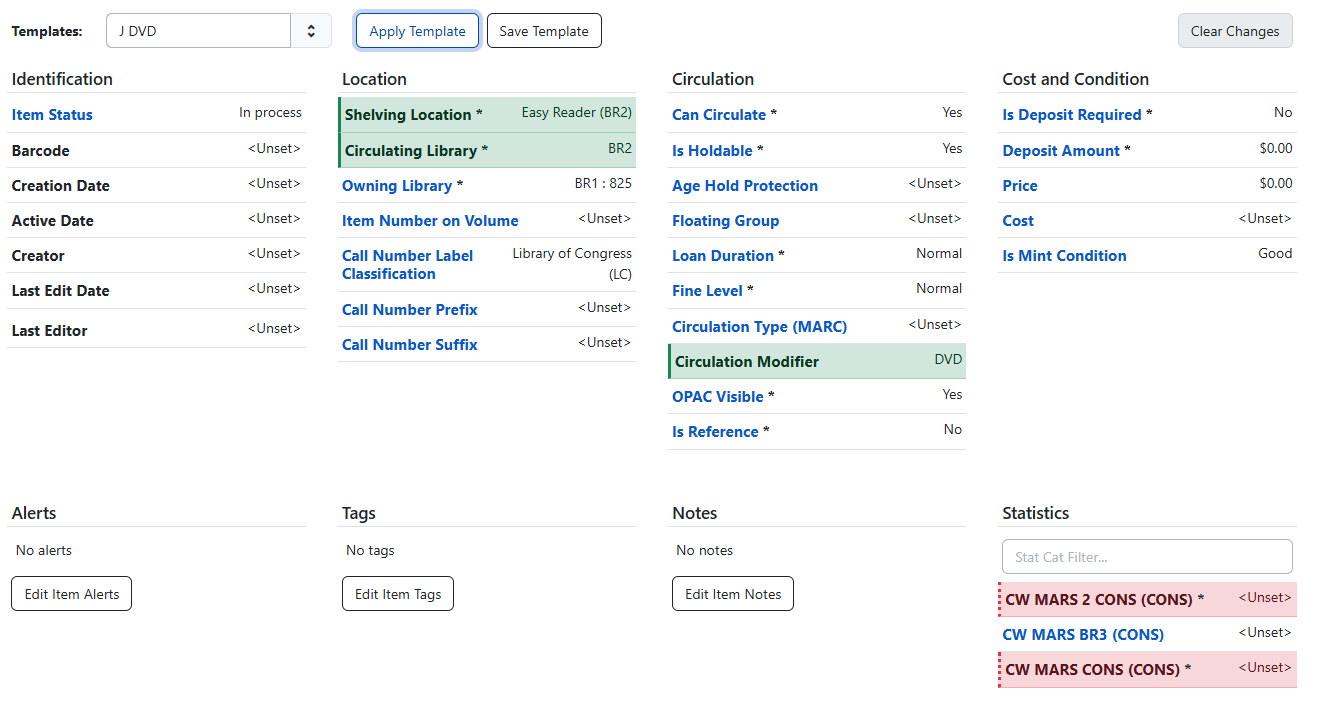
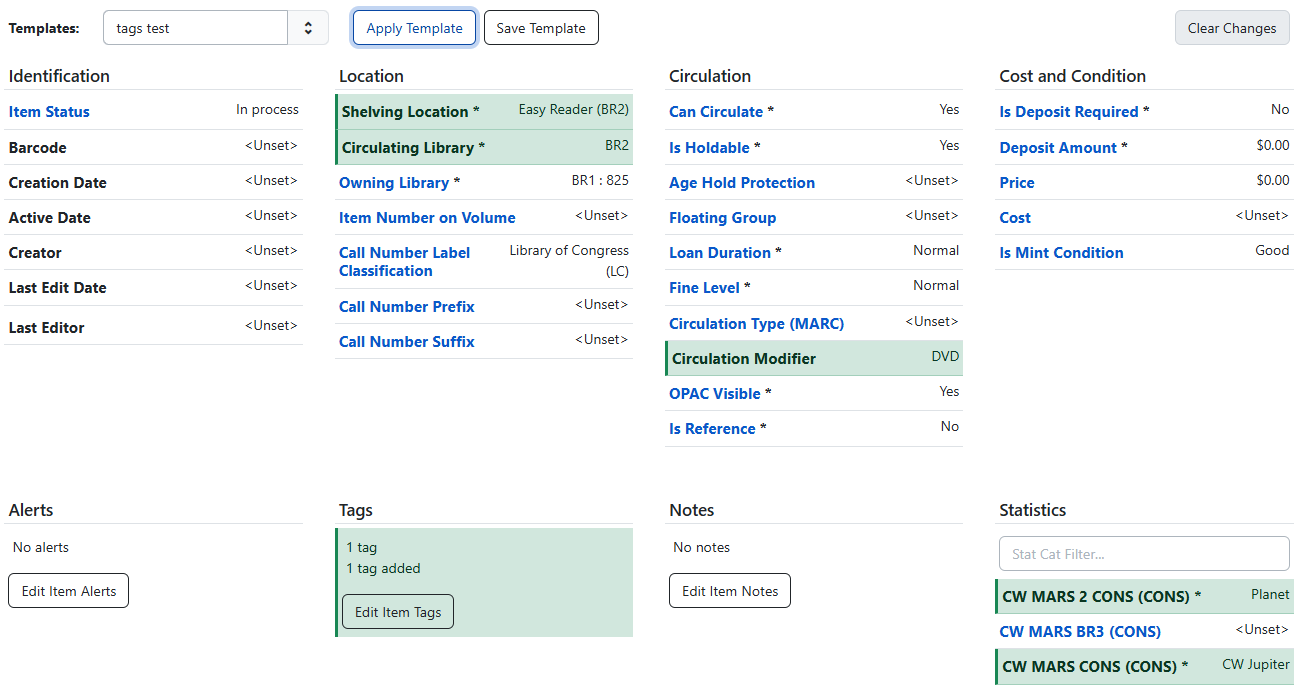
| Applying multiple templates will be additive; for example, if you apply a template with no Fine Level set, and then apply a template with a Fine Level set, the result will be an item(s) with a Fine Level set. Similarly, Item Alerts, Notes, and Tags will be added from each template that you apply. Successive templates with values in the same fields will replace the previous field value; for example, if the first template applies a Shelving Location of DVD and the second template applies a new Shelving Location of Easy Reader, the second template value will override the previously set value. |
In the screenshot below, the J DVD template is applied first and sets values for Shelving Location, Circulating Library, and Circulation Modifier. The second screenshot below shows the same item after the tags test template is applied, which adds values in the Tags and Statistics fields.