Item Tags, Notes, and Alerts
Item tags, notes, and alerts are all ways to add additional information to items. Item tags and item alerts typically rely on a pre-defined set, and item notes are free text. Item alerts are configured to display at certain circulation points.
Item tags, notes, and alerts are described individually in the sections below.
Item Tags
Item Tags allow staff to apply custom, pre-defined labels or tags to items.
Item tags are visible in the public catalog and are searchable in both the staff client and public catalog based on configuration.
This feature was designed to be used for Digital Bookplates to attach donation or memorial information to items, but may be used for broader purposes to tag items.
Item tags can be created ahead of time in the Administration and then applied to items or they can be created on the fly during the cataloging process.
See the Item Tags administrative documentation for more information.
Adding Existing Item Tags to Items
Item Tags can be added to existing items or to new items as they are cataloged. To add an item tag:
-
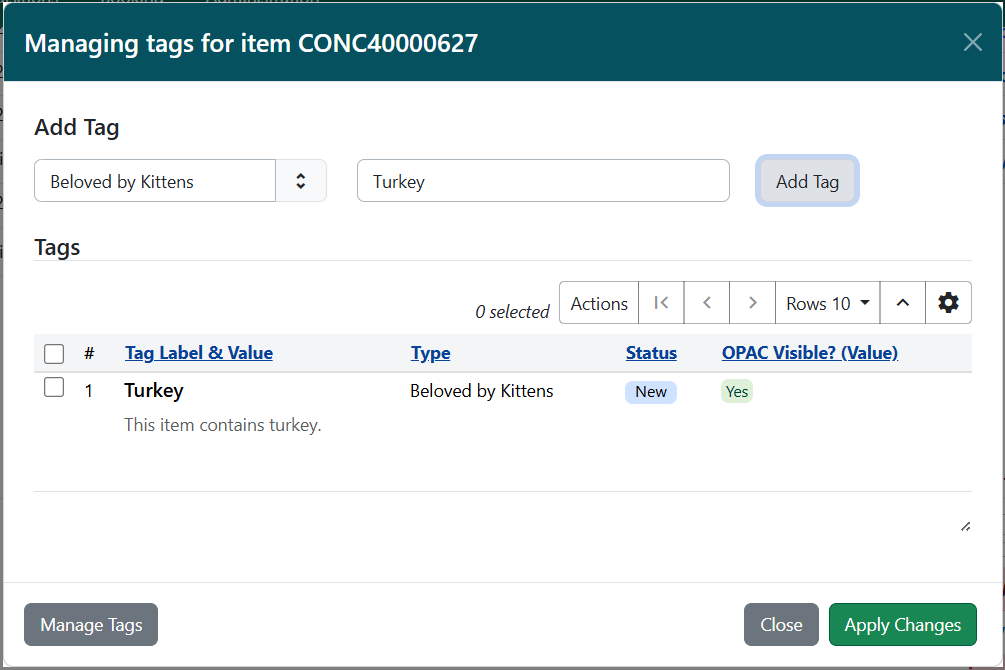
In the Holdings Editor, select Edit Item Tags. This will open a modal named Managing tags for item.
-
Select the Tag Type from the drop down menu and start typing in the Tag field to bring up tag suggestions from the existing item tags. Select the tag and click Add Tag.
-
Your tag will display in the Tags grid below. Columns in this grid include:
-
Tag Label and Value - this shows the tag’s label and its text value.
-
Type - this shows the tag’s type
-
Status - this shows if a tag is newly added. If it is blank, the tag already existed on this item.
-
OPAC Visible - this shows whether or not the tag is visible in the public catalog (OPAC)
-
Additional columns are available in this grid and can be accessed by clicking the gear icon in the top-right of the grid.
-
-
Repeat this as needed for other tags.
-
-
If you need to edit or remove a tag that you have added, hover on the tag row to show actions for Edit Tag (which will open the tags administrative interface in a new tab) and Remove Tag. + TIP: If you need to perform administrative actions on tags, the Manage Tags button will also open the tags administrative interface in a new tab.
-
Once you have added your tags and done any other tag work, select Apply Changes. The modal will close.
-
To close without saving, select Close.
-
-
Proceed with the rest of your edits to the item, and then select either Apply All & Save or Apply All, Save & Exit to finish your edits.
Creating and Applying a Item Tag During Cataloging
Item tags can be created in the Holdings Editor on the fly while cataloging or viewing an item:
-
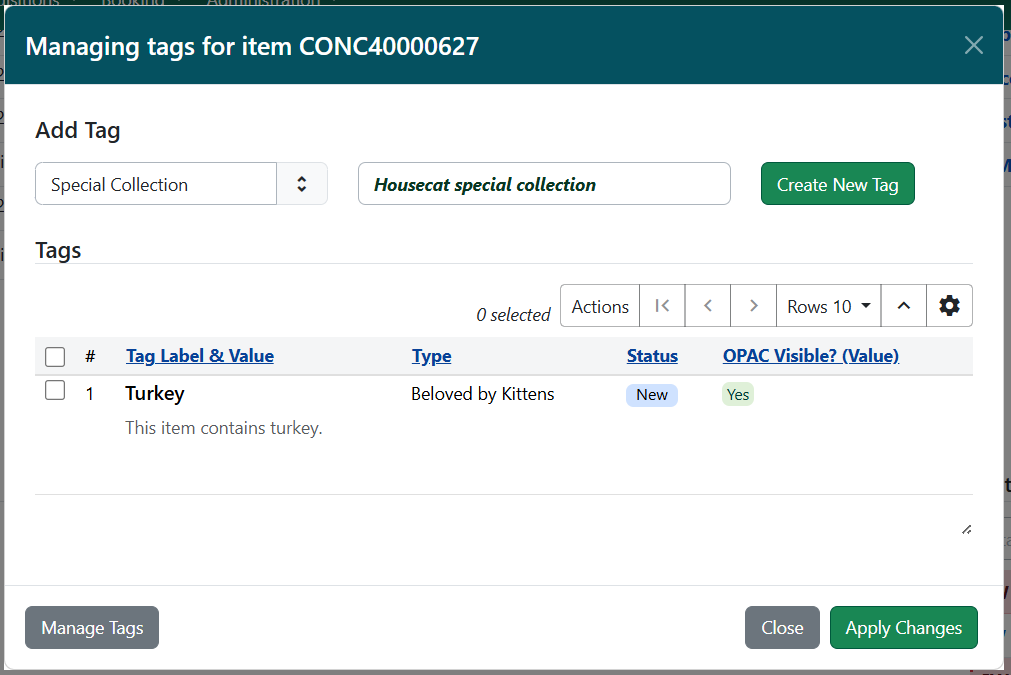
In the Holdings Editor, select Edit Item Tags. This will open a modal named Managing tags for Items.
-
Select the Tag Type from the drop down menu and start typing in the Tag field to create your new tag.
-
Select Add Tag, and then Create New Tag.
-
Your tag will be displayed in the grid below, and will be saved for future use. The tag will be owned at the Organizational Unit of your workstation.
-
Once you have added your tags and done any other tag work, select Apply Changes. The modal will close.
-
To close without saving, select Close.
-
-
Proceed with the rest of your edits to the item, and then select either Apply All & Save or Apply All, Save & Exit to finish your edits.
Removing Item Tags from Items
To remove an item tag from a item:
-
In the Holdings Editor, select Edit Item Tags. This will open a modal named Managing tags for Items.
-
Hover on the tag row to show the Remove Tag option.

-
Once you have removed your tags and done any other tag work, select Apply Changes. The modal will close.
-
To close without saving, select Close.
-
-
Proceed with the rest of your edits to the item, and then select either Apply All & Save or Apply All, Save & Exit to finish your edits.
Adding Item Tags in Batch
Item tags can be added to multiple items in batch using Item Buckets, Item Status, or via the Holdings Editor.
To add tags in batch via an item bucket, open a bucket with your desired items in it or create a new bucket with items in it.
-
Navigate to Cataloging → Item Buckets → Bucket View and select the bucket from the Buckets drop down menu.
-
Select the items to which you want to add the item tag and go to Actions → Apply Tags or right-click and select Apply Tags. The Apply Item Tags dialog box will appear.
-
Select the Tag Type and start typing the name of your tag. The dropdown will show you matching tag values.
-
Select Add Tag, then OK. The item tag will now be attached to the items.
To add item tags in batch via the Holdings Editor, open a set of items in the Holdings Editor. You can do this from several entry points, including Item Status, item buckets, or from the bibliographic record in the Holdings View tab.
-
At whichever entry point, select your set of items and then click Actions → Edit Items.
-
If you are in the Holdings View tab, you can also select Actions → Add / Manage Item Tags. This will open the tags modal, and you can proceed to step 3.
-
-
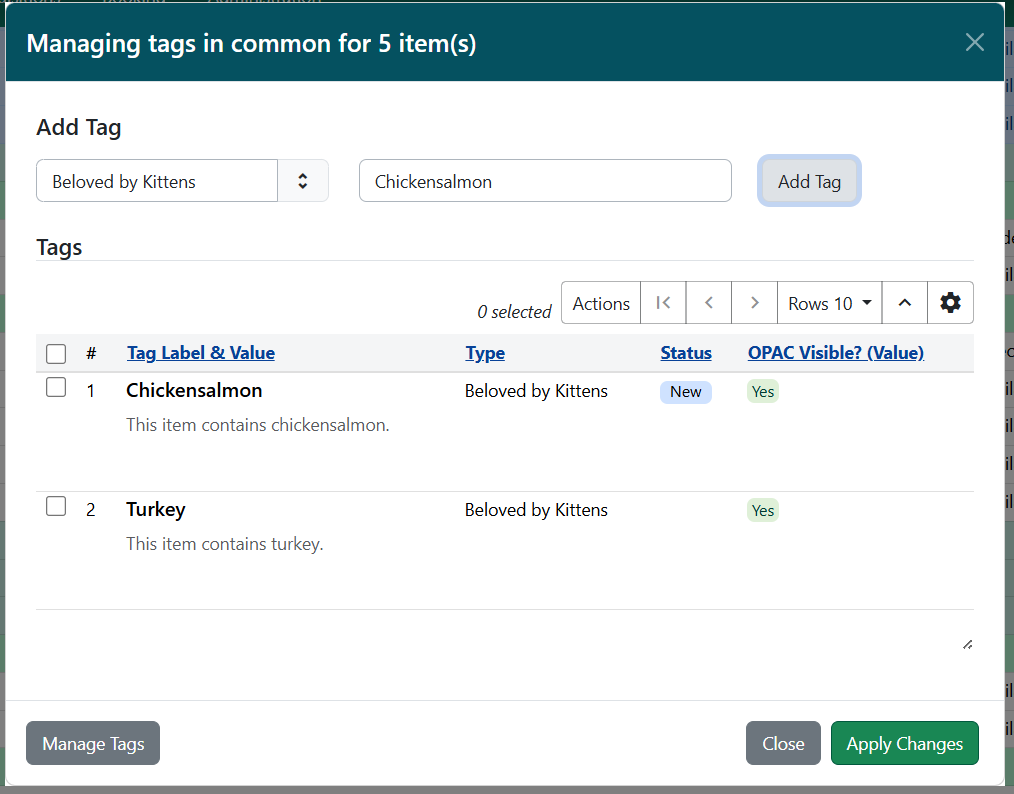
In the Holdings Editor, select Edit Item Tags. This will open a modal named Managing tags in common for <number> item(s).
-
IMPORTANT: This modal will only show existing tags if they are commonly held among all selected items.
-
-
Select the Tag Type from the drop down menu and start typing in the Tag field to bring up tag suggestions from the existing item tags. Select the tag and click Add Tag.
-
Your tag will display in the Tags grid below.
-
Repeat this as needed for other tags.
-
-
If you need to edit or remove a tag that you have added, hover on the tag row to show actions for Edit Tag (which will open the tags administrative interface in a new tab) and Remove Tag.
If you need to perform administrative actions on tags, the Manage Tags button will also open the tags administrative interface in a new tab. -
Once you have added your tags and done any other tag work, select Apply Changes. The modal will close.
-
If you accessed the modal directly from the holdings view tab, this will save your changes.
-
To close without saving, select Close.
-
-
Proceed with the rest of your edits to the items, and then select either Apply All & Save or Apply All, Save & Exit to finish your edits if you are in the Holdings Editor.
To add tags in batch using the Item Status (List View), scan barcodes or upload a file of barcodes via the interface.
-
Navigate to Search → Search for Items by Barcode.
-
Scan barcodes or upload a file of barcodes in the Item Status interface.
-
Select the items to which you want to add the item tag and go to Actions → Edit Items. The Holdings Editor will open in a new tab with all of your selected items.
-
Follow the instructions above for the Holdings Editor, starting at step 2.
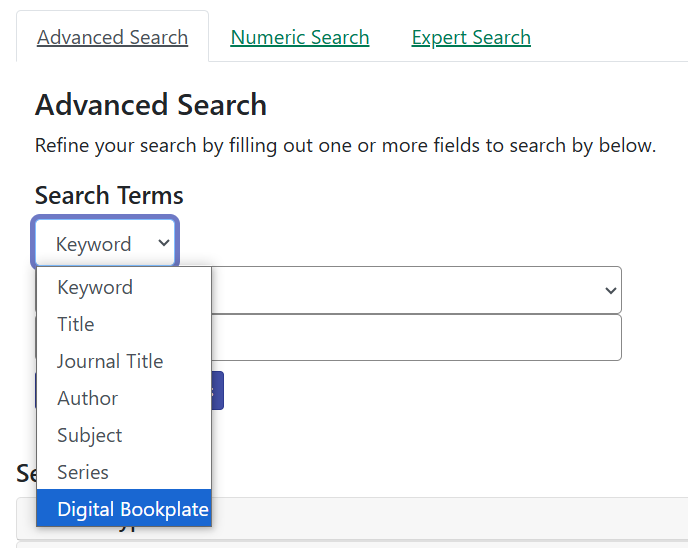
Searching Item Tags
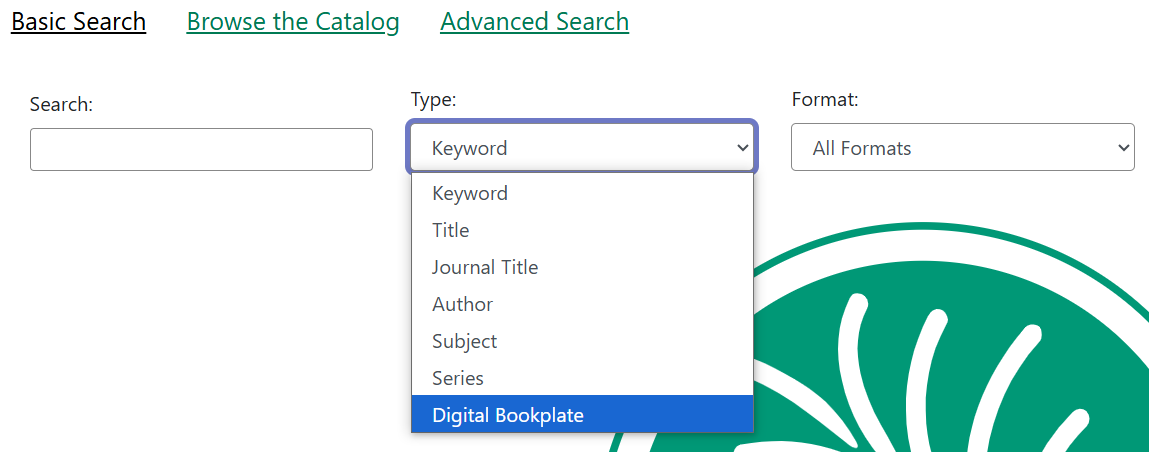
Item Tags can be searched as Digital Bookplates in the public catalog if searching has been enabled via the Library Setting Enable Digital Bookplate Search. Item Tags can be searched in the Basic and Advanced Search interfaces by selecting Digital Bookplate as the search field. Specific item tags can also be searched using a Keyword search and a specific search syntax.
Keyword Search
Item Tags can also be searched by using a Keyword search in the Basic and Advanced search interfaces. Searches need to be constructed using the following syntax:
copy_tag(item tag type code, search term)
For example:
copy_tag(bookplate, friends of the library)
It is also possible to conduct a wildcard search across all item tag types:
copy_tag(*, smith)
Item Notes
Item notes are free text fields that include a note title, note content, and checkbox to indicate whether a note is public. Public notes are visible in the OPAC, but not searchable.
Neither item note titles nor item note contents are controlled, and there is no administrative interface to control notes.
Notes can be added or edited from the Holdings Editor, or directly from the holdings view tab.
Adding Notes to Items
Item notes can be added to existing items or to new items as they are cataloged. To add an item note:
-
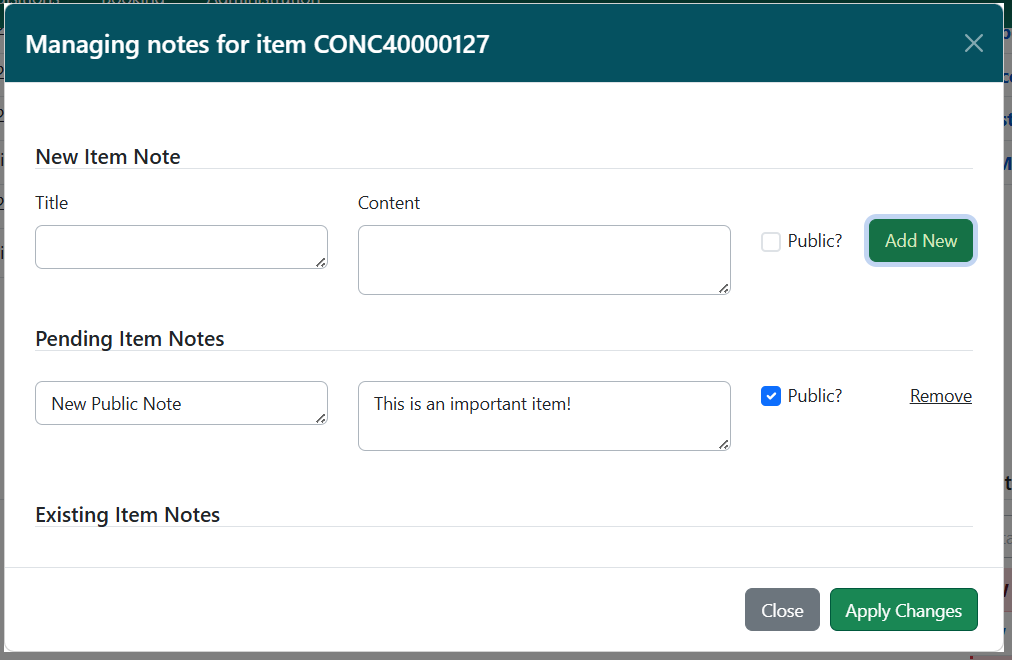
In the Holdings Editor, select Edit Item Notes. This will open a modal named Managing notes for item.
-
If you are in the holdings view tab, you can also select Actions → Add / Manage Item Notes. This will open the notes modal, and you can proceed to step 2.
-
-
Enter a title and content for your note. Select the Public? checkbox if you want the note to be visible in the OPAC.
-
Select Add New. The new note will appear below, under a heading labeled Pending Item Notes.
-
Repeat this as needed to add other notes.
-
Notes will remain pending until the item is saved in step #6.
-
-
You can edit or remove notes before saving. Text entries for note title and content can be edited directly in their respective fields, and you can also change the Public checkbox selection. To remove a note, select Remove on the right side of the note’s line.
-
Once you have added your notes and done any other notes work, select Apply Changes. The modal will close.
-
If you accessed the modal directly from the holdings view tab, this will save your changes.
-
To close without saving, select Close.
-
-
Proceed with the rest of your edits to the item, and then select either Apply All & Save or Apply All, Save & Exit to finish your edits.
Editing Item Notes
Note titles and content are free text, and can be edited.
-
In the Holdings Editor, select Edit Item Notes. This will open a modal named Managing notes for item.
-
If you are in the holdings view tab, you can also select Actions → Add / Manage Item Notes. This will open the notes modal, and you can proceed to step 2.
-
-
Make your desired edits to the note title, content, and public checkbox.
-
Once you have finished, select Apply Changes. The modal will close.
-
To close without saving, select Close.
-
-
Proceed with the rest of your edits to the item, and then select either Apply All & Save or Apply All, Save & Exit to finish your edits.
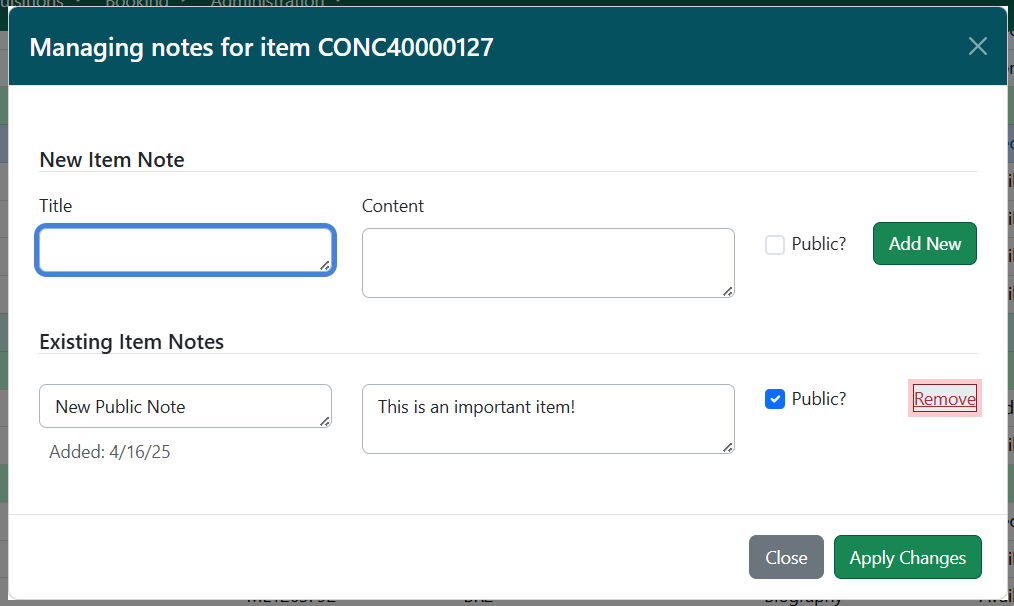
Removing Item Notes from Items
To remove an item note from a item:
-
In the Holdings Editor, select Edit Item Notes. This will open a modal named Managing notes for item.
-
Select Remove on the right side of the note for the note(s) you want to remove.
-
You can also Undelete a removed note before you close the modal. To do this, select Undelete on the right side of the appropriate note.
-
-
Once you have finished, select Apply Changes. The modal will close.
-
To close without saving, select Close.
-
-
Proceed with the rest of your edits to the item, and then select either Apply All & Save or Apply All, Save & Exit to finish your edits.
Adding Item Notes in Batch
Item notes can be added to multiple items in batch via the Holdings Editor, or directly from the Holdings View tab.
To add item notes in batch via the Holdings Editor, open a set of items in the Holdings Editor. You can do this from several entry points, including item status, item buckets, or from the bibliographic record in the Holdings View tab.
-
At whichever entry point, select your set of items and then click Actions → Edit Items.
-
If you are in the Holdings View tab, you can also select Actions → Add / Manage Item Notes. This will open the tags modal, and you can proceed to step 3.
-
-
In the Holdings Editor, select Edit Item Notes. This will open a modal named Managing notes in common for <number> item(s).
-
IMPORTANT: This modal will only show existing note labels that are commonly held among all selected items. Items do note share notes directly.

-
-
Enter a title and content for your note. Select the Public? checkbox if you want the note to be visible in the OPAC.
-
Select Add New. The new note will appear below, under a heading labeled Pending Item Notes.
-
Repeat this as needed to add other notes.
-
Notes will remain pending until the item is saved in step #7.
-
-
You can edit or remove notes before saving. Text entries for note title and content can be edited directly in their respective fields, and you can also change the Public checkbox selection. To remove a note, select Remove on the right side of the note’s line.
-
Once you have added your notes and done any other notes work, select Apply Changes. The modal will close.
-
If you accessed the modal directly from the holdings view tab, this will save your changes.
-
To close without saving, select Close.
-
-
Proceed with the rest of your edits to the items, and then select either Apply All & Save or Apply All, Save & Exit to finish your edits.
To add notes in batch using the Item Status (List View) via an item status, scan barcodes or upload a file of barcodes via the interface in the item status interface.
-
Navigate to Search → Search for Items by Barcode.
-
Scan barcodes or upload a file of barcodes in the item status interface.
-
Select the items to which you want to add the item note and go to Actions → Edit Items. The Holdings Editor will open in a new tab with all of your selected items.
-
Follow the instructions above for the Holdings Editor, starting at step 2.
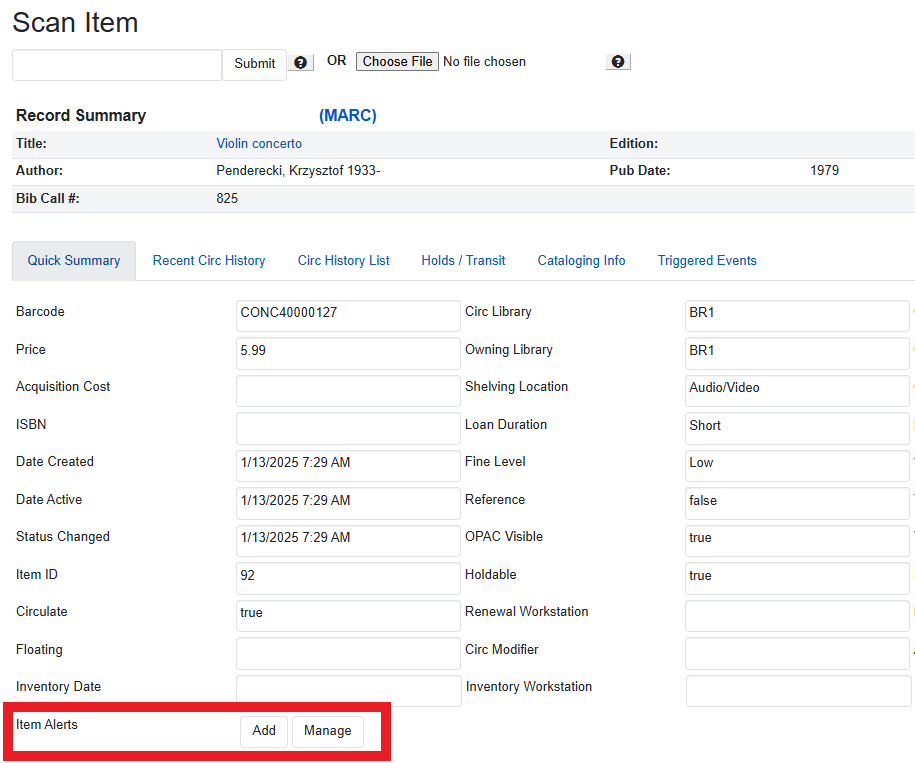
Item Alerts
The Item Alerts feature allows library staff to add customized alert messages to items. The item alerts will appear when a specific event takes place, such as when the item is checked in, checked out, or renewed.
Alerts can be temporary or persistent:
-
Temporary alerts will be disabled after the initial alert and acknowledgement from staff.
-
Persistent alerts will display each time the alert event takes place.
Item Alerts can be configured to display at the circulating or owning library only or, alternatively, when the library at which the alert event takes place is not the circulating or owning library. Item Alerts at check in can also be configured to provide options for the next item status that should be applied to an item. Library administrators have the ability to create and customize Item Alert Types and to suppress item alerts at specific org units. See the Item Alerts Administration documentation for more information.
Adding an Item Alert
Item Alerts can be added to new items or existing items using the Holdings Editor. They can also be added directly to items through the Check In, Check Out, Renew, Capture Holds, and Item Status screens; or from the bibliographic record in the Holdings View tab.
To add an Item Alert in the Holdings Editor:
-
At whichever entry point, select your item and then select Actions → Edit Items.
-
If you are in the Holdings View tab, you can also select Actions → Add / Manage Item Alerts. This will open the alerts modal, and you can proceed to step 3.
-
-
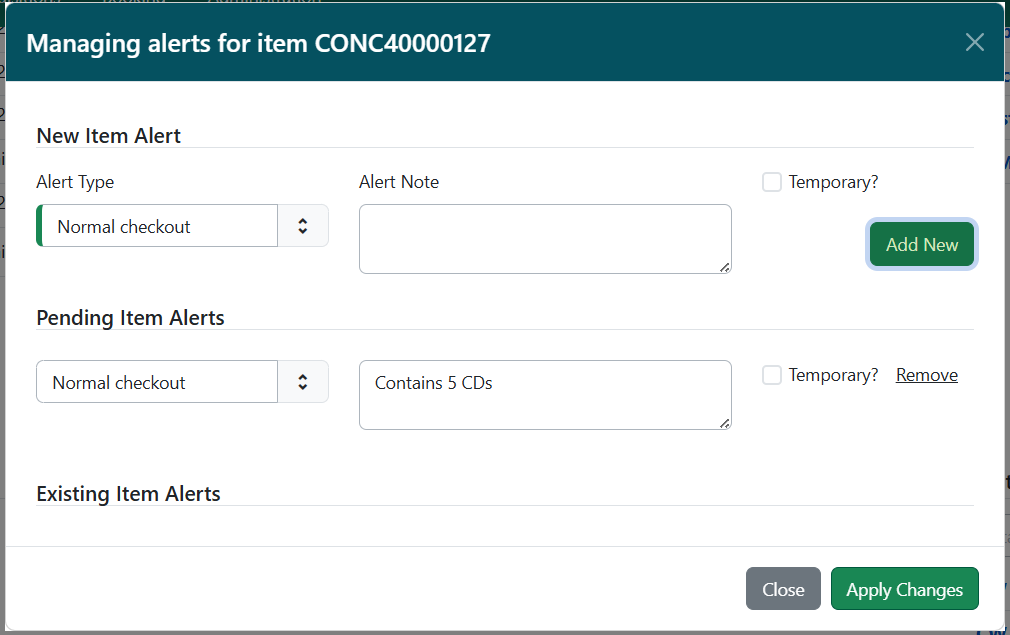
Within the Holdings Editor, scroll to the bottom of the screen and select Edit Item Alerts.
-
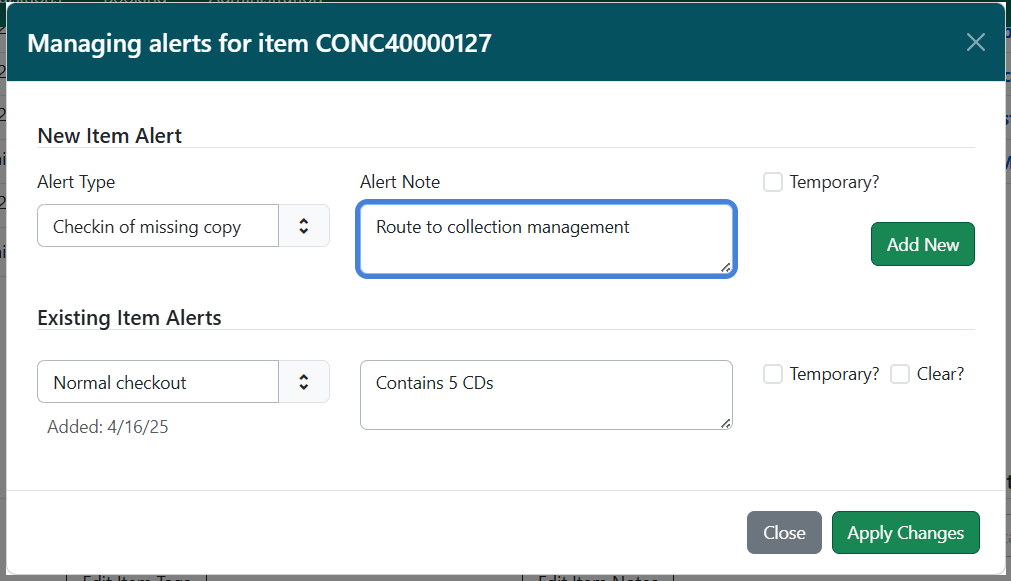
This will open a modal labeled “Managing alerts for item <barcode>”.
-
Select an Alert Type and enter an additional alert message if needed in the Alert Note field.
-
Select the box next to Temporary? if this alert should not appear after the initial alert is acknowledged.
-
Leaving the Temporary? box unchecked will create a persistent alert that will appear each time the action to trigger the alert occurs, such as check in or check out.
-
-
Select Apply Changes to save the new Item Alert.
-
If you accessed the modal directly from the Holdings View tab, Item Status, or Check In / Check Out interfaces, this will save your changes.
-
To close without saving, select Close.
-
-
After an Item Alert has been added, selecting the Edit Item Alerts button in the Holdings Editor will allow you to add another item alert and to view and/or edit existing item alerts.
-
Proceed with the rest of your edits to the item, and then select either Apply All & Save or Apply All, Save & Exit to finish your edits.
To add a Item Alert from the Check In, Check Out, Capture Holds, or Renewal screens:
-
Navigate to the appropriate screen, for example to Circulation →Check In.
-
Scan in the item barcode.
-
Select the item row and go to Actions → Add Item Alerts or right click on the item row and select Add Item Alerts.
-
This will open a new tab with a modal labeled “Managing alerts for item <barcode>”.
-
Follow the instructions above, starting with step 4.
-
After an Item Alert has been added, selecting the Manage Item Alerts action will allow you to add another item alert and to view and/or edit existing item alerts.
To add a Item Alert from the Item Status list view:
-
From the Item Status list view, scan in the item barcode.
-
Select the item row and go to Actions → Add Item Alerts or right click on the item row and select Add Item Alerts.
-
This will open a new tab with a modal labeled “Managing alerts for item <barcode>”.
-
Follow the instructions above, starting on step 4.
-
After an Item Alert has been added, selecting the Manage Item Alerts action will allow you to add another item alert and to view and/or edit existing item alerts.
Alternatively, you can add or manage alerts from the detail view in Item Status.
-
Select the Detail View button in the top-right of the Item Status screen.
-
In the bottom-left corner of this view are two buttons for Add and Manage Alerts.
-
Select Add Item Alerts.
-
This will open a new tab with a modal labeled “Managing alerts for item <barcode>”.
-
Follow the instructions above, starting on step 4.
-
After an Item Alert has been added, selecting the Manage button will allow you to add another item alert and to view and/or edit existing item alerts.
Removing an Item Alert
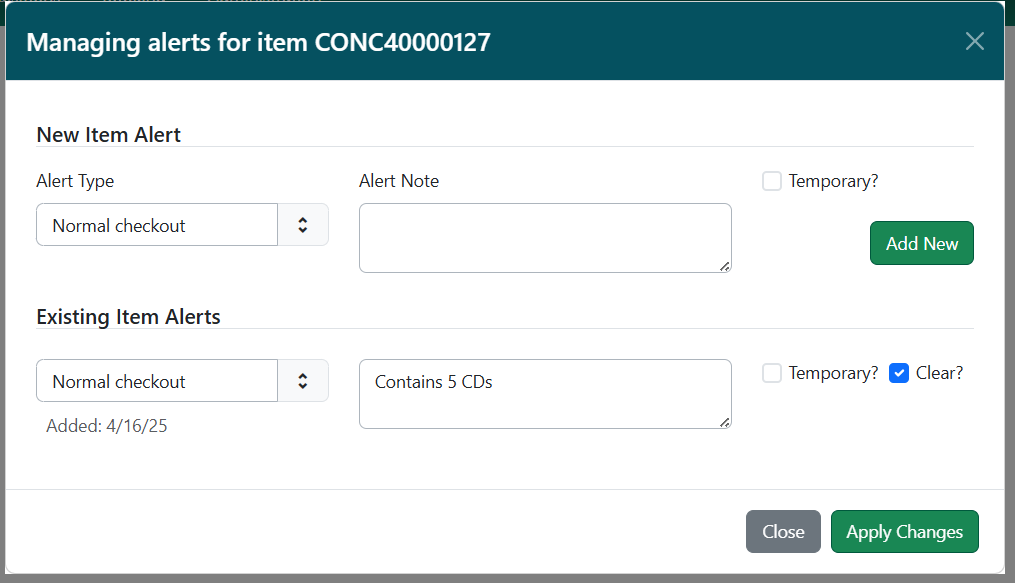
Navigate to the Manage Item Alerts modal via one of the routes described above. Under Existing Item Alerts, select the checkbox next to Clear? for the alert(s) you want to remove. Select Apply Changes to save your changes; or select Close to close without saving.
Adding and Managing Item Alerts in Batch
Item alerts can be added to multiple items in batch via the Holdings Editor, directly from the Holdings View tab, from the Item Status interface, or from circulation interfaces such as Check In, Check Out, Capture Holds, and Renew.
To add item alerts in batch via the Holdings Editor, open a set of items in the Holdings Editor. You can do this from the Item Status interface or from the bibliographic record in the Holdings View tab.
-
At whichever entry point, select your set of items and then click Actions → Edit Items.
-
If you are in the Holdings View tab, you can also select Actions → Add / Manage Item Notes. This will open the tags modal, and you can proceed to step 3.
-
If you are in a circulation interface, or Item Status list view, you can select Actions → Add Item Alerts or Actions → Manage Item Alerts. This will open the tags modal in a new tab, and you can proceed to step 3.
-
-
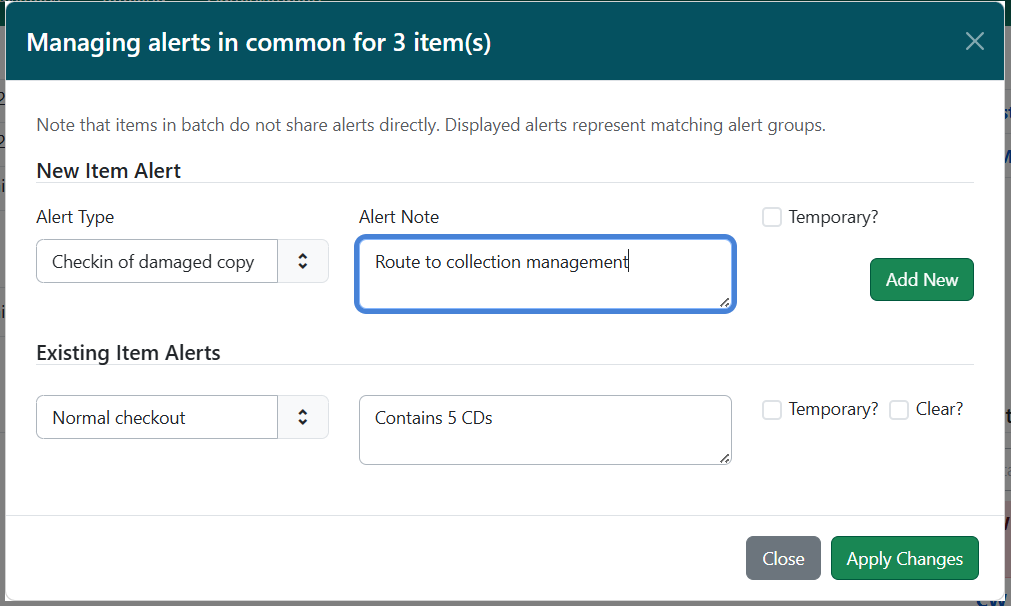
In the Holdings Editor, select Edit Item Alerts. This will open a modal named Managing alerts in common for <number> item(s).
IMPORTANT: This modal will only show existing alert types that are commonly held among all selected items. Items do note share alerts directly.
-
Select an Alert Type and enter an additional alert message if needed in the Alert Note field.
-
Select the box next to Temporary? if this alert should not appear after the initial alert is acknowledged.
-
Leaving the Temporary? box unchecked will create a persistent alert that will appear each time the action to trigger the alert occurs, such as check in or check out.
-
-
Select Apply Changes to save the new Item Alert.
-
If you accessed the modal directly from the holdings view tab, Item Status, or check in / check out interfaces, this will save your changes.
-
To close without saving, select Close.
-
-
After an Item Alert has been added, selecting the Item Alerts button in the Holdings Editor will allow you to add another item alert and to view and/or edit existing item alerts.
-
Proceed with the rest of your edits to the item, and then select either Apply All & Save or Apply All, Save & Exit to finish your edits.