Managing patron purchase requests
Introduction
Patron Requests can be used to track purchase suggestions from patrons in Evergreen. This feature allows purchase requests to be placed on selection lists to integrate with the Acquisitions module. Patron Requests can be accessed through the Acquisitions module under Acquisitions → Patron Requests and through patron accounts under Other → Acquisition Patron Requests. Requests can be placed and managed through both interfaces.
Place a Patron Request
-
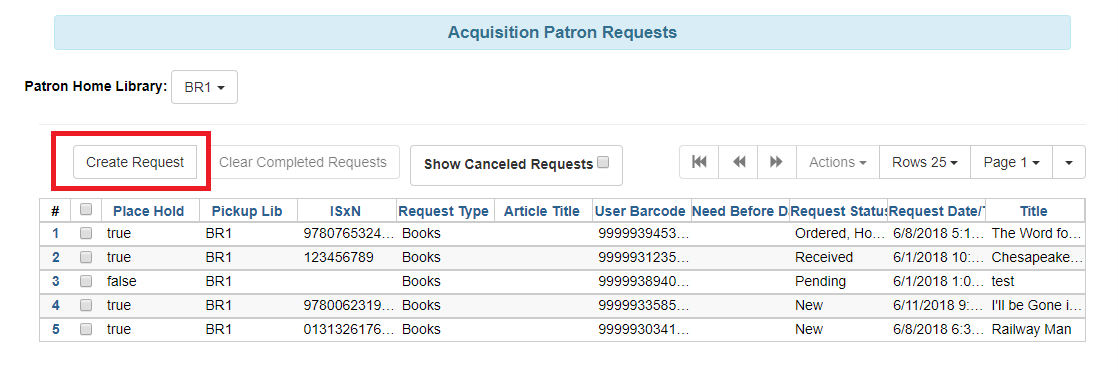
Go to Acquisitions → Patron Requests. This interface is scoped by Patron Home Library and will default to the library your workstation is registered to.
-
Requests can also be placed directly through a patron account, in which case the interface will scope to the patron ID.
-
-
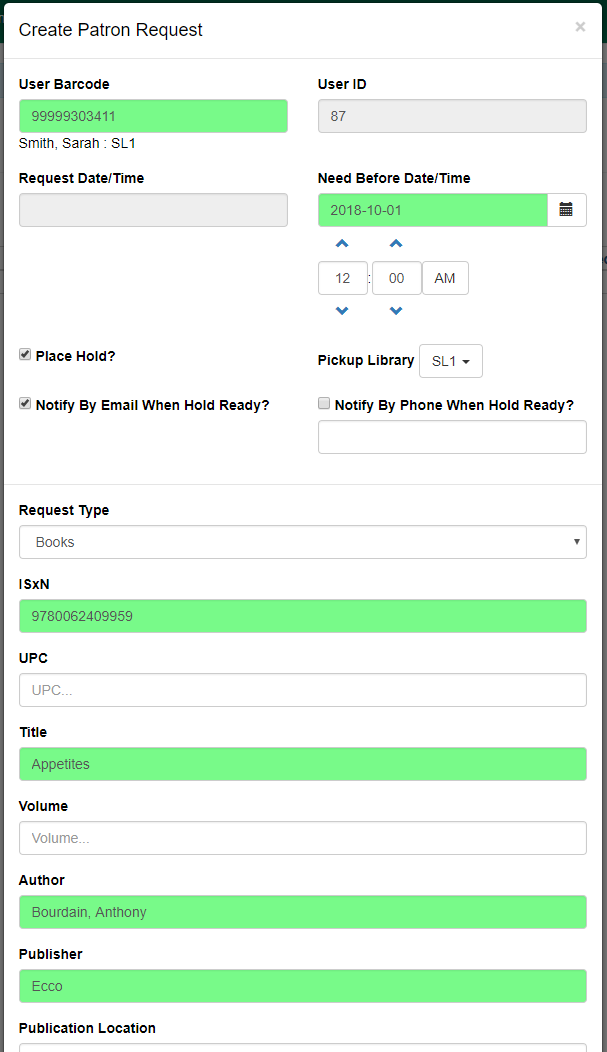
Click Create Request and a modal with the patron request form will appear.
-
Create the request by filling out the following information:
-
User Barcode (required): enter the barcode of the user that is placing the request
-
User ID: this field will populate automatically when the User Barcode is entered
-
Request Date/Time: this field will populate automatically
-
Need Before Date/Time: if applicable, set the date and time after which the patron is no longer interested in receiving this title
-
Place Hold?: check this box to place a hold on this title for this patron. Holds are placed when the bib and item record are created in the catalog as part of the acquisitions process.
-
Pickup Library: pickup library for the hold. This field will default to the patron’s home library is the pickup library is not selected in the patron account.
-
Notify by Email When Hold is Ready and Notify by Phone When Hold is Ready: preferences set in patron account will be used or can be set manually here.
-
Request Type (required): type of material requested
-
ISxN
-
UPC
-
Title
-
Volume
-
Author
-
Publisher
-
Publication Location
-
Publication Date
-
Article Title: option available if Request Type is “Articles”
-
Article Pages: option available if Request Type is “Articles”
-
Mentioned In
-
Other Info
-
-
Click Save at the bottom of the form.
Actions for Requests
After placing a Patron Request, a variety of actions can be taken by selecting the request, or right-clicking, and selecting Actions within either Acquisitions → Patron Requests or through the patron account under Other → Acquisition Patron Requests:
-
Edit Request - make changes to the request via the original request form. Edits can be made when the status of a request is New.
-
View Request - view a read-only version of the request form
-
Retrieve Patron - retrieve the account of the patron who placed the request
-
Add Request to Selection List - add the request to a new or existing Selection List in the Acquisitions module. The bibliographic information in the request will generate the MARC order record. From the selection list, the request will be processed through the acquisitions module and the status of the request itself will be updated accordingly.
-
View Selection List - view the Selection List a request has been added to (this option will be active only if the request is on a selection list)
-
Set Hold on Requests - allows you to indicate that a hold should be placed on the requested title, without needing to go in and edit the request. You can set a hold as long as the status of the request is New or Pending.
-
Set No Hold on Requests - allows you to indicate that a hold should not be placed on the requested title, without needing to go in and edit the request individually.
-
Cancel Requests - cancel the request and select a cancellation reason
Administration
Request Status
Patron Requests will use the following statuses:
-
New - This is the initial state for a newly created acquisition request. This is the only state from which a request is editable.
-
Pending - This is the state after a request is added to a selection list.
-
Ordered, Hold Not Placed - This is the state when an associated purchase order has been created and the request’s Place Hold flag is false.
-
Ordered, Hold Placed - This is the state when the request’s Place Hold flag is true, an associated purchase order has been created, and the bibliographic record and item for the request have been created in the catalog as part of the acquisitions process..
-
Received - This is the state when the line item on the linked purchase order has been marked as received.
-
Fulfilled - This is the state when an associated hold request has been fulfilled.
-
Canceled - This is the state when the acquisition request has been canceled.
Notifications/Action Triggers
The following email notifications are included with Evergreen, but are disabled by default. The notices can be enabled through the Notifications/Action Triggers interface under Administration → Local Administration. The existing notices could also be modified to place a message in the Patron Message Center. Any enabled notifications related to holds placed on requests will also be sent to patrons.
-
Email Notice: Acquisition Request created
-
Email Notice: Acquisition Request Rejected
-
Email Notice: Patron Acquisition Request marked On-Order
-
Email Notice: Patron Acquisition Request marked Cancelled
-
Email Notice: Patron Acquisition Request marked Received
Permissions
This feature includes one new permission and makes use of several existing permissions. The following permissions are required to manage patron requests:
-
CLEAR_PURCHASE_REQUEST
-
A new permission that allows users to clear completed requests
-
This permission has been added to the stock Acquisitions permission group
-
user_request.update will still be required with this sort of action
-
The stock permission mappings for the Acquisitions group will be changed to include this permission
-
-
CREATE_PICKLIST
-
Will allow the staff user to create a selection list.
-
-
VIEW_USER
-
Permission depth will apply to requests. If a user tries to view a patron request that is beyond the scope of their permissions, a permission denied message will appear with a prompt to log in with different credentials.
-
-
STAFF_LOGIN
-
user_request.create
-
user_request.view
-
user_request.update
-
This is checked when updating a request or canceling a request
-
-
user_request.delete
Placing purchase requests from a patron record
Patrons may wish to suggest titles for your Library to purchase. You can track these requests within Evergreen, whether or not you are using the acquisitions module for other purposes. This section describes how you can record these requests within a patron’s record.
-
Retrieve the patron’s record.
-
Select Other -→ Acquisition Patron Requests. This takes you to the Aquisition Patron Requests Screen. CTRL+click or scrollwheel click to open this in a new browser tab.
-
The Acquisition Patron Requests Screen will show any other requests that this patron has made. You may sort the requests by clicking on the column headers.
-
To show canceled requests, click the Show Canceled Requests checkbox.
-
To add the request, click the Create Request button.
You will need the CREATE_PURCHASE_REQUEST permission to add a request. -
The request type field is required. Every other field is optional, although it is recommended that you enter as much information about the request as possible.
-
The Pickup Library and User ID fields will be filled in automatically.
-
Request Date/Time and User Barcode will be automatically recorded when the request is saved.
-
Notify by Email When Hold is Ready and Notify by Phone When Hold is Ready will pull in preferences from the patron account if left blank, or can be set manually here.
-
You have the option to automatically place a hold for the patron if your library decides to purchase the item. If you’d like Evergreen to generate this hold, check the Place Hold box.
-
When you have finished entering information about the request, click the Save button.