Bibliographic Records (Record Details)
Each item in the catalog is linked to a bibliographic record. This record contains detailed information about the item. You can also perform a number of actions from a bibliographic record.
Access an item’s bibliographic record by finding the item in the Staff Catalog, then selecting the item’s title or cover image.
You may also access an item’s record by clicking its title any time it is hyperlinked, such as on a patron’s account or on the Item Status page.
There may be multiple records for a given title if the title has multiple editions, formats, or publishers in your catalog. Differences in cataloging practices between libraries could also result in multiple records for the same title.
|
Select Show Search Form in the top-right corner of a bibliographic record page to display the search form. If the search form is displayed, the button will say Hide Search Form. Select this button to hide the search form. The search form is filled by information in your URL. This information will still be present in the search form if you accessed the record from a search results page or by selecting a link that contained search information. 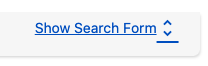
|
Record Summary
The top panel in a record is the Record Summary. This contains the following information:
-
Format: The type of item, such as book, DVD, or large print book. This appears above the cover image.
-
Cover Image: Image of the cover of the specific version of the item on this record. Note that clicking the cover image will open the image file in your browser.
-
Title: The title is a hyperlink. Selecting the title will direct you to the record with no other information in the URL. This is useful for sharing the record.
-
Author: The author’s name exactly as it appears in the MARC record.
-
Bibliographic Call Number: This is pulled from the MARC record, so it may different from any call number used in your library or consortium.
-
Edition
-
Publication Date
-
Record Owner
-
TCN: Title Control Number
-
Database ID
-
Created On Date
-
Created By User: The user’s Evergreen account is linked here.
-
Last Edited By User: The user’s Evergreen account is linked here.
-
Last Edited On Date

Select the caret (^) icon in the top-right corner of the Record Summary to collapse the record summary panel. Only the title, edition, TCN, and Created By user will be shown.
Select the icon again to expand the record summary panel.
Results Navigation
If you accessed the bibliographic record through a search, you can navigate to the records for other results from your search directly from this record. Use the buttons below the Record Summary to the left to navigate your search results.
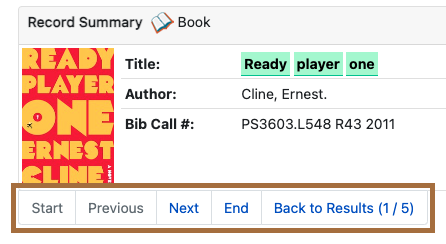
The following buttons are available:
-
Start: View the record for the first search result.
-
Previous: View the record for the search result before this one.
-
Next: View the record for the search result after this one.
-
End: View the record for the last search result.
-
Back to Results (# / #): Return to the search results page. The first number indicates the position of the current record in the search results. The second number indicates the total number of results.
| If there was only one search result, or if you access the record through any method besides a catalog search, the Results Navigation buttons may not be available. |
Record Actions
Action buttons are located below the Record Summary to the right.
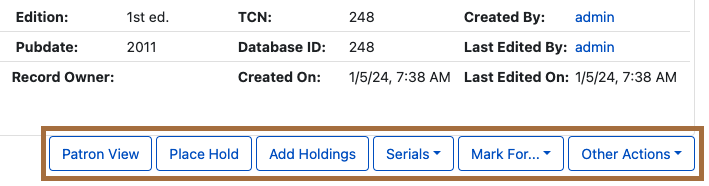
You can use the following actions:
-
Patron View: The record will open in the patron catalog (OPAC) in a new tab. You will not be logged in to Evergreen in this new tab. You must return to your staff tab to continue using staff features.
-
Place Hold: The Place Hold screen will appear in the current tab. You may place a title or part level hold. Select Return to return to the record.
-
Add Holdings: The Holdings Editor for the current record will open in a new tab. Users with the appropriate permissions can begin the process of adding a new holding (item).
-
Serials: A dropdown menu opens with the options Manage Serials and Manage MFHDs. Both options take you to the Serials page for the current record with the selected pane open.
-
Mark For…: A dropdown menu opens with the options Conjoined Items, Overlay Target, Title Hold Transfer, Holding Transfer, and Reset Record Marks. Cataloging primarily use these to complete a variety of cataloging tasks. Circulation staff may use the Title Hold Transfer option to transfer a hold to a different hold request while preserving the other hold details. Reset Record Marks removes all marks.
-
Other Actions: A dropdown menu opens with the following options:
-
Add To Bucket: The Add Item # to Bucket window opens. You may add the record to an existing, new, or shared record bucket.
-
Add To Carousel: The Add to Carousel window opens. You may add the record to an existing carousel or create a new carousel.
-
Upload Cover Image: The Upload Cover Image window opens. You may upload a cover image for the current record.
-
View/Place Orders: The Line Items Related to Bib Record page in the Acquisitions module opens in a new tab.
-
Record Views
The Record Views appear below Results Navigation and Record Actions buttons. The Item Table tab is selected by default.
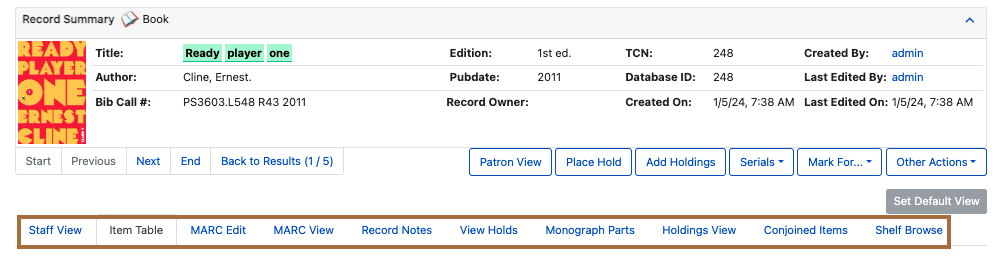
To change the tab that is selected by default, navigate to the tab of your choice, then select the Set Default View button located above the tabs to the right of the page.
Staff View
The Staff View tab contains information from the MARC record in a human-readable format. It includes title, author, edition, publisher, type of resource, physical description, ISBN, hold and copy counts, subjects, genre, and formats and editions information.
Selecting any of the hyperlinked information will run the appropriate search.
Item Table
The Item Table tab displays a table of all holdings related to the record. The table is organized alphabetically by library.
If a preferred library is not set for the workstation, only items in the library chosen in the Library Selector will be shown.
If a preferred library is set for the workstation, items in that library will appear in the list when available, but may not be at the top.
Some columns in this table contain links that will let you complete the indicated actions.
To change what information is displayed in the table, see more results, and select other options, see Grid Options.
| For a more detailed view of holdings with the ability to use actions, see Holdings View. |
MARC Edit
The MARC Edit tab allows users with appropriate permissions to modify fixed fields and tags in the MARC record.
This tab allows users to pick between the Enhanced MARC Editor and the Flat Text Editor.
Use the MARC View tab for a printer-friendly version of the MARC record.
MARC View
The MARC View tab shows a non-editable version of the MARC record.
You may print the MARC record from this tab by selecting the Print Page button located to the left of the page below the record views list.
This tab can give users quick access to basic information about a title, but the Staff View tab may be more useful.
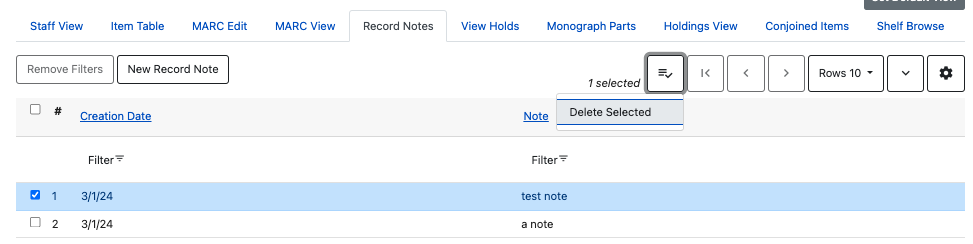
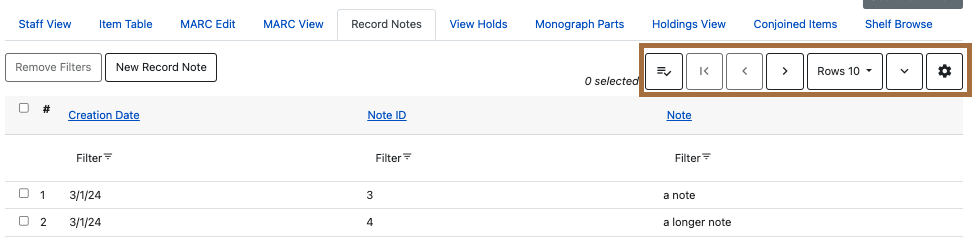
Record Notes
The Record Notes tab allows users with appropriate permissions to keep notes on a record. This may be useful when a record is under review.
Create a new note by selecting New Rcord Note below the record views list. The Record Editor: Bib Record Note window opens. Enter your note in the Note text box and select Save. All other information is generated automatically. Your note is added to the table.
Sort the list in ascending order by creation date or note contents by selecting Creation Date or Note. Sort the list in descening order by selecting the appropriate button again.
Filter the notes by creation date or note contents by selecting Filter below the Creation Date or Note column. A menu opens. Select an operator and criteria, then select Apply Filter. Select Close to close the filter menu.
To remove filters, select Remove Filters below the record views list.
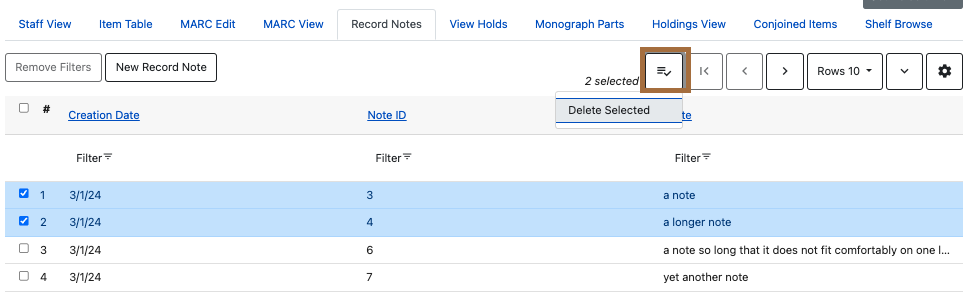
To delete a note:
-
Select a note from the list by checking the checkbox to the left of the note. You may select multiple notes, or select the checkbox at the top of the table to select all notes.
-
Select the Actions for Selected Rows button located below the record views list. It is the first button to the right of the New Record Note button.
-
Select Delete Selected. The selected note is deleted.
To change what information is displayed in the table, see more results, and select other options, see Grid Options.
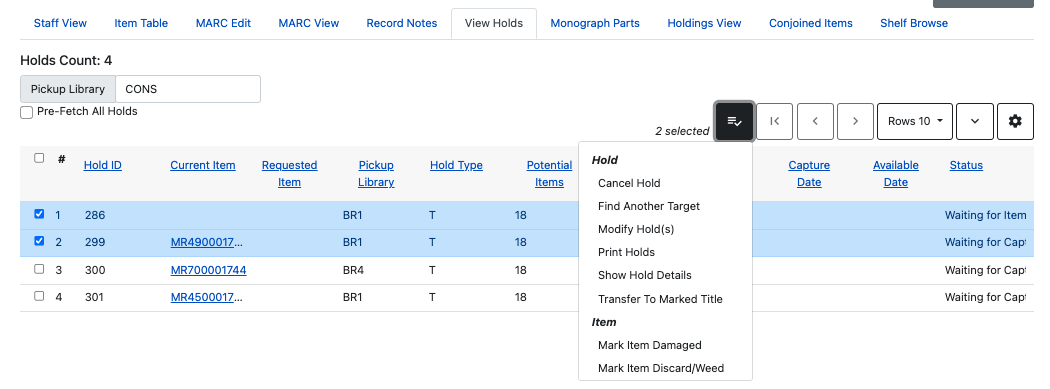
View Holds
The View Holds tab lists all holds on the record. The total number of holds on a record is displayed below the record views list to the left of the page.
Select a library from the Pickup Library menu to filter the holds by pickup library. By default, this is the library selected in the Library Selector.
To perform an action on a hold:
-
Select a hold by checking the checkbox to the left of the hold. You may select multipe holds, or select all holds in the list by checking the checkbox at the top of the table.
-
Select the Actions for Selected Rows button located below the record views list. It is the left-most button in the group of buttons to the right of the page.
-
Select an action from the list. Some common actions include Cancel Hold, Modify Hold, and Retrieve Patron.
Sort holds by any column heading in ascending order by clicking the column heading. Sort the holds in descending order by clicking the heading again.
To change what information is displayed in the table, see more results, and select other options, see Grid Options.
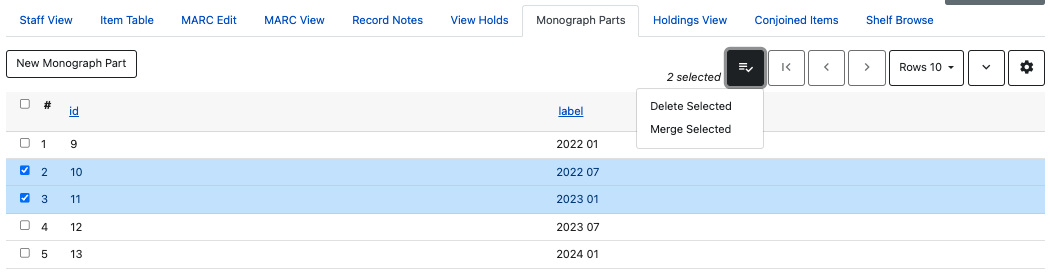
Monograph Parts
The Monograph Parts tab allows users with the appropriate permissions manage parts associated with a record.
To add a new part:
-
Select New Monograph Part below the record views list to the left of the screen. The Record Editor: Monograph Parts window opens.
-
Enter the label for the new part in the label text box.
-
Select Save. The ID is generated automatically and the part is added to the table.
To delete or merge parts:
-
Select a part by checking the checkbox to the left of the part. You may select multipe parts, or select all parts in the list by checking the checkbox at the top of the table.
-
Select the Actions for Selected Rows button located below the record views list. It is the first button to the right of the New Monograph Part button.
-
Select an option from the menu.
-
Delete Selected: The selected part is deleted.
-
Merge Selected: The Merge Monograph Parts window opens. Select a lead part by checking a checkbox. Select Merge. All selected parts are merged into the lead part.
-
Sort parts by any column heading in ascending order by clicking the column heading. Sort the parts in descending order by clicking the heading again.
To change what information is displayed in the table, see more results, and select other options, see Grid Options.
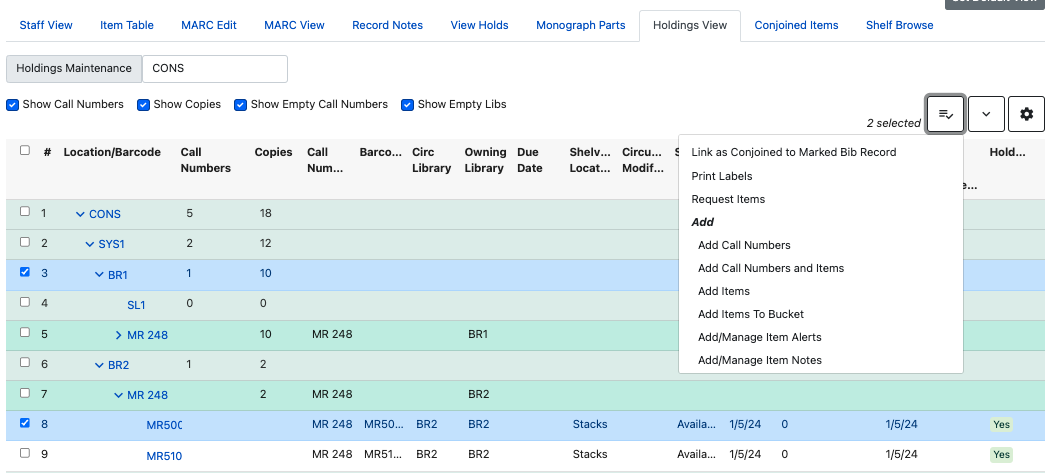
Holdings View
The Holdings View tab displays detailed item and call number information. It also allows users with appropriate permissions to perform actions on holdings.
To perform actions from the Holdings View:
-
Select the appropriate library in the Holdings Maintenance menu that appears below the record views list. The table will update to reflect your selection. The library chosen in the Library Selector will be chosen by default.
-
Check or uncheck the checkboxes below the Holdings Maintenance text box to match your preferences.
-
In the table, expand or collapse rows by selecting arrow in the Location/Barcode column.
-
Select items by checking the checkbox on the left side of the item’s row.
-
Select an action from the Actions for Selected Rows menu. This menu is the left-most button in the group of three butons to the right of the page above the table.
To change what information is displayed in the table, see more results, and select other options, see Grid Options.
Conjoined Items
The Conjoined Items view allows users with appropriate permissions to manage conjoined items from the bibliographic record.
To perform any actions, first select conjoined items from the table by checking the checkbox located on the left side of the row.
To change the type of the selected conjoined items:
-
Select the Change Type button located above the table to the left of the page. The Attach/Modify # Conjoined Item(s) window opens.
-
Selected a peer trype from the Peer Type dropdown menu.
-
Select Attach/Modify. A confirmation message appears at the bottom of the screen.
To unlink items:
-
Select the Actions for Selected Rows menu. This is the next button to the right of the Change Type button above the table.
-
Select Unlink. The selected items are unlinked.
Sort items by any column heading in ascending order by clicking the column heading. Sort the items in descending order by clicking the heading again.
To change what information is displayed in the table, see more results, and select other options, see Grid Options.
Grid Options
Many parts of Evergreen use tables, also called grids, to display information. All grids can be navigated and modified using the same buttons, even if the available buttons or options might change between grids.
To illustrate the various grid options, we will look at the Record Notes view on a bibliographic record because it shows all of the available grid options and features. All other grids will work similarly, even if not all features are used.
Most grid options can be access through the buttons located on top of the table to the right of the page.
Grid Actions
Some grids allow you to perform actions on items selected in the grid.
To perform actions, you must first select items in the grid. Select items by checking the checkbox on the left side of the item’s row. You may select all items on the current page of a grid by checking the checkbox at the top of the grid.
| Selecting the checkbox at the top of the grid will only select items on the current page. To select more items, you may navigate to other pages and make additional selections, or change the number of rows that appear on each page. See Navigating Grids. |
Then select the Actions for Selected Rows button and choose an action.
Navigating Grids
There are four buttons that help you see different results and navigate through the results.

Change the number of results that appear on a page by making a selection from the Rows dropdown menu. You may choose 5, 10, 25, 50, or 100. The grid updates automatically.
Advance to the next page of results by selecting the > (right caret) button.
Return to the previous page of results by selecting the < (left caret) button.
Return to the first page of results by selecting the |< button (pipe-left caret) button.
Grid View Options
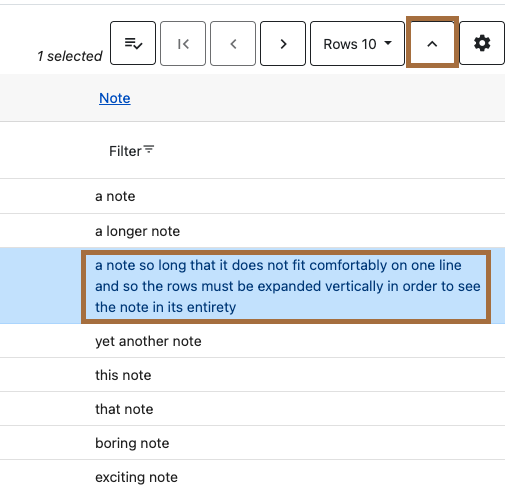
To expand rows vertically, select the downward caret. The button will change to a caret (^). Rows will expand to accommodate overflowing text.
To collapse rows vertically, select the caret (^). The button will change to a downward caret. Rows will collapse to a single line and overflowing text will be replaced with an ellipsis.
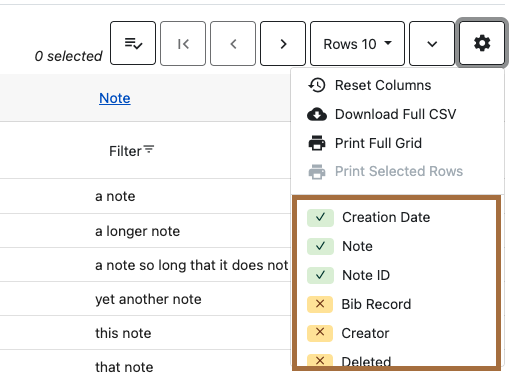
To access more grid options, select the gear button. A menu opens.
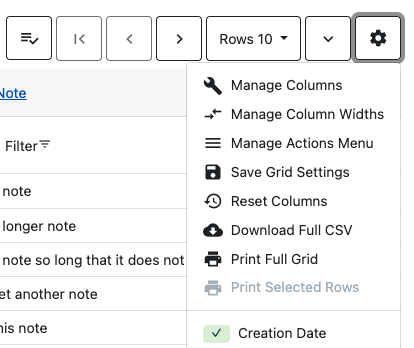
Manage Columns: The Grid Columns Configurations window opens. Changes are applied automatically.
-
Make columns visible or invisible by checking or unchecking boxes in the Visible column.
-
Change the order of columns be selecting buttons in the Move Up, Move Down, First Visible, and Last Visible columns. Top columns will appear to the left on the grid, and bottom column will appear to the right.
-
Select Move Visible Columns To Top to gather all columns marked Visible to the top of the window.
-
Select Close when you are finished.
Manage Column Widths: The Expand and Shrink options appear above the results in the table.
-
To make a column wider, select the arrow in the Expand row in the desired column.
-
To make a column narrower, select the arrow in the Shrink row in the desired column.
-
To hide the Expand and Shrink options, select the Manage Column Widths button again.
Manage Actions Menu: This will change the options that appear in the Actions for Selected Rows menu. The Grid Menu Configuration menu opens. Check or uncheck the checkbox in the Visible column to show or hide the menu item. Select Close when finished.
Save Grid Settings: Save all grid settings to the workstation. Other users of this workstation will have the same grid settings. Your grid settings will not appear if you log on to a different workstation.
Reset Columns: Resets the columns the the default settings. This does not affect your saved settings.
Download Full CSV: Downloads a comma separated values (CSV) file of all grid information. Only visible columns will be included. All rows, even if they are not shown on the current page, will be included.
Print Full Grid: Prepares a printer-friendly table containing all grid information. Only visible columns will be included. All rows, even if they are not visible on the current page, will be included.
Print Selected Rows: Prepares a printer-friendly table containing only selected rows. Only visible columns will be included.
Column Selections: All available columns are listed at the bottom of the menu. Visible columns have a green check next to them. Hidden columns have a yellow x next to them. To toggle the visibility of a column, select the column name in the menu. The menu closes and the change is applied.
Sorting
Some grids allow you to sort the grid by column. If this is possible, the column headings will be formatted as hyperlinks. That is, they will be blue and underlined.
To sort the grid by a given column in ascending order (0-9, a-z), select the column heading. An up arrow will appear in the selected column heading. The grid will be sorted automatically.
To sort the grid by a given column in descending order (z-a, 0-9), select the same column heading twice. A down arrow will appear in the selected column heading. The grid will be sorted automatically.
To remove your sorting selections, refresh the page. This may erase your other grid selections.
This grid is sorted in descending order by the column Note. Notice that entries beginning with letters appear first in z-a order, then entries beginning with numbers appear in 9-0 order.

Filters
If filters are available, a row will appear between the column headings and the grid contents with the word Filter and a filter symbol in each column.
To apply a filter:
-
Select Filter in the desired column. The filter menu opens.
-
Choose an operator. This will determine how your filter will be applied. Options will vary depending on the kind of data contained in the column.
-
Enter a filter criteria in the empty text box.
-
Select Apply Filter. The filter menu closes and the filter is apllied.
To close the Filter menu without applying the filter, select Close.
To clear a filter from a particular column, select Filter then select Clear Filter. The Filter menu closes and the filter is cleared.
To clear all filters, select Remove Filters above the table to the left.