Designing your catalog
- Configuring and customizing the public interface
- Locating the default template files
- Mapping templates to URLs
- How to override template files
- Configuring the custom templates directory in Apache’s eg.conf
- Adjusting colors for your public interface
- Adjusting fonts in your public interface
- Media file locations in the public interface
- Changing some text in the public interface
- Adding translations to PO file
- Adding and removing MARC fields from the record details display page
- Setting the default physical location for your library environment
- Setting a default language and adding optional languages
- Change Date Format in Patron Account View
- Including External Content in Your Public Interface
- Including Locally Hosted Content in Your Public Interface
- Styling the searchbar on the homepage
When people want to find things in your Evergreen system, they will check the catalog. In Evergreen, the catalog is made available through a web interface, called the OPAC (Online Public Access Catalog). In the latest versions of the Evergreen system, the OPAC is built on a set of programming modules called the Template Toolkit. You will see the OPAC sometimes referred to as the TPAC.
In this chapter, we’ll show you how to customize the OPAC, change it from its default configuration, and make it your own.
Configuring and customizing the public interface
The public interface is referred to as the TPAC or Template Toolkit (TT) within the Evergreen community. The template toolkit system allows you to customize the look and feel of your OPAC by editing the template pages (.tt2) files as well as the associated style sheets.
Locating the default template files
The default URL for the TPAC on a default Evergreen system is http://localhost/eg/opac/home (adjust localhost to match your hostname or IP address).
The default template file is installed in /openils/var/templates/opac.
You should generally avoid touching the installed default template files, unless you are contributing changes for Evergreen to adopt as a new default. Even then, while you are developing your changes, consider using template overrides rather than touching the installed templates until you are ready to commit the changes to a branch. See below for information on template overrides.
Mapping templates to URLs
The mapping for templates to URLs is straightforward. Following are a few examples, where <templates> is a placeholder for one or more directories that will be searched for a match:
-
http://localhost/eg/opac/home ⇒ /openils/var/<templates>/opac/home.tt2
-
http://localhost/eg/opac/advanced ⇒ /openils/var/<templates>/opac/advanced.tt2
-
http://localhost/eg/opac/results ⇒ /openils/var/<templates>/opac/results.tt2
The template files themselves can process, be wrapped by, or include other template files. For example, the home.tt2 template currently involves a number of other template files to generate a single HTML file.
Example Template Toolkit file: opac/home.tt2.
[%  PROCESS "opac/parts/header.tt2";
    WRAPPER "opac/parts/base.tt2";
    INCLUDE "opac/parts/topnav.tt2";
    ctx.page_title = l("Home") %]
    <div id="search-wrapper">
      [% INCLUDE "opac/parts/searchbar.tt2" %]
    </div>
    <div id="content-wrapper">
        <div id="main-content-home">
             <div class="common-full-pad"></div>
             [% INCLUDE "opac/parts/homesearch.tt2" %]
             <div class="common-full-pad"></div>
        </div>
     </div>
[% END %]
Note that file references are relative to the top of the template directory.
How to override template files
Overrides for template files or TPAC pages go in a directory that parallels the structure of the default templates directory. The overrides then get pulled in via the Apache configuration.
The following example demonstrates how to create a file that overrides the default "Advanced search page" (advanced.tt2) by adding a new templates_custom directory and editing the new file in that directory.
bash$ mkdir -p /openils/var/templates_custom/opac
bash$ cp /openils/var/templates/opac/advanced.tt2 \
         /openils/var/templates_custom/opac/.
bash$ vim /openils/var/templates_custom/opac/advanced.tt2
Configuring the custom templates directory in Apache’s eg.conf
You now need to teach Apache about the new custom template directory. Edit /etc/apache2/sites-available/eg.conf and add the following <Location /eg> element to each of the <VirtualHost> elements in which you want to include the overrides. The default Evergreen configuration includes a VirtualHost directive for port 80 (HTTP) and another one for port 443 (HTTPS); you probably want to edit both, unless you want the HTTP user experience to be different from the HTTPS user experience.
<VirtualHost *:80>
    # <snip>

    # - absorb the shared virtual host settings
    Include eg_vhost.conf
    <Location /eg>
        PerlAddVar OILSWebTemplatePath "/openils/var/templates_custom"
    </Location>

    # <snip>
</VirtualHost>
Finally, reload the Apache configuration to pick up the changes. You should now be able to see your change at http://localhost/eg/opac/advanced where localhost is the hostname of your Evergreen server.
Adjusting colors for your public interface
You may adjust the colors of your public interface by editing the colors.tt2 file. The location of this file is in /openils/var/templates/opac/parts/css/colors.tt2. When you customize the colors of your public interface, remember to create a custom file in your custom template folder and edit the custom file and not the file located in your default template.
Adjusting fonts in your public interface
Font sizes can be changed in the colors.tt2 file located in /openils/var/templates/opac/parts/css/. Again, create and edit a custom template version and not the file in the default template.
Other aspects of fonts such as the default font family can be adjusted in /openils/var/templates/opac/css/style.css.tt2.
Media file locations in the public interface
The media files (mostly PNG images) used by the default TPAC templates are stored in the repository in Open-ILS/web/images/ and installed in /openils/var/web/images/.
Changing some text in the public interface
Out of the box, TPAC includes a number of placeholder text and links. For example, there is a set of links cleverly named Link 1, Link 2, and so on in the header and footer of every page in TPAC. Here is how to customize that for a custom templates skin.
To begin with, find the page(s) that contain the text in question. The simplest way to do that is with the grep -s command. In the following example, search for files that contain the text "Link 1":
bash$ grep -r "Link 1" /openils/var/templates/opac
/openils/var/templates/opac/parts/topnav_links.tt2
4:            <a href="http://example.com">[% l('Link 1') %]</a>
Next, copy the file into our overrides directory and edit it with vim.
Copying the links file into the overrides directory.
bash$ cp /openils/var/templates/opac/parts/topnav_links.tt2 \
/openils/var/templates_custom/opac/parts/topnav_links.tt2
bash$ vim /openils/var/templates_custom/opac/parts/topnav_links.tt2
Finally, edit the link text in opac/parts/header.tt2. Content of the opac/parts/header.tt2 file.
<div id="gold-links-holder">
    <div id="gold-links">
        <div id="header-links">
            <a href="http://example.com">[% l('Link 1') %]</a>
            <a href="http://example.com">[% l('Link 2') %]</a>
            <a href="http://example.com">[% l('Link 3') %]</a>
            <a href="http://example.com">[% l('Link 4') %]</a>
            <a href="http://example.com">[% l('Link 5') %]</a>
        </div>
    </div>
</div>
For the most part, the page looks like regular HTML, but note the [%_(" ")%]
that surrounds the text of each link. The [% … %] signifies a TT block,
which can contain one or more TT processing instructions. l(" … "); is a
function that marks text for localization (translation); a separate process can
subsequently extract localized text as GNU gettext-formatted PO (Portable
Object) files.
As Evergreen supports multiple languages, any customization to Evergreen’s
default text must use the localization function. Also, note that the
localization function supports placeholders such as [_1], [_2] in the text;
these are replaced by the contents of variables passed as extra arguments to the
l() function.
Once the link and link text has been edited to your satisfaction, load the page in a Web browser and see the live changes immediately.
Adding translations to PO file
After you have added custom text in translatable form to a TT2 template, you need to add the custom strings and its translations to the PO file containing the translations. Evergreen PO files are stored in /openils/var/template/data/locale/
The PO file consists of pairs of the text extracted from the code: Message ID denoted as msgid and message string denoted as msgstr. When adding the custom string to PO file:
-
The line with English expressions must start with msgid. The English term must be enclosed in double apostrophes.
-
The line with translation start with /msgstr/. The translation to local language must be and enclosed in enclosed in double apostrophes.
-
It is recommended to add a note in which template and on which line the particular string is located. The lines with notes must be marked as comments i.e., start with number sign (#)
Example:
# ---------------------------------------------------------------------
# The lines below contains the custom strings manually added to the catalog
# ---------------------------------------------------------------------

#: ../../Open-ILS/src/custom_templates/opac/parts/topnav_links.tt2:1
msgid "Union Catalog of the Czech Republic"
msgstr "Souborný katalog České republiky"


#: ../../Open-ILS/src/custom_templates/opac/parts/topnav_links.tt2:1
msgid "Uniform Information Gateway "
msgstr "Jednotná informační brána"
|
It is good practice to save backup copy of the original PO file before changing it. |
After making changes, restart Apache to make the changes take effect. As root run the command:
service apache2 restart
Adding and removing MARC fields from the record details display page
It is possible to add and remove the MARC fields and subfields displayed in the record details page. In order to add MARC fields to be displayed on the details page of a record, you will need to map the MARC code to variables in the /openils/var/templates/opac/parts/misc_util.tt2 file.
For example, to map the template variable args.pubdates to the date of publication MARC field 260, subfield c, add these lines to misc_util.tt2:
args.pubdates = [];
FOR sub IN xml.findnodes('//*[@tag="260"]/*[@code="c"]');
    args.pubdates.push(sub.textContent);
END;
args.pubdate = (args.pubdates.size) ? args.pubdates.0 : ''
You will then need to edit the /openils/var/templates/opac/parts/record/summary.tt2 file in order to get the template variable for the MARC field to display.
For example, to display the date of publication code you created in the misc_util.tt2 file, add these lines:
[% IF attrs.pubdate; %]
    <span itemprop="datePublished">[% attrs.pubdate | html; %]</span>
[% END; %]
You can add any MARC field to your record details page. Moreover, this approach can also be used to display MARC fields in other pages, such as your results page.
Using bibliographic source variables
For bibliographic records, there is a "bib source" that can be associated with every record. This source and its ID are available as record attributes called bib_source.source and bib_source.id. These variables do not present themselves in the catalog display by default.
Setting the default physical location for your library environment
physical_loc is an Apache environment variable that sets the default physical location, used for setting search scopes and determining the order in which copies should be sorted. This variable is set in /etc/apache2/sites-available/eg.conf. The following example demonstrates the default physical location being set to library ID 104:
SetEnv physical_loc 104
Setting a default language and adding optional languages
OILSWebLocale adds support for a specific language. Add this variable to the Virtual Host section in /etc/apache2/eg_vhost.conf.
OILSWebDefaultLocale specifies which locale to display when a user lands on a page in TPAC and has not chosen a different locale from the TPAC locale picker. The following example shows the fr_ca locale being added to the locale picker and being set as the default locale:
PerlAddVar OILSWebLocale "fr_ca"
PerlAddVar OILSWebLocale "/openils/var/data/locale/opac/fr-CA.po"
PerlAddVar OILSWebDefaultLocale "fr-CA"
Below is a table of the currently supported languages packaged with Evergreen:
| Language | Code | PO file |
|---|---|---|
Arabic - Jordan |
ar_jo |
/openils/var/data/locale/opac/ar-JO.po |
Armenian |
hy_am |
/openils/var/data/locale/opac/hy-AM.po |
Czech |
cs_cz |
/openils/var/data/locale/opac/cs-CZ.po |
English - Canada |
en_ca |
/openils/var/data/locale/opac/en-CA.po |
English - Great Britain |
en_gb |
/openils/var/data/locale/opac/en-GB.po |
*English - United States |
en_us |
not applicable |
French - Canada |
fr_ca |
/openils/var/data/locale/opac/fr-CA.po |
Portuguese - Brazil |
pt_br |
/openils/var/data/locale/opac/pt-BR.po |
Spanish |
es_es |
/openils/var/data/locale/opac/es-ES.po |
*American English is built into Evergreen so you do not need to set up this language and there are no PO files.
Updating translations in Evergreen using current translations from Launchpad
Due to Evergreen release workflow/schedule, some language strings may already have been translated in Launchpad, but are not yet packaged with Evergreen. In such cases, it is possible to manually replace the PO file in Evergreen with an up-to-date PO file downloaded from Launchpad.
-
Visit the Evergreen translation site in Launchpad
-
Select required language (e.g. Czech or Spanish)
-
Open the tpac template and then select option Download translation. Note: to be able to download the translation file you need to be logged in to Launchpad.
-
Select PO format and submit the request for download button. You can also request for download of all existing templates and languages at once, see https://translations.launchpad.net/evergreen/master/+export. The download link will be sent You to email address provided.
-
Download the file and name it according to the language used (e.g., cs-CZ.po for Czech or es-ES.po for Spanish)
-
Copy the downloaded file to /openils/var/template/data/locale. It is a good practice to backup the original PO file before.
-
Be sure that the desired language is set as default, using the Default language procedures.
Analogously, to update the web staff client translations, download the translation template webstaff and copy it to openils/var/template/data/locale/staff.
Changes require web server reload to take effect. As root run the command
service apache2 restart
Change Date Format in Patron Account View
Libraries with same-day circulations may want their patrons to be able to view the due time as well as due date when they log in to their OPAC account. To accomplish this, go to opac/myopac/circs.tt2. Find the line that reads:
[% date.format(due_date, DATE_FORMAT) %]
Replace it with:
[% date.format(due_date, '%D %I:%M %p') %]
Including External Content in Your Public Interface
The public interface allows you to include external services and content in your public interface. These can include book cover images, user reviews, table of contents, summaries, author notes, annotations, user suggestions, series information among other services. Some of these services are free while others require a subscription.
The following are some of the external content services which you can configure in Evergreen.
OpenLibrary
The default install of Evergreen includes OpenLibrary book covers. The settings for this are controlled by the <added_content> section of /openils/conf/opensrf.xml. Here are the key elements of this configuration:
<module>OpenILS::WWW::AddedContent::OpenLibrary</module>
This section calls the OpenLibrary perl module. If you wish to link to a different book cover service other than OpenLibrary, you must refer to the location of the corresponding Perl module. You will also need to change other settings accordingly.
<timeout>1</timeout>
Max number of seconds to wait for an added content request to return data. Data not returned within the timeout is considered a failure.
<retry_timeout>600</retry_timeout>
This setting is the amount of time to wait before we try again.
<max_errors>15</max_errors>
Maximum number of consecutive lookup errors a given process can have before added content lookups are disabled for everyone. To adjust the site of the cover image on the record details page edit the config.tt2 file and change the value of the record.summary.jacket_size. The default value is "medium" and the available options are "small", "medium" and "large."
ChiliFresh
ChiliFresh is a subscription-based service which allows book covers, reviews and social interaction of patrons to appear in your catalog. To activate ChiliFresh, you will need to open the Apache configuration file /etc/apache2/eg_vhost.conf and edit several lines:
-
Uncomment (remove the "#" at the beginning of the line) and add your ChiliFresh account number:
#SetEnv OILS_CHILIFRESH_ACCOUNT
-
Uncomment this line and add your ChiliFresh Profile:
#SetEnv OILS_CHILIFRESH_PROFILE
Uncomment the line indicating the location of the Evergreen JavaScript for ChiliFresh:
#SetEnv OILS_CHILIFRESH_URL http://chilifresh.com/on-site /js/evergreen.js
-
Uncomment the line indicating the secure URL for the Evergreen JavaScript :
#SetEnv OILS_CHILIFRESH_HTTPS_URL https://secure.chilifresh.com/on-site/js/evergreen.js
Content Café
Content Café is a subscription-based service that can add jacket images, reviews, summaries, tables of contents and book details to your records.
In order to activate Content Café, edit the /openils/conf/opensrf.xml file and change the <module> element to point to the ContentCafe Perl Module:
<module>OpenILS::WWW::AddedContent::ContentCafe</module>
To adjust settings for Content Café, edit a couple of fields with the <ContentCafe> Section of /openils/conf/opensrf.xml.
Edit the userid and password elements to match the user id and password for your Content Café account.
This provider retrieves content based on ISBN or UPC, with a default preference for ISBNs. If you wish for UPCs to be preferred, or wish one of the two identifier types to not be considered at all, you can change the "identifier_order" option in opensrf.xml. When the option is present, only the identifier(s) listed will be sent.
Obalkyknih.cz
Setting up Obalkyknih.cz account
If your library wishes to use added content provided by Obalkyknih.cz, a service based in the Czech Republic, you have to create an Obalkyknih.cz account. Please note that the interface is only available in Czech. After logging in your Obalkyknih.cz account, you have to add your IP address and Evergreen server address to your account settings. (In case each library uses an address of its own, all of these addresses have to be added.)
Enabling Obalkyknih.cz in Evergreen
Set obalkyknih_cz.enabled to true in '/openils/var/templates/opac/parts/config.tt2':
obalkyknih_cz.enabled = 'true';Enable added content from Obalkyknih.cz in '/openils/conf/opensrf.xml' configuration file (and – at the same time – disable added content from Open Library, i.e., Evergreen’s default added content provider):
<!-- <module>OpenILS::WWW::AddedContent::OpenLibrary</module> -->
<module>OpenILS::WWW::AddedContent::ObalkyKnih</module>
Using default settings for Obalkyknih.cz means all types of added content from Obalkyknih.cz are visible in your online catalog. If the module is enabled, book covers are always displayed. Other types of added content (summaries, ratings or tables of contents) can be:
-
switched off using false option,
-
switched on again using true option.
The following types of added content are used:
-
summary (or annotation)
-
tocPDF (table of contents available as image)
-
tocText (table of contents available as text)
-
review (user reviews)
An example of how to switch off summaries:
<summary>false</summary>Google Analytics
Google Analytics is a free service to collect statistics for your Evergreen site. Statistic tracking is disabled by default through the Evergreen client software when library staff use your site within the client, but active when anyone uses the site without the client. This was a preventive measure to reduce the potential risks for leaking patron information. In order to use Google Analytics you will first need to set up the service from the Google Analytics website at http://www.google.com/analytics/. To activate Google Analytics you will need to edit config.tt2 in your template. To enable the service set the value of google_analytics.enabled to true and change the value of google_analytics.code to be the code in your Google Analytics account.
Matomo Analytics
Matomo Analytics (https://matomo.org/) is free software that you can host yourself, so that you can collect web site statistics without sharing your users' data with third parties. Statistic tracking is disabled by default through the Evergreen client software when library staff use your site within the client, but active when anyone uses the site without the client. This was a preventive measure to reduce the potential risks for leaking patron information. To use Matomo Analytics you need to:
-
Set up a hosted instance of Matomo
-
Add your Evergreen catalog as a site
-
Use the Library Settings Editor to add a Matomo URL and Site ID for your library.
Typically, Matomo will give you a block of javascript you can insert into web sites. One line will look like:
var u="http://mylibrary.lib/matomo/";
The full URL in the double quotes will be your URL. Another line will look like:
_paq.push(['setSiteId', '1']);
In this case the number 1 will be your site ID.
NoveList
Novelist is a subscription-based service providing reviews and recommendation for books in you catalog. To activate your Novelist service in Evergreen, open the Apache configuration file /etc/apache2/eg_vhost.conf and edit the line:
#SetEnv OILS_NOVELIST_URL
You should use the URL provided by NoveList.
RefWorks
RefWorks is a subscription-based online bibliographic management tool. If you have a RefWorks subscription, you can activate RefWorks in Evergreen by editing the config.tt2 file located in your template directory. You will need to set the ctx.refworks.enabled value to true. You may also set the RefWorks URL by changing the ctx.refworks.url setting on the same file.
SFX OpenURL Resolver
An OpenURL resolver allows you to find electronic resources and pull them into your catalog based on the ISBN or ISSN of the item. In order to use the SFX OpenURL resolver, you will need to subscribe to the Ex Libris SFX service. To activate the service in Evergreen edit the config.tt2 file in your template. Enable the resolver by changing the value of openurl.enabled to true and change the openurl.baseurl setting to point to the URL of your OpenURL resolver.
Syndetic Solutions
Syndetic Solutions is a subscription service providing book covers and other data for items in your catalog. In order to activate Syndetic, edit the /openils/conf/opensrf.xml file and change the <module> element to point to the Syndetic Perl Module:
<module>OpenILS::WWW::AddedContent::Syndetic</module>
You will also need to edit the <userid> element to be the user id provided to you by Syndetic.
Then, you will need to uncomment and edit the <base_url> element so that it points to the Syndetic service:
<base_url>http://syndetics.com/index.aspx</base_url>
For changes to be activated for your public interface you will need to restart Evergreen and Apache.
The Syndetic Solutions provider retrieves images based on the following identifiers found in bibliographic records:
-
ISBN
-
UPC
-
ISSN
Clear External/Added Content Cache
On the catalog’s record summary page, there is a link for staff that will forcibly clear the cache of the Added Content for that record. This is helpful for when the Added Content retrieved the wrong cover jacket art, summary, etc. and caches the wrong result.

Once clicked, there is a pop up that will display what was cleared from the cache.
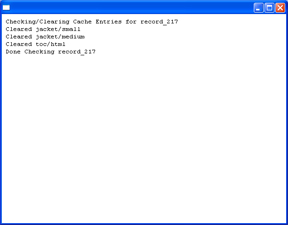
You will need to reload the record in the staff client to obtain the new images from your Added Content Supplier.
Including Locally Hosted Content in Your Public Interface
It is also possible to show added content that has been generated locally by placing the content in a specific spot on the web server. It is possible to have local book jackets, reviews, TOC, excerpts or annotations.
File Location and Format
By default the files will need to be placed in directories under /openils/var/web/opac/extras/ac/ on the server(s) that run Apache.
The files need to be in specific folders depending on the format of the added content. Local Content can only be looked up based on the record ID at this time.
http://catalog/opac/extras/ac/{type}/{format}/r/{recordid}
-
type is one of jacket, reviews, toc, excerpt or anotes.
-
format is type dependent:
-
for jacket, one of small, medium or large
-
others, one of html, xml or json … html is the default for non-image added content
-
-
recordid is the bibliographic record id (bre.id).
Example
If you have some equipment that you are circulating such as a laptop or eBook reader and you want to add an image of the equipment that will show up in the catalog.
|
If you are adding jacket art for a traditional type of media (book, CD, DVD) consider adding the jacket art to the http://openlibrary.org project instead of hosting it locally. This would allow other libraries to benefit from your work. |
Make note of the Record ID of the bib record. You can find this by looking at the URL of the bib in the catalog. http://catalog/eg/opac/record/123, 123 is the record ID. These images will only show up for one specific record.
Create 3 different sized versions of the image in png or jpg format.
-
Small - 80px x 80px - named 123-s.jpg or 123-s.png - This is displayed in the browse display.
-
Medium - 240px x 240px - named 123-m.jpg or 123-m.png - This is displayed on the summary page.
-
Large - 400px x 399px - named 123-l.jpg or 123-l.png - This is displayed if the summary page image is clicked on.
| The image dimensions are up to you, use what looks good in your catalog. |
Next, upload the images to the evergreen server(s) that run apache, and move/rename the files to the following locations/name. You will need to create directories that are missing.
-
Small - Move the file 123-s.jpg to /openils/var/web/opac/extras/ac/jacket/small/r/123
-
Medium - Move the file 123-m.jpg to /openils/var/web/opac/extras/ac/jacket/medium/r/123.
-
Large - Move the file 123-l.jpg to /openils/var/web/opac/extras/ac/jacket/large/r/123.
| The system doesn’t need the file extension to know what kind of file it is. |
Reload the bib record summary in the web catalog and your new image will display.
| As of version 3.9, staff with appropriate permissions can directly add images to a bibliographic record. These images are stored locally. For more information, see Cover Image Uploader. |
Styling the searchbar on the homepage
The .searchbar-home class is added to the div that
contains the searchbar when on the homepage. This allows
sites to customize the searchbar differently on the
homepage than in search results pages, and other places the
search bar appears. For example, adding the following CSS
would create a large, Google-style search bar on the homepage only:
.searchbar-home .search-box {
  width: 80%;
  height: 3em;
}

.searchbar-home #search_qtype_label,
.searchbar-home #search_itype_label,
.searchbar-home #search_locg_label {
  display:none;
}