Acquisitions Administration
Acquisitions Settings
Several setting in the Library Settings area of the Administration module pertain to functions in the Acquisitions module. You can access these settings by clicking Administration → Local Administration → Library Settings Editor.
-
CAT: Delete bib if all copies are deleted via Acquisitions lineitem cancellation - If you cancel a line item, then all of the on order copies in the catalog are deleted. If, when you cancel a line item, you also want to delete the bib record, then set this setting to TRUE.
-
Allow funds to be rolled over without bringing the money along - enables you to move a fund’s encumbrances from one year to the next without moving unspent money. Unused money is not added to the next year’s fund and is not available for use.
-
Allows patrons to create automatic holds from purchase requests.
-
Default circulation modifier - This modifier would be applied to items that are created in the acquisitions module
-
Default copy location - This copy location would be applied to items that are created in the acquisitions module
-
Fund Spending Limit for Block - When the amount remaining in the fund, including spent money and encumbrances, goes below this percentage, attempts to spend from the fund will be blocked.
-
Fund Spending Limit for Warning - When the amount remaining in the fund, including spent money and encumbrances, goes below this percentage, attempts to spend from the fund will result in a warning to the staff.
-
Rollover Distribution Formulae Funds - When set to true, during fiscal rollover, all distribution formulae will update to use new funds.
-
Set copy creator as receiver - When receiving a copy in acquisitions, set the copy "creator" to be the staff that received the copy
-
Temporary barcode prefix - Temporary barcode prefix for items that are created in the acquisitions module
-
Temporary call number prefix - Temporary call number prefix for items that are created in the acquisitions module
Cancel/Delay reasons
The Cancel reasons link enables you to predefine the reasons for which a line item or a PO can be cancelled. A default list of reasons appears, but you can add custom reasons to this list. Applying the cancel reason will prevent the item from appearing in a claims list and will allow you to cancel debits associated with the purchase. Cancel reasons also enable you to delay a purchase. For example, you could create a cancel reason of 'back ordered,' and you could choose to keep the debits associated with the purchase.
Create a cancel/delay reason
-
To add a new cancel reason, click Administration → Acquisitions Administration → Cancel reasons.
-
Click New Cancel Reason.
-
Select a using library from the drop-down menu. The using library indicates the organizational units whose staff can use this cancel reason. This menu is populated with the shortnames that you created for your libraries in the organizational units tree (See Administration → Server Administration → Organizational Units.)
-
Create a label for the cancel reason. This label will appear when you select a cancel reason on an item or a PO.
-
Create a description of the cancel reason. This is a free text field and can comprise any text of your choosing.
-
If you want to retain the debits associated with the cancelled purchase, click the box adjacent to Keep Debits→
-
Click Save.
Delete a custom cancel/delay reason
You can delete custom cancel reason.
-
Select the checkbox for the custom cancel reason that should be deleted.
-
Click the Delete Selected button.
| You cannot select the checkbox for any of the default cancel reasons because the system expects those reasons to be available to handle EDI order responses. |
Claiming
The Claiming interface enables you to create claim policies and specify the action(s) that users should take to claim items. Claim policies can be associated with a particular vendor or lineitems on a PO. When items are eligible for claiming, they will appear in Acquisitions → Claim Ready Items. Currently, all claiming is manual and users will need to take an action based on the claim policy.
Create a claim policy
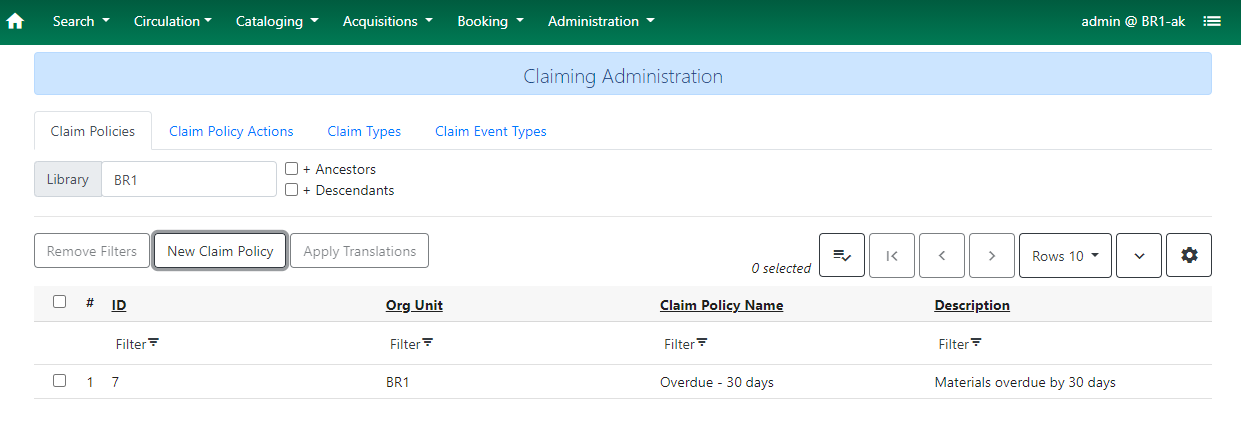
To create a claim policy, go to Administration → Acquisitions Administration>Claiming. The first tab in this interface is labeled Claim Policies. Claim Policies enables you to name the claim policy and specify the organization that owns it.
-
To create a claim policy, click New Claim Policy.
-
Enter a Claim Policy Name. No limits exist on the number of characters that can be entered in this field. Example: Overdue - 30 days or Brodart Shelf-ready
-
Enter a claim policy Description. No limits exist on the number of characters that can be entered in this field. Example: Materials overdue by 30 days.
-
Select an Org Unit from the drop-down menu. The org unit indicates the organizational units whose staff can use this claim policy. This menu is populated with the Short (Policy) Name codes that you created for your libraries in the organizational units tree (See Administration → Server Administration → Organizational Units).
[NOTE] The rule of parental inheritance applies to this list.
-
Click Save.
Create a claim type
The claim type link enables you to specify the reason for a type of claim.
-
To create a Claim Type, go to the Claim Types tab and click New Claim Type.
-
Enter a Code and a Description. No limits exist on the number of characters that can be entered in these fields. Example: Past due, Damaged, Wrong Item, etc.
-
Select an Org Unit from the drop-down menu. The org unit indicates the organizational units whose staff can use this claim type. This menu is populated with the Short (Policy) Name codes that you created for your libraries in the organizational units tree (See Administration → Server Administration → Organizational Units).
[NOTE] The rule of parental inheritance applies to this list.
-
Click Save.
Create a claim event type
The claim event type describes the physical action that should occur when an item needs to be claimed. For example, the user should notify the vendor via email that the library is claiming an item.
-
To create a Claim Event Type, go to the Claim Event Types tab and click New Claim Event Type.
-
Enter a Code for the claim event type. No limits exist on the number of characters that can be entered in this field. Example: Email, Phone call, etc.
-
Enter a Description. No limits exist on the number of characters that can be entered in this field.
-
If this claim is initiated by the user, then check the box adjacent to Library Initiated.
[NOTE] Currently, all claims are initiated by a user. The ILS cannot automatically claim an issue.
-
Select an Org Unit from the drop-down menu. The org unit indicates the organizational units whose staff can use this event type. This menu is populated with the Short (Policy) Name codes that you created for your libraries in the organizational units tree (See Administration → Server Administration → Organizational Units).
[NOTE] The rule of parental inheritance applies to this list.
-
Click Save.
Create a claim policy action
The Claim Policy Action enables you to specify how long a user should wait before claiming the item or how long Evergreen should wait until the item appears on the Claim Ready Items list.
-
To create a New Claim Policy Action, go to the Claim Policy Actions tab and click New Claim Policy Action.
-
Select an Action (Event Type) from the drop-down menu.
-
Enter an Action Interval. This field indicates how long a user should wait before claiming the item.
-
In the Claim Policy ID field, select a claim policy from the drop-down menu.
-
Click Save.
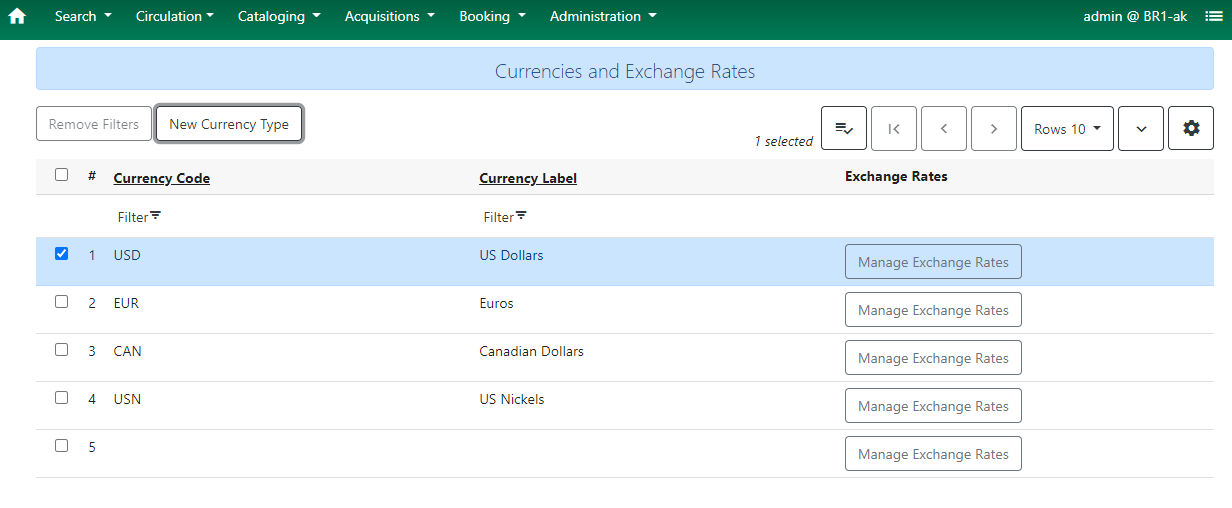
Currencies and Exchange Rates
Currency types can be created to represent the various currencies a library may use for purchasing and acquisitions. Currency types are applied to funds in the administrative module (Administration → Acquisitions Administration → Fund Administration → Funds). When a fund is applied to a copy or line item for purchase, the item will be purchased in the currency associated with that fund.
Create a currency type
-
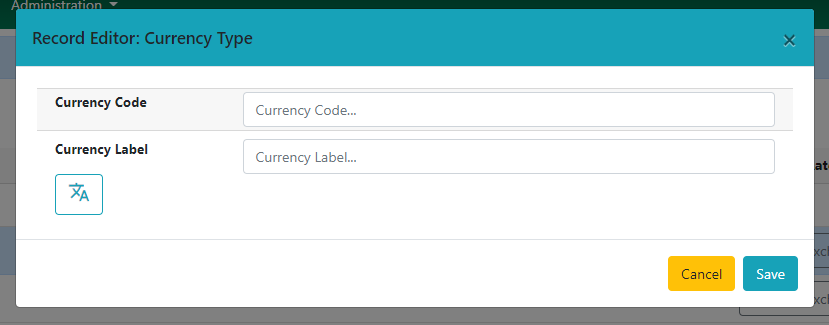
To create a new currency type, go to Administration → Acquisitions Administration → Currencies and Exchange Rates and click New Currency Type.
-
Enter the currency code. No limits exist on the number of characters that can be entered in this field.
-
Enter the name of the currency type in the Currency Label field. No limits exist on the number of characters that can be entered in this field.
-
Click Save.
Edit a currency type
-
To edit a currency label, right-click in the row that you want to edit. The row will turn blue.
-
Select the Edit Selected action. The pop-up box will appear, and you can edit the Currency Label field. Currency Code is not editable
-
After making changes, click Save.
| From the Currencies and Exchange Rates interface, you can delete currencies that have never been applied to funds or used to make purchases. Multiple delete is not available in this interface. |
Exchange Rates
Exchange rates define the rate of exchange between currencies. Evergreen will automatically calculate exchange rates for purchases.
Create an exchange rate
-
To create an exchange rate, click on the Manage Exchange Rates button associated with a specific Currency Type.
-
For that specific Currency Type, indicate the current exchange rate with the other configured currencies.
-
Click Save.
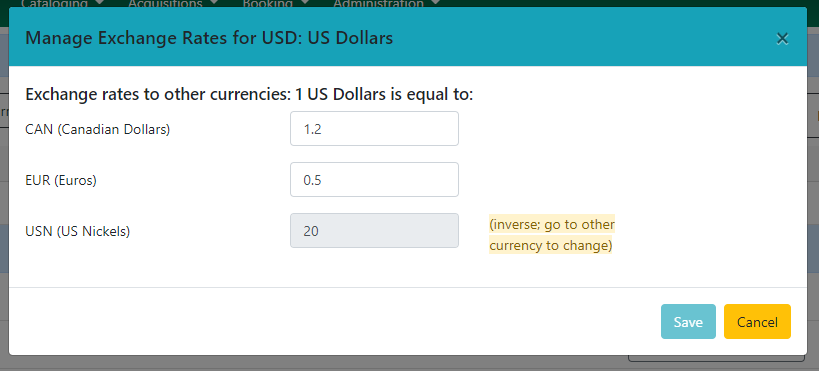
Evergreen assumes that the currency of the purchasing fund is identical to the currency of the provider, but it provides for two unique situations: . If the currency of the fund that is used for the purchase is different from the currency of the provider as listed in the provider profile, then Evergreen will use the exchange rate to calculate the price of the item in the currency of the fund and debit the fund accordingly. . When money is transferred between funds that use different currency types, Evergreen will automatically use the exchange rate to convert the money to the currency of the receiving fund.
Distribution Formulas
Distribution formulas allow you to specify the number of copies that should be distributed to specific branches. They can also serve as templates allowing you to predefine settings for your copies. You can create and reuse formulas as needed.
Create a distribution formula
-
Go to Administration → Acquisitions Administration → Distribution Formulas.
-
Click New Distribution Formula.
-
Enter a Formula Name. No limits exist on the number of characters that can be entered in this field.
-
Choose a Formula Owner from the drop-down menu. The Formula Owner indicates the organizational units whose staff can use this formula. TThe drop-down menu is controlled by permissions and you will see a list of org units that your user account has permission to create distribution formulas for. .
[NOTE] The rule of parental inheritance applies to this list.
-
Next, start building the distribution formula by entering the following information:
-
Owning Library: which library will receive the items. (required)
-
Item Count: indicate the number of items that should be added to the lineitem for the Owning Library. (required)
-
Optionally enter any of the following item details you want to predefine in the distribution formula:
-
Shelving Location: default shelving location for items when they are added to a purchase order. (optional, may be added in PO)
-
Fund: select the default purchasing fund. (optional, may be added in PO)
-
Circ Modifier: select the default circulation modifier. (optional, may be added in PO)
-
-
-
Click Add to add another row to the distribution formula. Add a row for each Owning Library that should be represented in the distribution formula.
-
Click Save when the distribution formula is complete.
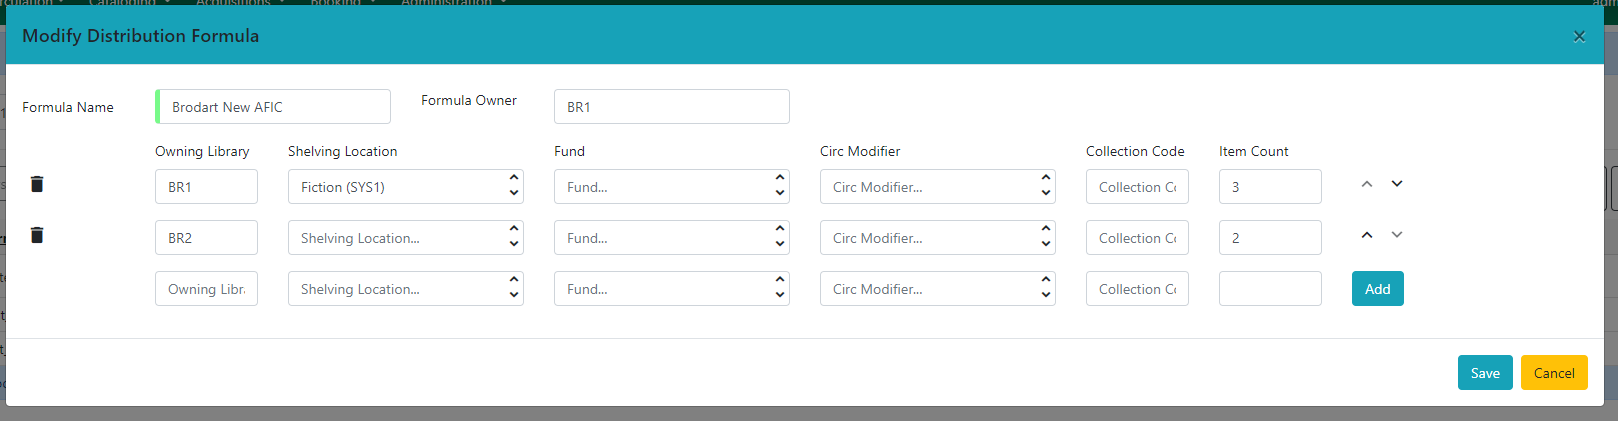
The Distribution Formula may now be applied to lineitems on a Purchase Order to streamline the ordering process.
To edit an existing Distribution Formula, double-click on the line of the formula you want to edit. Alternatively, you can right-click on the line and select Edit Selected. To delete a Distribution Formula, right-click on the line you wish to delete and select Delete Selected. Multiple-delete is not available for Distribution Formulas.
Please note that as part of the Angular Acquisitions work, the Skip Count field was removed since it is not actually used in the code.
Electronic Data Interchange
Many libraries use Electronic Data Interchange (EDI) accounts to send purchase orders and receive invoices from providers electronically. In Evergreen users can setup EDI accounts and manage EDI messages in the admin module. EDI messages and notes can be viewed in the acquisitions module. See also the command line system administration manual, which includes some initial setup steps that are required for use of EDI.
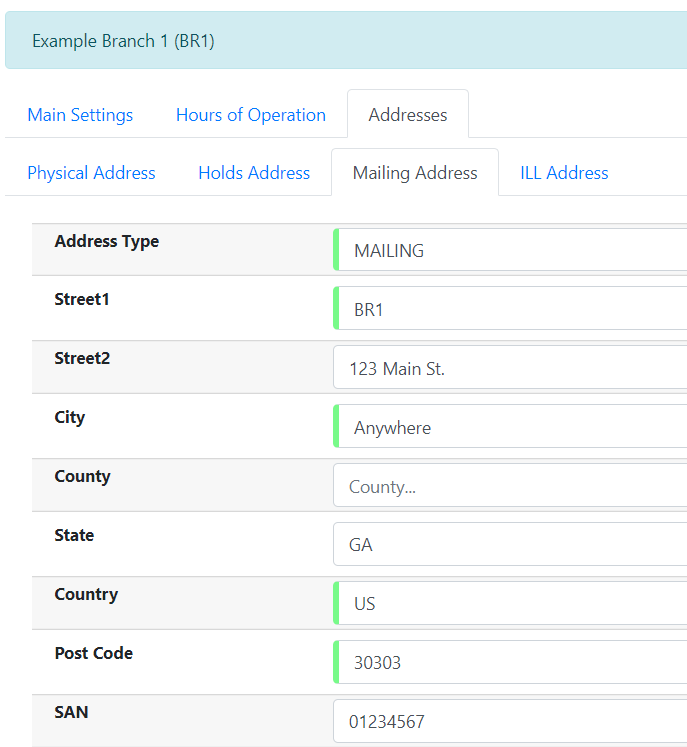
Entering SANs (Standard Address Numbers)
For EDI to work your library must have a SAN and each of your providers must each supply you with their SAN.
A SAN (Standard Address Number) is a unique 7 digit number that identifies your library.
Entering a Library’s SAN
These steps only need to be done once per library.
-
In Evergreen select Administration → Server Administration → Organizational Units
-
Find your library in the tree on the left side of the page and click on it to open the settings.
Multi-branch library systems will see an entry for each branch but should select their system’s top organization unit. -
Click on the Address tab.
-
Click on the Mailing Address tab.
-
Enter your library’s SAN in the field labeled SAN.
-
Click Save.
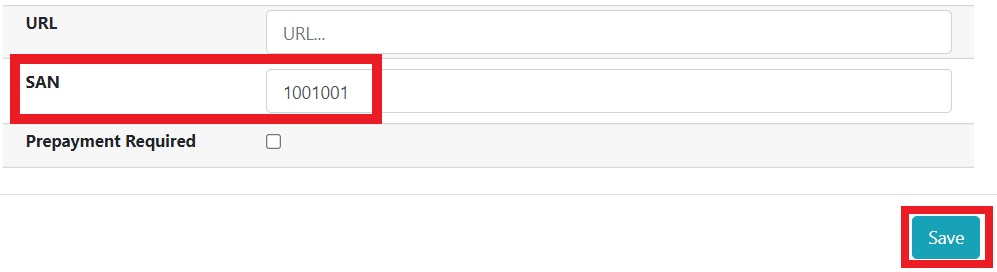
Entering a Provider’s SAN
These steps need to be repeated for every provider with which EDI is used.
-
In Evergreen select Administration → Acquisitions Administration → Providers.
-
Double click in the grid line of the provider you would like to edit.

-
Scroll down to see the field labeled SAN and enter your provider’s SAN.
-
Click Save.
Create an EDI Account
| You must create your provider before you create an EDI account for the provider. |
-
Contact your provider requesting the following information:
-
Host
-
Username
-
Password
-
Path
-
Incoming Directory
-
Provider’s SAN
-
Account, Account Number, and Assigned Code if your Provider uses that information.
-
-
In Evergreen select Administration → Acquisitions Administration → EDI Accounts.
-
Click New EDI Account. A pop-up will appear.
-
Fill in the following fields:
-
In the Label field, enter a name for the EDI account. This field is required.
-
In the Provider field, select the Provider code from the dropdown. This field is required.
-
In the Owner field, select the owning Organizational Unit from the dropdown. Multi-branch libraries should select their top level organizational unit.
-
In the Account field, enter information supplied by your provider.
-
In the Vendor Account Number field, enter information supplied by your provider.
-
In the Vendor Assigned Code field, enter information supplied by your provider.
-
The Last Activity updates automatically with any inbound or outbound communication.
-
In the Host field, enter the requisite FTP or SCP information supplied by your provider. Be sure to include the protocol (e.g.
ftp://ftp.vendorname.com) -
In the Username field, enter the username supplied by your provider.
-
In the Password field, enter the password supplied by your provider.
-
In the Path field, enter the path supplied by your provider. The path indicates a directory on the provider’s server where Evergreen will deposit its outgoing order files.
If your vendor requests a specific file extension for EDI purchase orders, such as .ord, enter the name of the directory, followed by a slash, followed by an asterisk, followed by a period, followed by the extension. For example, if the vendor requests that EDI purchase orders be sent to a directory calledinwith the file extension.ord, your path would bein/*.ord. -
In the Incoming Directory field, enter the incoming directory supplied by your provider. This indicates the directory on the vendor’s server where Evergreen will retrieve incoming order responses and invoices.
Don’t worry if your incoming directory is named outoroutgoing. From your vendor’s perspective, this directory is outgoing, because it contains files that the vendor is sending to Evergreen. However, from Evergreen’s perspective, these files are incoming. -
If your Provider requires the use of an Attributes set, check the box next to Use EDI Attributes and select the correct Attributes set from the EDI Attributes Set dropdown. image::media/new_edi_account_ang_2.png[Create EDI Account]
-
-
Click Save.
[NOTE] If there are multiple EDI Accounts for your Provider, you may want to set a EDI Default, which can be done from the Provider interface.
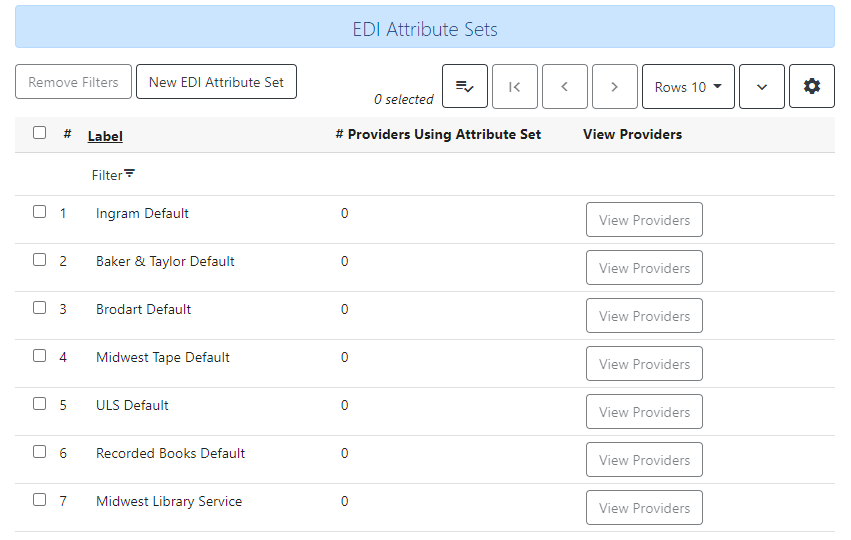
EDI Attribute Sets
EDI Attribute Sets define the information that is sent to a vendor in EDI messages. Evergreen currently has stock EDI Attribute Sets for use with several materials vendors:
-
Baker & Taylor Default
-
Brodart Default
-
Ingram Default
-
Midwest Library Service
-
Midwest Tape Default
-
Recorded Books Default
-
ULS Default
These stock EDI Attribute Sets can be modified depending on EDI configuration needs and customized EDI Attribute Sets can also be created.
EDI Attribute Sets are linked to EDI Accounts in Administration → Acquisitions Administration → EDI Accounts.
View or modify existing EDI Attribute Set configuration
To view or modify an existing EDI Attribute Set:
-
Select the EDI Attribute Set row and go to the Actions menu or right-click to view the Actions menu and select Edit Selected.
-
The EDI Attribute Set editor will appear.
-
The Attribute Set Label will display the name of the EDI Attribute Set you are editing.
-
A list of attributes and their descriptions display. If the box next to the attribute is checked, the attribute will be included in the EDI Attribute Set and the information will be sent to the vendor via EDI order message when an order is placed in Evergreen.
-
Add or remove attributes from the set using the checkboxes and click Save.
Create a new EDI Attribute Set
To create a new EDI Attribute Set:
-
Click New EDI Attribute Set.
-
Enter an Attribute Set Label to assign a name to the new attribute set. This may be the name of the vendor.
-
Check the box next to each attribute that you want to include in the EDI Attribute Set.
-
Click Save.
Clone an EDI Attribute Set
To clone an EDI Attribute Set:
-
Right click on the row of an Attribute Set.
-
Select Clone Selected.
-
Enter an Attribute Set Label to assign a new unique name to the cloned attribute set.
-
Check or uncheck boxes next to attributes to make changes to the Attribute Set.
-
Click Save.
EDI Messages
The EDI Messages screen displays all incoming and outgoing messages between the library and its providers. To see details of a particular EDI message, including the raw EDIFACT message, double click on a message entry. To find a specific EDI message, the Filter options can be useful. Outside the Admin interface, EDI messages that pertain to a specific purchase order can be viewed from the purchase order interface (See Acquisitions → Purchase Orders).
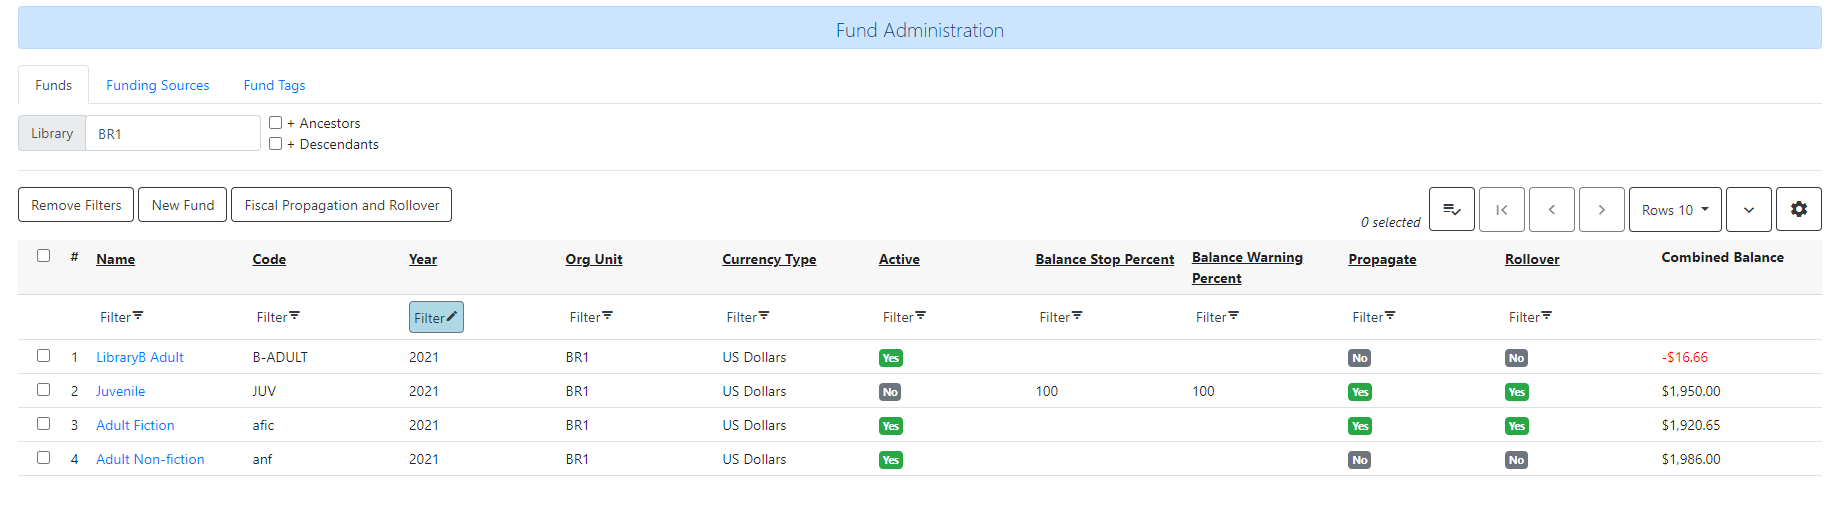
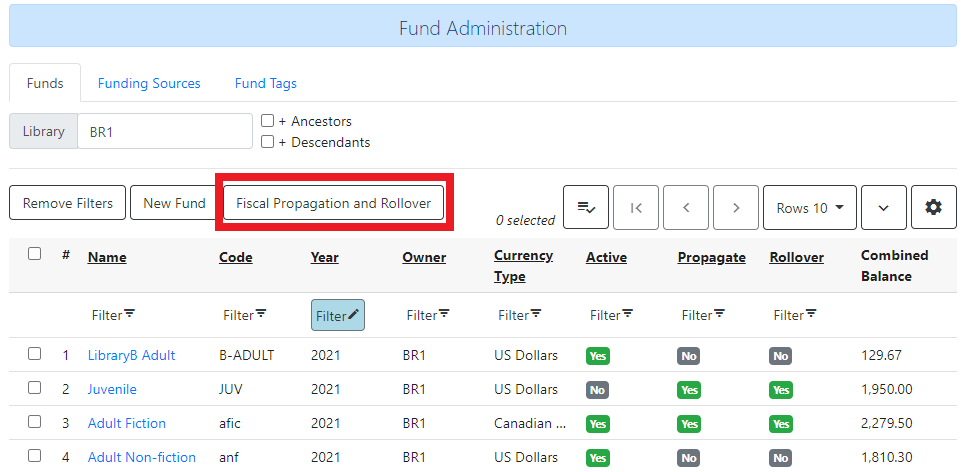
Fund Administration
Fund Administration provides a unified interface for configuring your funding sources, purchasing funds, and optional fund tags. To access Fund Administration, go to Administration → Acquisitions Administration → Fund Administration. This interface has three tabs: Funds, Funding Sources, and Fund Tags. Negative numbers in these interfaces are styled in red.
Funding Sources
Funding sources allow you to specify the sources that contribute monies to your fund(s). You can create as few or as many funding sources as you need. These can be used to track exact amounts for accounts in your general ledger. You can then use funds to track spending and purchases for specific collections.
Examples of funding sources are:
-
A municipal allocation for your materials budget;
-
A trust fund used for collections;
-
A revolving account that is used to replace lost materials;
-
Grant funds to be used for collections.
Create a funding source
To create a new funding source:
-
Go to Administration → Acquisitions Administration → Fund Administration.
-
Go to the Funding Sources tab and click on New Funding Source.
-
Enter a funding source Name. No limits exist on the number of characters that can be entered in this field.
-
Create a Code for the source. No limits exist on the number of characters that can be entered in this field.
-
Select a Currency from the drop-down menu. This menu is populated from the choices in the Currencies and Exchange Rates interface.
-
Select an Owner from the drop-down menu. The owner indicates the organizational unit(s) whose staff can use this funding source. This menu is populated with the Short (Policy) Name codes that you created for your libraries in the organizational units tree (See Administration → Server Administration → Organizational Units).
-
NOTE: The rule of parental inheritance applies to this list. For example, if a system is made the owner of a funding source, then users with appropriate permissions at the branches within the system could also use the funding source.
-
-
Click Save.
Allocate credits to funding sources
To apply a credit to a funding source:
-
Select the funding source row and go to the Actions menu or right-click to view the actions menu and click Apply Credit.
-
Enter the Amount of money that the funding source contributes to the organization.
-
Funding sources are not tied to fiscal or calendar years, so you can continue to add money to the same funding source over multiple years, e.g. County Funding. Alternatively, you can name funding sources by year, e.g. County Funding 2021 and County Funding 2022, and apply credits each year to the matching source.
-
-
Enter a Note. This field is optional.
-
Enter an Effective Date and a Deadline Date for the credit.
-
Click Save to apply the credit amount to the funding source.

Allocate credits to funds
If you have already set up your funds, you can allocate money from a funding source to a fund.
-
Select the funding source row and go to the Actions menu or right-click to view the actions menu and click Allocate to Fund.
-
Select the Fund the money should be allocated to. Only active Funds will display in the dropdown.
-
Enter the Amount you want to allocate.
-
Enter a Note. This field is optional.
-
Click Save.
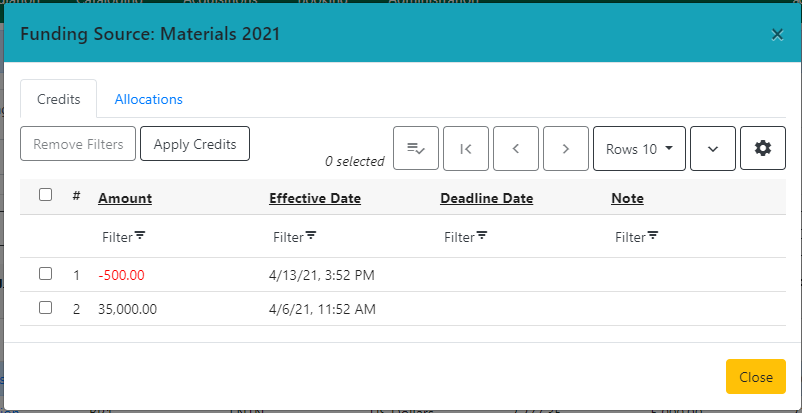
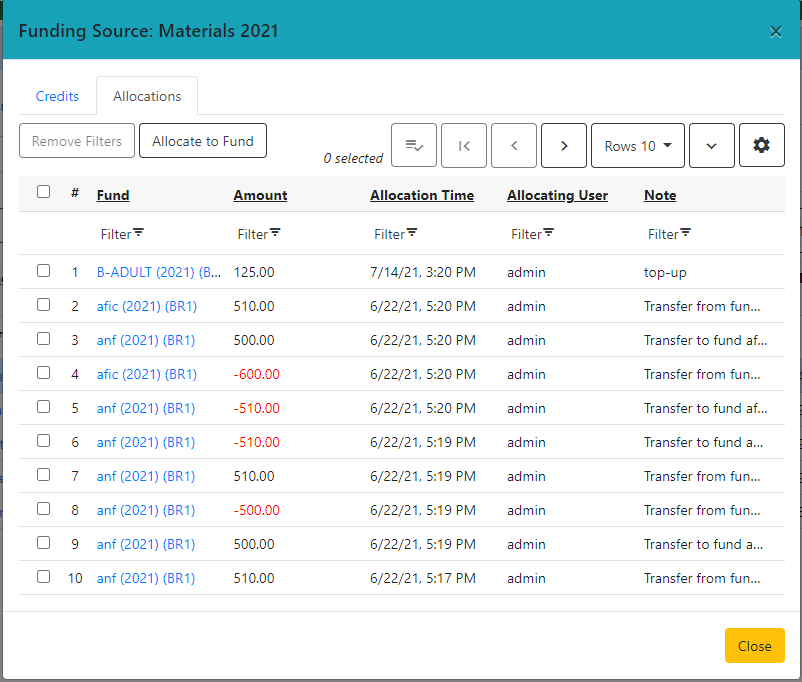
Track debits and credits
You can track credits to and allocations from each funding source. These amounts are updated when credits and allocations are made in the Funding Source Details.
To Access the Funding Source Details:
-
Select a funding source row and go to the Actions menu or right-click to view the actions menu and click View Allocations or View Credits.
-
Either option will bring you to the Funding Source Details screen where you can select the Credits tab or Allocations tab to view a list of transactions.
-
View Credits
-
View Allocations
-
Funds
Funds allow you to allocate credits toward specific purchases. They typically are used to track spending and purchases for specific collections. Some libraries may choose to define very broad funds for their collections (e.g. children’s materials, adult materials) while others may choose to define more specific funds (e.g. adult non-fiction DVDs for BR1).
If your library does not wish to track fund accounting, you can create one large generic fund and use that fund for all of your purchases.
In the funds interface, you can create funds; allocate credits from funding sources to funds; transfer money between funds; and apply fund tags to funds.
Funds are created for a specific year, either fiscal or calendar, and are owned by an org unit or library. At the top of the funds interface, you can set a contextual org unit or library to view the associated funds. Within the grid display of funds you can filter by year to view the funds for a specific year only.
The Funds tab will give you a general overview of the configuration and status of your funds.
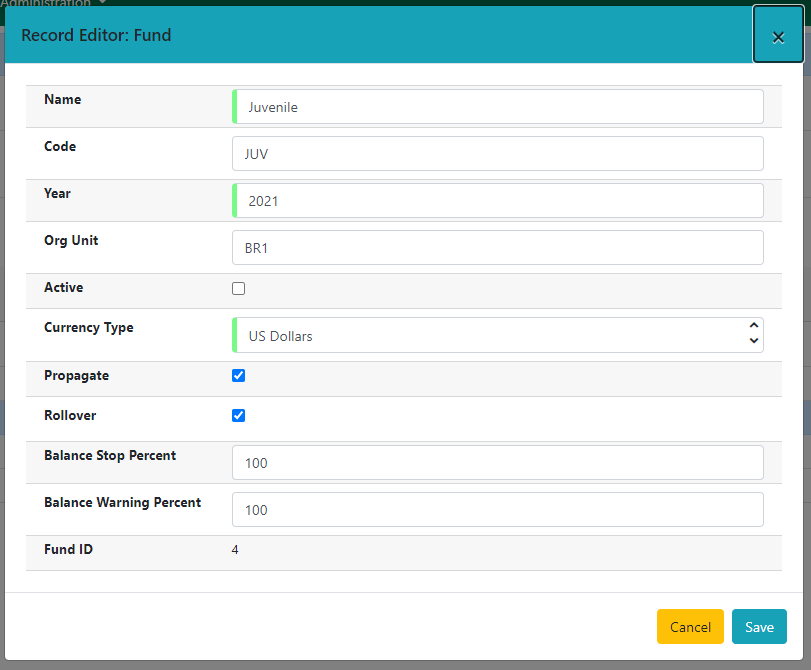
Create a fund
To create a new Fund:
-
Go to Administration → Acquisitions Administration → Fund Administration.
-
Go to the Funds tab and click the New Fund button.
-
Enter a Name for the fund. No limits exist on the number of charactersthat can be entered in this field.
-
Create a Code for the fund. No limits exist on the number of characters that can be entered in this field.
-
Enter a Year for the fund. This can be a fiscal year or a calendar year. The format of the year is YYYY. The year entry is restricted to a range of 10 years before through 10 years after the current year.
-
Select an Org Unit from the drop-down menu. The org unit indicates the organizational units whose staff can use this fund. This menu is populated with the Short (Policy) Name codes that you created for your libraries in the organizational units tree (See Administration → Server Administration → Organizational Units).
-
Check the Active box to make this an active fund. You cannot make purchases from this fund if it is not active.
-
Select a Currency Type from the drop-down menu. This menu consists of entries Currencies and Exchange Rates interface. When a fund is applied to a line item or copy, the price of the item will be encumbered in the currency associated with the fund.
-
Check the Propagate box if you want to propagate funds during fiscal year close out procedures.
-
When you propagate a fund, the ILS will create a new fund for the following fiscal year with the same parameters as your current fund. All of the settings transfer except for the year and the amount of money in the fund. Propagation occurs during the fiscal year close out operation.
-
-
Check the Rollover box if you want to roll over remaining funds into an equivalent fund during the next year.
-
You should also check this box if you only want to roll over encumbrances into next year’s fund. Rollover occurs during the fiscal year close out operation.
-
-
Enter a Balance Stop Percent.
-
The balance stop percent prevents you from making purchases when only a specified amount of the fund remains. For example, if you want to spend 95 percent of your funds, leaving a five percent balance in the fund, then you would enter 95 in the field. When the fund reaches its balance stop percent, it will appear in red when you apply funds to copies.
-
-
Enter a Balance Warning Percent.
-
The balance warning percent gives you a warning that the fund is low. You can specify any percent. For example, if you want to spend 90 percent of your funds and be warned when the fund has only 10 percent of its balance remaining, then enter 90 in the field. When the fund reaches its balance warning percent, it will appear in yellow when you apply funds to copies.
-
-
Click Save.
Track balances and expenditures
The Fund Details Summary tab allows you to track a fund’s balance, encumbrances, and amount spent. It also allows you to track allocations from the funding source(s), debits, and fund tags.
To access the fund details, click on the hyperlinked name of the fund that you created.
The Summary allows you to track the following: * Combined Balance - The balance is calculated by subtracting both items that have been invoiced and encumbrances from the total allocated to the fund. * Allocation Total - This amount is the total amount allocated from the Funding Source. * Spent Balance - This balance is calculated by subtracting only the items that have been invoiced from the total allocated to the fund. It does not include encumbrances. * Debit Total - The total debits are calculated by adding the cost of items that have been invoiced and encumbrances. * Spent Total - The total spent is calculated by adding the cost of items that have been invoiced. It does not include encumbrances. *Encumbrance Total - The total encumbered is calculated by adding all encumbrances.
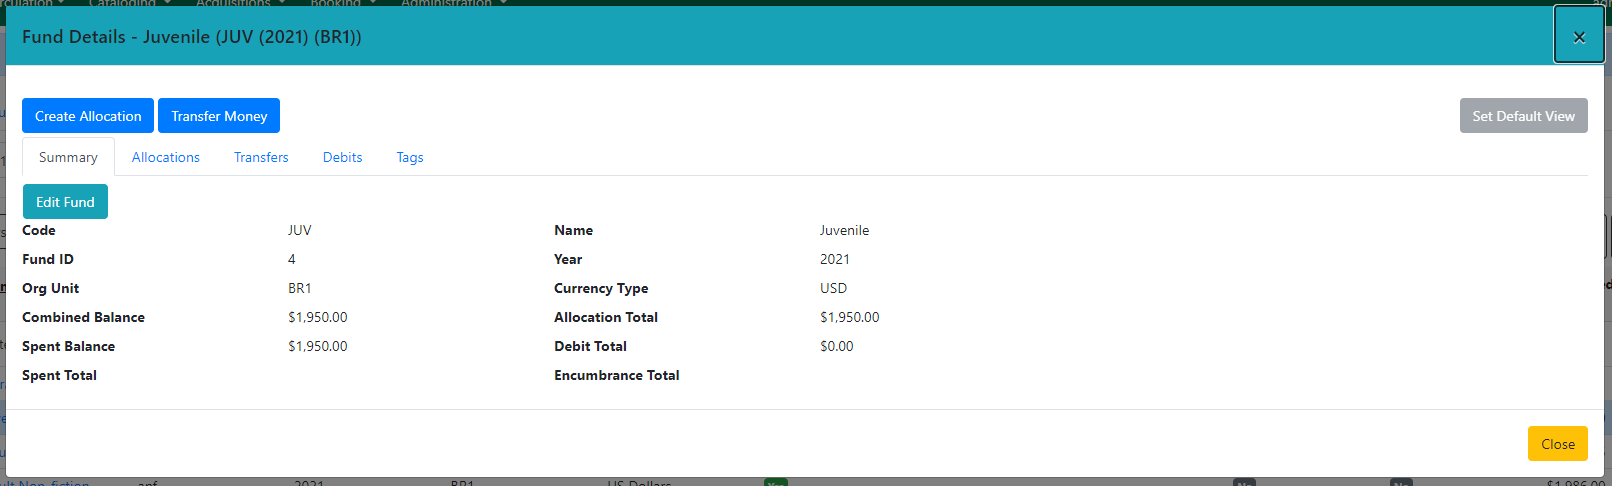
From this interface, you can also Transfer Money between Funds and Create an Allocation to a Fund from a Funding Source.
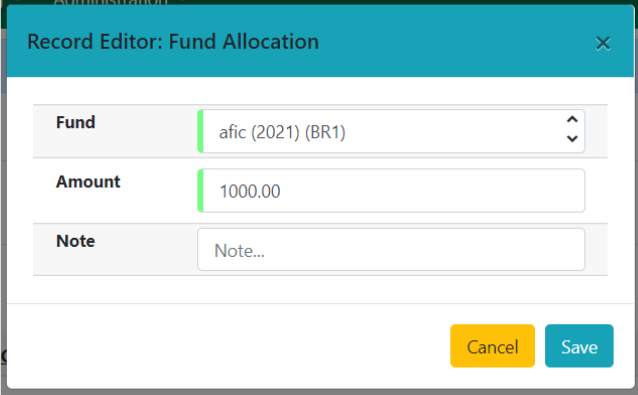
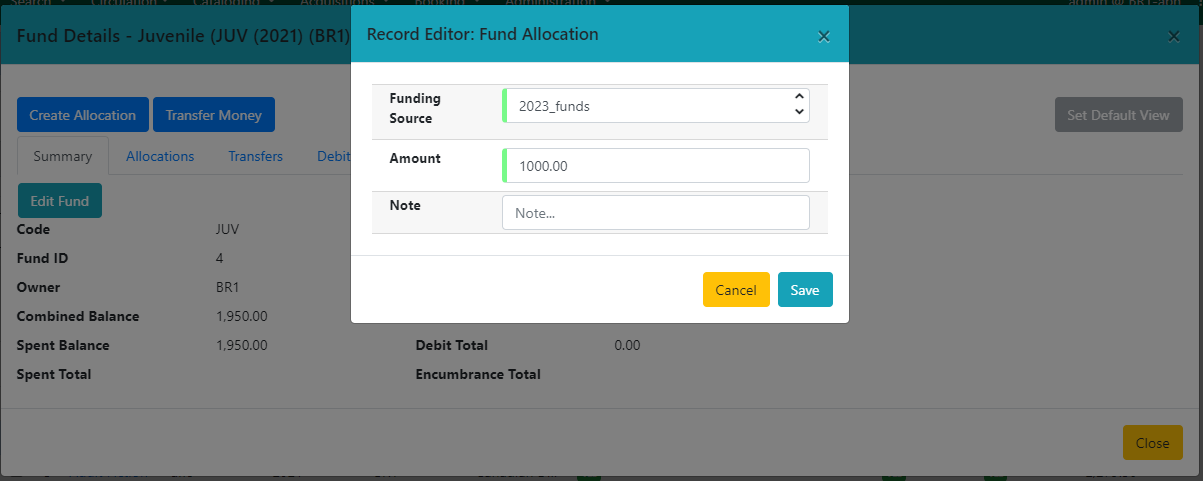
Allocate credits from funding sources to funds
Credits can be applied to funds from funding sources. The credits that you apply to the fund can be applied later to line items on purchase orders.
-
When viewing the Fund Details of a specific fund, click on Create Allocation.
-
Choose a Funding Source from the drop-down menu.
-
Enter an Amount that you want to apply to the fund from the funding source.
-
Enter a Note. This field is optional.
-
Click Save.
-
The amount specified will be moved from the Funding Source to the Fund and you will see this reflected in the Allocation Total in the Fund Details Summary tab and in the Allocations tab.
Transfer money between funds
The money that you allocate to funds can be transferred between funds if desired. In the following example, you can transfer $500.00 from the Adult Fiction fund to the Juvenile fund.
-
When viewing the Fund Details of a specific fund, click Transfer Money.
-
From the drop-down menu, select the Destination Fund.
-
Enter the Amount that you would like to transfer.
-
Add a Note. This field is optional.
-
Click Transfer.
-
The amount specified will be moved between the Funds and you will see this reflected in the Allocation Total in the Fund Details Summary tab and in the Transfers tab.
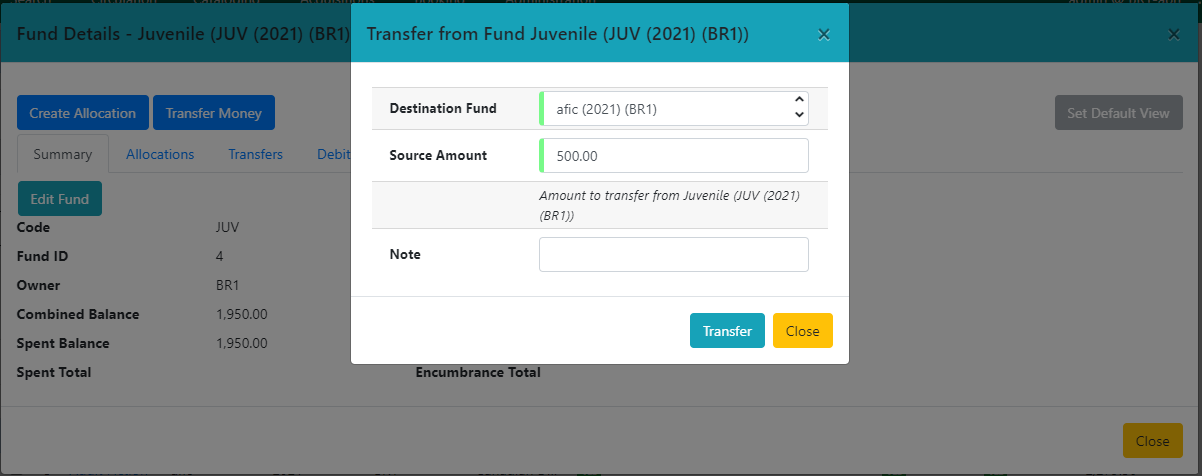
| If the source fund has allocations from multiple funding sources, the fund transfer function will sometimes split the transfer allocation between the funding sources. |
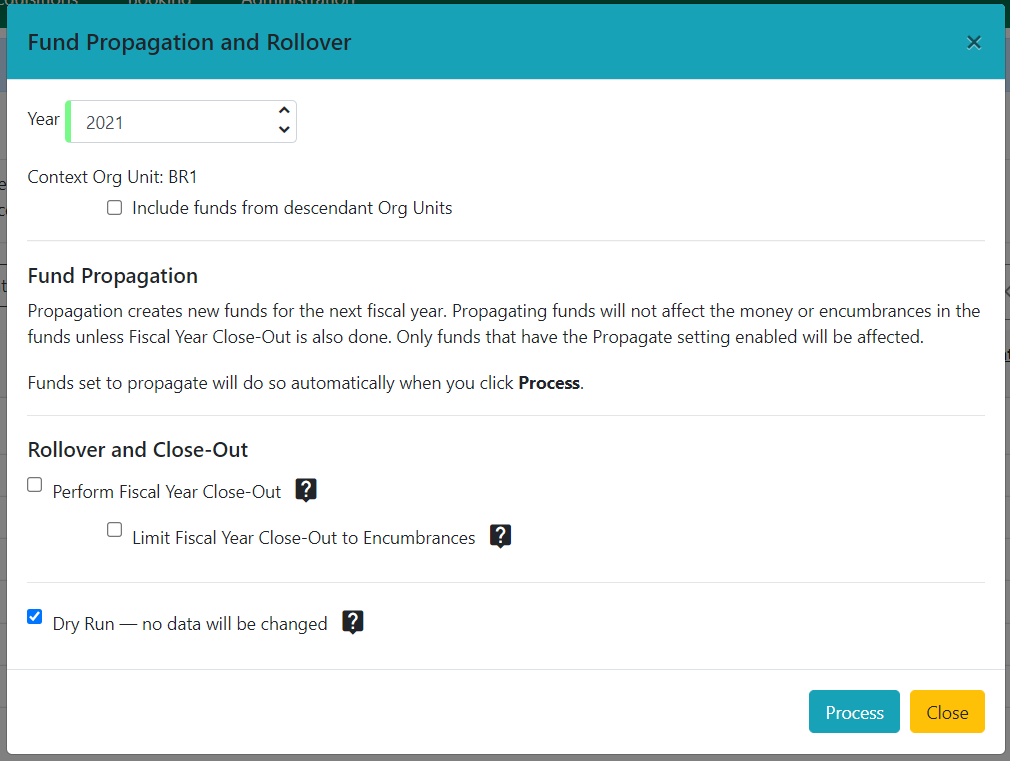
Perform fiscal year close out operation
The Fiscal Propagation and Rollover operation allows you to deactivate funds for the current year and create analogous funds for the next year. It transfers encumbrances to the analogous funds, and it rolls over any remaining funds if you checked the rollover box when creating the fund.
To perform the year end closeout of funds:
-
Go to Administration → Acquisitions Administration → Fund Administration.
-
Click Fund Propagation and Rollover.
-
Verify the Context Org Unit for the close out operation.
-
Select the Year that you want to close out.
-
Include funds from descendant Org Units: check this box if you want to include funds owned by descendant org units of the Context Org Unit.
-
Fund Propagation: This will happen automatically when Process is clicked, if the Fund’s Propagate setting is enabled.
-
Perform Fiscal Year Close-Out: check this box to move encumbrances and unspent funds to the analogous fund for the next fiscal year. It will also deactivate funds for the selected fiscal year. Evergreen will only move encumbrances and unspent funds if the Rollover setting is enabled for a fund.
-
Limit Fiscal Year Close-Out to Encumbrances: check this box if only encumbered funds should be moved to the analogous fund for the next fiscal year. Unspent funds will not be carried forward to the next fiscal year. This setting will only display if the ‘Allow funds to be rolled over without bringing the money along’ Library Setting has been enabled. This setting is available in the Library Setting Editor accessible via Administration → Local Administration → Library Settings Editor.
-
-
Dry Run: check this box if you want to test changes to the funds before they are enacted. Evergreen will generate a summary of the changes that would occur during the selected operations. No data will be changed.
-
Click Process.
-
Evergreen will begin the propagation process. Evergreen will make a clone of each fund, but it will increment the year by 1.
Fund Tags
You can apply tags to funds so that you can group funds for easy reporting. For example, you have three funds for children’s materials: Children’s Board Books, Children’s DVDs, and Children’s CDs. Assign a fund tag of 'children’s' to each fund. When you need to report on the amount that has been spent on all children’s materials, you can run a report on the fund tag to find total expenditures on children’s materials rather than reporting on each individual fund.
Create a Fund Tag
To create a fund tag:
-
Go to Administration → Acquisitions Administration → Fund Administration.
-
Select the Fund Tags tab.
-
Click New Fund Tag. No limits exist on the number of characters that can be entered in this field.
-
Enter a Fund Tag Name. No limits exist on the number of characters that can be entered in this field.
-
Select a Fund Tag Owner from the drop-down menu. The owner indicates the organizational unit(s) whose staff can use this fund tag. This menu is populated with the Short (Policy) Name codes that you created for your libraries in the organizational units tree (See Administration→Server Administration→Organizational Units).
-
Click Save.
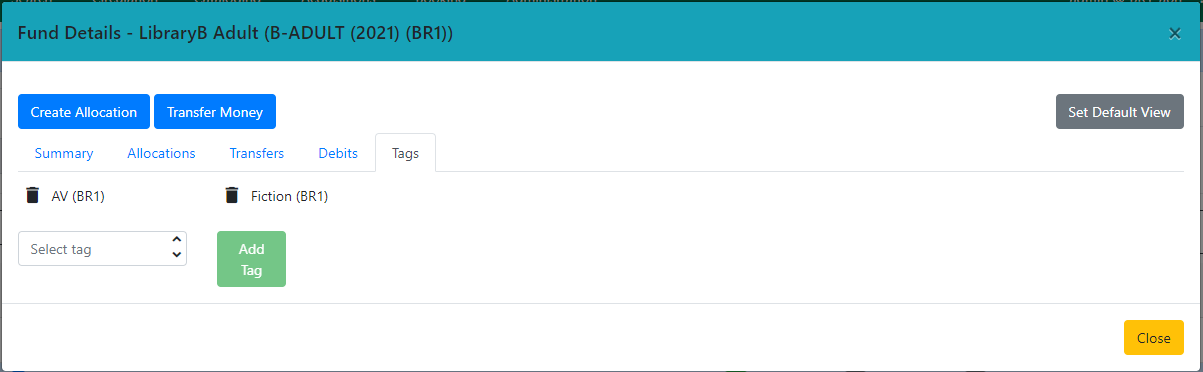
Add a Fund Tag to a Fund
To add a fund tag to a specific fund:
-
Go to the Funds tab in the Fund Administration screen.
-
Click on the Name of the Fund you want to add the fund tag to.
-
The Fund Details screen will appear. Click on the Tags tab.
-
Select a fund tag from the drop down menu and click Add Tag.
-
You may add multiple tags to a fund.
-
You will see a toast in the lower right of the screen confirming that a tag has been added.
-
-
To remove a tag, click the trash can icon next to the tag. You will see a toast in the lower right corner of the screen confirming that the tag has been removed.
-
Click Close.
Invoice menus
Invoice menus allow you to create drop-down menus that appear on invoices. You can create an invoice item type or invoice payment method.
Invoice item type
The invoice item type allows you to enter the types of additional charges that you can add to an invoice. Examples of additional charge types might include taxes or processing fees. Charges for bibliographic items are listed separately from these additional charges. A default list of charge types displays, but you can add custom charge types to this list. Invoice item types can also be used when adding non-bibliographic items to a purchase order. When invoiced, the invoice item type will copy from the purchase order to the invoice.
-
To create a new charge type, click Administration → Acquisitions Administration → Invoice Item Type.
-
Click New Invoice Item Type.
-
Create a code for the charge type. No limits exist on the number of characters that can be entered in this field.
-
Create a label. No limits exist on the number of characters that can be entered in this field. The text in this field appears in the drop-down menu on the invoice.
-
If items on the invoice were purchased with the monies in multiple funds, then you can divide the additional charge across funds. Check the box adjacent to Prorate→ if you want to prorate the charge across funds.
-
Click Save.
Invoice payment method
The invoice payment method allows you to predefine the type(s) of invoices and payment method(s) that you accept. The text that you enter in the admin module will appear as a drop-down menu in the invoice type and payment method fields on the invoice.
-
To create a new invoice payment method, click Administration → Acquisitions Administration → Invoice Payment Method.
-
Click New Invoice Payment Method.
-
Create a code for the invoice payment method. No limits exist on the number of characters that can be entered in this field.
-
Create a name for the invoice payment method. No limits exist on the number of characters that can be entered in this field. The text in this field appears in the drop-down menu on the invoice.
-
Click Save.
Payment methods can be deleted from this screen.
Line Item Features
Line item alerts are predefined text that can be added to line items that are on selection lists or purchase orders. You can define the alerts from which staff can choose. Line item alerts appear in a pop-up box when the line item, or any of its copies, are marked as received.
Create a line item alert
-
To create a line item alert, click Administration → Acquisitions Administration → Line Item Alerts.
-
Click New Line Item Alert Text.
-
Create a code for the text. No limits exist on the number of characters that can be entered in this field.
-
Create a description for the text. No limits exist on the number of characters that can be entered in this field.
-
Select an owning library from the drop-down menu. The owning library indicates the organizational units whose staff can use this alert. This menu is populated with the shortnames that you created for your libraries in the organizational units tree (See Administration → Server Administration → Organizational Units).
-
Click Save.
Line item MARC attribute definitions
Line item attributes define the fields that Evergreen needs to extract from the bibliographic records that are in the acquisitions database to display in the catalog. Also, these attributes will appear as fields in the New Brief Record interface. You will be able to enter information for the brief record in the fields where attributes have been defined.
Providers
Providers in the Evergreen Acquisitions module represent the vendors or providers from which the library purchases materials. Purchase orders and invoices in Evergreen are linked to a Provider account.
The Providers interface in the Acquisitions module allows libraries to create accounts for each provider or vendor from which they purchase materials. Provider accounts can be accessed by going to Administration → Acquisitions Administration → Providers. They can also be searched by going to Acquisitions → Provider Search.
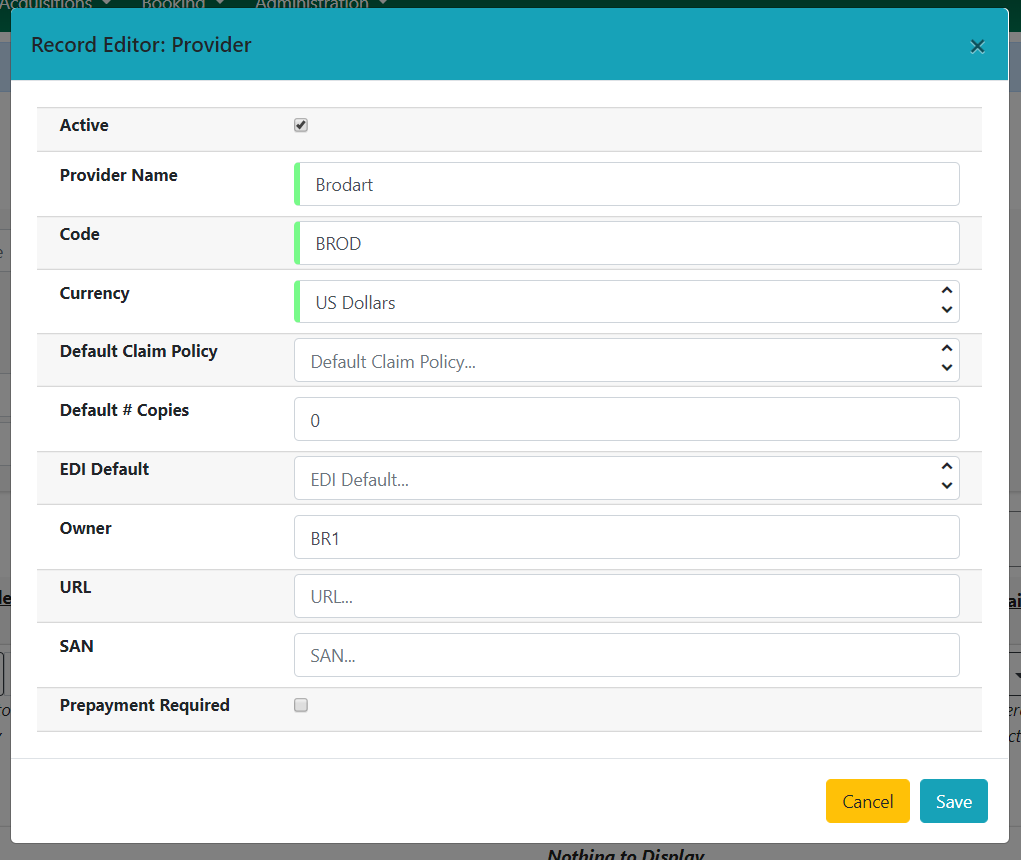
Create a Provider Account
To create a new Provider Account, follow one of the paths listed above to retrieve the Providers interface.
-
In the upper right hand corner, select New Provider and fill in the relevant information for your new provider account.
-
Provider Name: assign a name to the provider (required)
-
Code: assign a code to the provider (required)
-
Currency: assign a currency to the provider account. Currencies are configured in Acquisitions Administration → Currency Types. (required)
-
Default Claim Policy: assign a default claim policy to be applied to purchase orders created with this provider. Claim policies are set up in Acquisitions Administration. (optional)
-
Default # Copies: assign a default number of copies to be automatically created for each line item in purchase orders created with this provider. (optional)
-
EDI Default: assign the EDI Account to be used on purchase orders created with this provider. EDI Accounts can be set up from within the Provider record or from Acquisitions Administration→EDI Accounts. (optional)
-
Owner: assign the org unit that will use this provider account. This field will default to the org unit of the workstation you are logged in at. (required)
-
URL: add a URL associated with the provider (optional). URLs must include the prefix, such as http:// or https:// in order to link correctly.
-
SAN: assign the provider’s SAN. (required if using EDI ordering)
-
Prepayment Required: indicate if prepayment is required for orders with this provider. (optional)
-
-
Select Save.
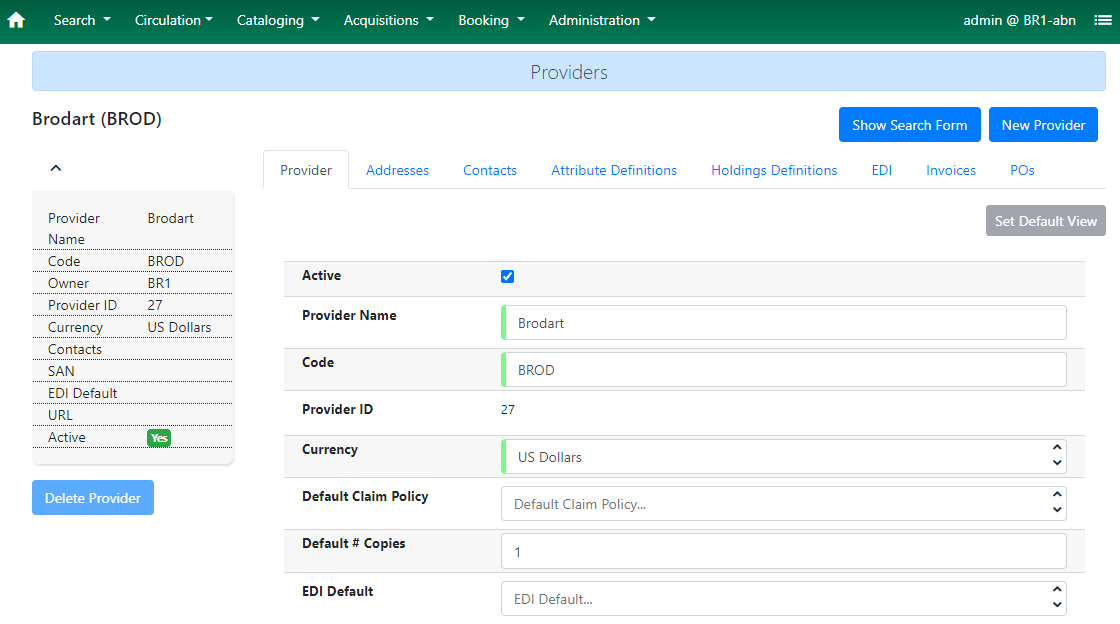
-
The new Provider account will appear. On the left hand side of the screen, you will see a summary of the account. In the main screen there will be several tabs.
-
Provider: this tab contains the information from the New Provider form, as well as fields for additional contact information such as Phone, Fax, and Email. Information in this tab is editable if you have appropriate permissions.
-
Addresses: this tab allows you to add or edit one or more addresses associated with the provider. Select New Provider Address to add an address. Addresses can be edited or deleted from the Actions menu. .
-
Contacts: this tab allows you to add or edit one or more contacts with the provider account. Select New Provider Contact to add a contact. Contacts can be edited or deleted from the Actions menu. Highlighting a contact will bring up a grid for Contact Addresses. Here you can add, edit, and delete addresses associated with the contact.
-
Attribute Definitions: this tab allows you to configure custom vendor specific tags that you might want to display in the Acquisitions module.
-
Holdings Definitions: if your library receives holdings data embedded in order records, this tab can be used to designate the MARC tag that will contain the holdings data and create a mapping that tells Evergreen which subfields will contain item level data.
-
Select New Holdings Subfield to create a new mapping.
-
The values supported are:
-
Quantity (required)
-
Estimated price (required for PO activation when loading records)
-
Owning library (required for PO activation when loading records)
-
Fund code (required for PO activation when loading records)
-
Circulation modifier (required for PO activation when loading records)
-
Copy Location
-
Note
-
Collection Code
-
Call number (Evergreen can generate a placeholder call number)
-
Barcode (Evergreen can generate a placeholder barcode)
-
-
Existing definitions can be edited and deleted from the Actions menu.
-
-
EDI: this tab can be used to create an EDI account that will be used with this provider account. Select New EDI Account to add a new EDI account. In order to be used, the EDI account needs to be set in the EDI Default field in the Provider account. This can be done from the Provider tab or through the Actions menu on the EDI tab. EDI accounts can also be edited or deleted from the Actions menu. Only one EDI account can be set as a default.
-
Invoices: this tab will display invoices associated with this Provider account.
-
POs: this tab will display purchase orders associated with this Provider account.
-
Delete a Provider Account
To delete a Provider account:
-
From the Providers interface, select an account to view the account details.
-
It is not possible to delete a Provider account from the search results screen.
-
-
The Delete Provider button on the left-hand side of the screen will become active when viewing the account details. Select Delete Provider.
-
The Provider cannot be deleted if it has Invoices, Line Items, or Purchase Orders attached to it.
-
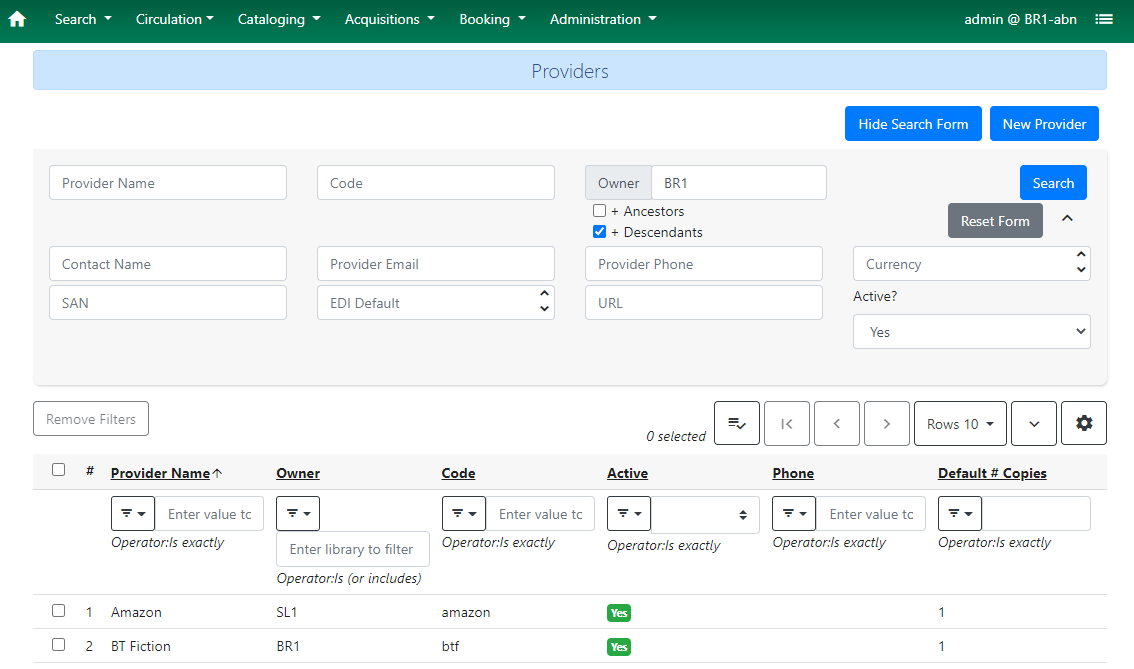
Provider Search
The Provider Search interface allows you to search for acquisitions provider accounts that have been created in your Evergreen system. Providers can be searched by a variety of criteria including Name, Code, Owning Library, and Contact information. The search will default to all Providers owned at the workstation’s Organizational Unit. The Search form can be shown or hidden using the toggle button on the upper-right.
The Provider Search will limit values in the Organizational Unit Selector to those locations where the user has one or more of the permissions VIEW_PROVIDER, ADMIN_PROVIDER, or MANAGE_PROVIDER.
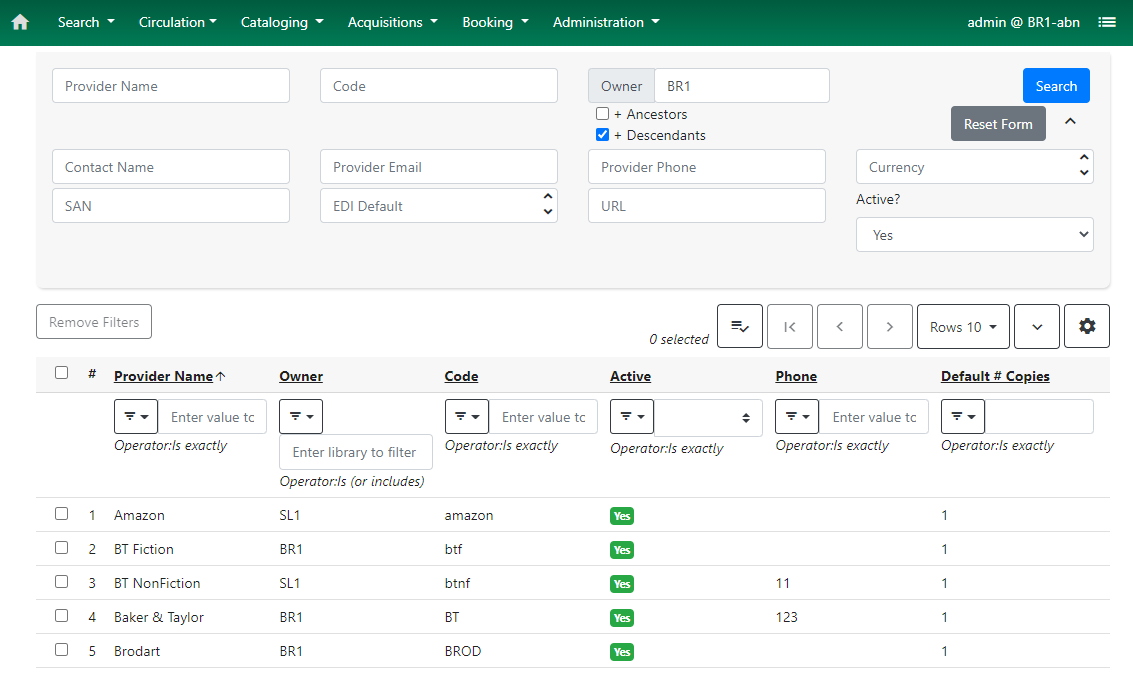
The search results consist of Provider accounts. Single-click on a row to view the Provider while leaving the search form visible. Double-click on a row to view the Provider and hide the search form.
Provider accounts contain several sub-tabs with information pertaining to the account:
-
Provider: this tab contains basic information about the account, as well as fields for additional contact information such as Phone, Fax, and Email.
-
Addresses: this tab allows you to add one or more addresses associated with the provider. Select New Provider Address to do so.
-
Contacts: this tab allows you to associate one or more contacts with the provider account. Select New Provider Contact to do so.
-
Provider Contact now includes an option to mark a Contact as Primary. A primary contact will have special styling in the Provider Summary area.
-
Only one Contact per Provider may be marked as Primary.
-
A Contact may be set or unset as Primary via the Actions Menu in the Contacts grid.
-
-
Attribute Definitions: this tab allows you to configure custom vendor specific tags that you might want to display in the Acquisitions module.
-
Holdings Definitions: if your library receives holdings data embedded in order records, this tab can be used to create the mapping to tell Evergreen which subfields will contain item level data.
-
Select New Holdings Subfield to create a new mapping.
-
The values supported are:
-
Quantity (required)
-
Estimated price (required for PO activation when loading records)
-
Owning library (required for PO activation when loading records)
-
Fund code (required for PO activation when loading records)
-
Circulation modifier (required for PO activation when loading records)
-
Copy Location
-
Note
-
Collection Code
-
Call number (Evergreen can generate a placeholder call number)
-
Barcode (Evergreen can generate a placeholder barcode)
-
-
-
EDI: this tab can be used to create an EDI account that will be used with this provider account. If an EDI account is marked as Default in this tab, it will set the EDI Default field in the Provider main tab. Only one EDI account can be marked as Default.
-
Invoices: this tab will display invoices associated with this Provider account.
-
POs: this tab will display purchase orders associated with this Provider account.
Display Improvements
As part of transitioning the General Search interface to Angular, several changes have been made to improve the display and usability of the module:
-
Fields that are associated with controlled vocabularies will display the controlled values in both the search terms and filters for easy selection. These fields include:
-
Owner
-
Active
-
Prepayment Required
-
-
Column headers for the search results can be clicked on to sort the results by the column. The columns will sort alphabetically or by date as appropriate for the data type.
-
Using the column actions to filter or sort search results will execute a new search using the original search parameters. If any un-executed changes are made to the search parameters between the initial search submission and any changes to the filters, the new search parameters will be executed upon filtering.
-
Dropdown menus for the search fields will retrieve a maximum of 100 rows at a time.