Line Items, Selection Lists, and Purchase Orders
This documentation covers line items, selection lists, purchase orders, brief records, and MARC federated search.
Most of the above were converted to Angular in the 3.10 release of Evergreen. Please refer to earlier versions of the documentation if you use Evergreen 3.9 or prior.
Dojo vs. Angular interfaces in Acquisitions
Since the work to convert Acquisitions to Angular is an ongoing, multi-part project, there may be an occasion where you will still end up in the old Dojo view of a selection list or purchase order. To navigate directly to the Angular view of a selection list or purchase order, use this URL pattern:
Locale is the localization setting for your staff client. If you are in the United States, this is probably en-US. In Canada this may be en-CA or fr-CA depending on whether your client uses English or French.
If you wish to allow staff to access the old Dojo view of purchase orders, there is a new Library Setting to control this. This setting is Display Links to Deprecated Acquisitions Interfaces, and it is disabled by default. If enabled, this will expose a link in the purchase order at the organizational unit(s) specified in the setting. Selecting this link will open a new tab with the purchase order displayed in Dojo.
You may also need to reauthenticate when accessing a Dojo interface, though every effort has been made to find and rectify these cases during development.
Line Items
The Evergreen Acquisitions module uses line items to represent individual bibliographic titles to order on both purchase orders and selection lists. Line items include a large amount of information, including styling to show you where a line item is in the ordering process, and links to other order information.
Line items can be searched from the Acquisitions General Search which is accessed from Acquisitions → General Search.
Line items convey a lot of information, which is described in detail in the following sections. An example of a line item is shown below.

Line Item Defaults: Owning Library
There are two new Library Settings related to ownership of automatically created items. These settings apply to items created as the result of the Provider Default Number of Copies setting.
-
How to set default owning library for auto-created line item items
-
Strategy to use to set default owning library to set when line item items are auto-created because the provider’s default copy count has been set.
-
Valid values are "workstation" to use the workstation library, "blank" to leave it blank, and "use_setting" to use the "Default owning library for auto-created line item items" setting. If not set, the workstation library will be used.
-
-
Default owning library for auto-created line item items
-
The default owning library to set when line item items are auto-created because the provider’s default copy count has been set. This applies if the "How to set default owning library for auto-created line item items" setting is set to "use_setting".
-
Note that due to a pre-existing bug, this setting will display the organizational unit ID when displayed in the larger Library Settings grid; but the selector itself uses organizational unit Shortname.
-
Line Item Colors and Statuses
At various points in the ordering process, selection lists and purchase orders will display line items with a colored background as a visual shorthand indicating the status of the line item. Those colors are as follows:
| Line Item Status | Color Description | Code |
|---|---|---|
New |
Light yellow |
FFFFEE |
Selector Ready |
Light pink |
FFEEEE |
Order Ready |
Light gray |
EEEEEE |
Pending Order |
Light olive green |
EEEEDD |
On Order |
Medium pink |
EEDDDD |
Received |
Medium gray |
DDDDDD |
Delayed |
Medium Blue |
B3D9FF |
Canceled |
White / no background |
FFFFFF |
The line item status is affected by the status(es) of all items attached to the line item. While items do not have a separate status field per se, they can have implicit statuses such as new, pending, received, or canceled.
When an item is canceled, the parent line item is checked to see if all of its items are now canceled. If so, the line item is canceled. Delayed items represent a special case of canceled items. For more information on canceled and delayed line items, see Canceling or Delaying Line Items, below.
When all items associated with a line item are received, the parent line item is marked received. While items are in a mixed set of statues (e.g., some delayed and some received), the line item status will remain as on order.
A purchase order is marked received once all of its line items are marked either as received, or as canceled with a non-keep-debits reason.
Line Item Batch Actions
Line items show a large amount of detail about the titles and items that are in various stages of the Acquisitions process. Line items are filterable and sortable. You can perform actions on a single line item, several line items, or all line items. You can also expand the line item display to show details of a single line item or all line items.
For specific selection list actions, see the documentation covering Selection Lists. For specific purchase order actions, see Purchase Order Actions. Below we will describe Line Item Batch Actions that apply to both selection lists and purchase orders.
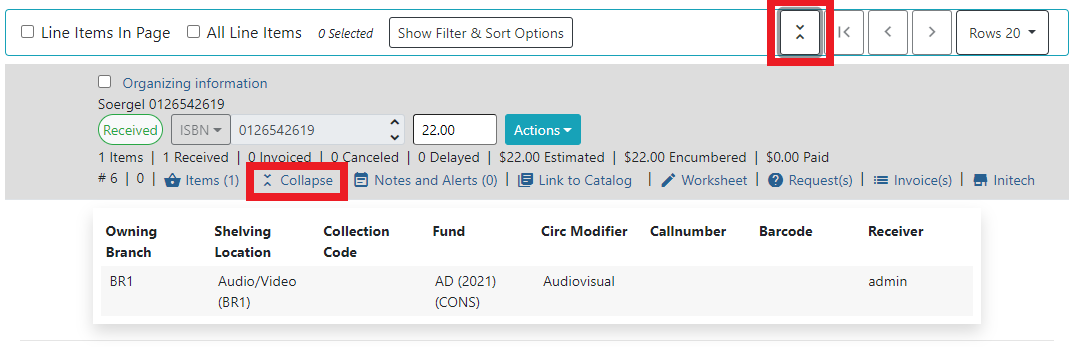
Expand Line Item Display
You can expand the line item display to show item details including Owning Branch, Shelving Location, Collection Code, Fund, Circ Modifier, Call Number, Barcode, and Receiver (if applicable).
To show this expanded information for a single line item or several line items, select the link labeled Expand on the line item(s). The label will flip to Collapse, and you can select Collapse to hide the expanded information.
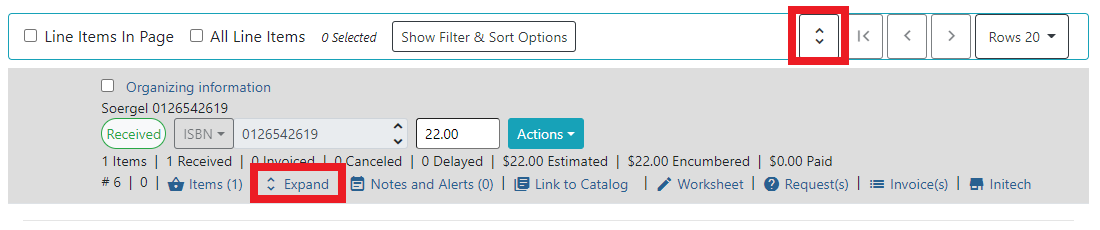
To show this expanded information for all line items, select the Expand All icon at the top right of the list. To hide this expanded information for all line items, select the Collapse All icon at the top right of the list. The current state of Expand All / Collapse All will be carried over to each page of your purchase order or selection list.
Line Item Filters and Sort Options
To show Filter and Sort Options, select the button Show Filter & Sort Options at the top of your purchase order or selection list. Filter elements are specific to line item details.

This will expand down to show filtering and sorting options.

-
Select your filter element in the first dropdown. Filter elements include:
-
Line Item ID
-
Status
-
Title
-
Author
-
Publisher
-
Publication date
-
ISBN
-
ISSN
-
UPC
-
Claim count
-
Item count
-
Estimated unit price
-
-
Select your operator in the second dropdown. Operators will vary depending on your selected filter element, but can include the following:
-
Is [i.e., equals - this is case sensitive]
-
Is NOT [i.e., does not equal - this is case sensitive]
-
Contains [i.e., contains string - this is not case sensitive]
-
STARTS with [i.e., beginning string - this is not case sensitive]
-
ENDS with [i.e., ending string - this is not case sensitive]
-
Claim Count and Item Count filter elements also include numeric operators “greater than or equal to” and “less than or equal to”
-
-
Enter your filter value in the third dropdown. Some operators expect numeric or case-specific values (see above).
-
Select Apply Filter to filter your list, or press the ENTER key on your keyboard. At this time only one filter may be in operation at a time.
-
Select Reset Filter to clear the filter.
To set a sort order for your list, choose a sort order from the dropdown labeled Sort by. Sort will be instantly applied to all items in the purchase order or selection list. Sorting is currently only available on a single axis. Once you select a sort order, it is sticky across purchase orders and selection lists until you change to a new sort order.
Sort options are:
-
Line Item ID Ascending
-
Line Item ID Descending
-
Title Ascending
-
Sorts by the value in the 245$a field in the line item bibliographic detail, ignoring initial articles.
-
-
Title Descending
-
Sorts by the value in the 245$a field in the line item bibliographic detail, ignoring initial articles.
-
-
Author Ascending
-
Sorts by the value as entered in the 1xx$a field in the line item bibliographic detail: “Author, Ima” will sort before “Ima Author”.
-
-
Author Descending
-
Sorts by the value as entered in the 1xx$a field in the line item bibliographic detail: “Author, Ima” will sort after “Ima Author”.
-
-
Publisher Ascending
-
Sorts by the value as entered in the 260$b field in the line item bibliographic detail, including initial articles.
-
-
Publisher Descending
-
Sorts by the value as entered in the 260$b field in the line item bibliographic detail, including initial articles.
-
-
Order Identifier Ascending
-
This is ISBN, ISSN, or UPC as assigned in the line item order identifier field
-
-
Order Identifier Descending
-
This is ISBN, ISSN, or UPC as assigned in the line item order identifier field
-
Delete Selected Line Items
You can delete one, several, or all line items from a purchase order or selection list, as long as the line items are still in a New, Selector Ready, Order Ready, or Pending Order status. Line items which are On Order or any status after On Order may not be deleted.
-
Select individual line item(s) by checking the box next to the line item title.
-
Alternatively, select all line items in the page by checking the box labeled Line Items in Page.
-
Alternatively, select all line items in the purchase order or selection list by checking the box labeled All Line Items.
-
-
Select the Action menu in the upper left of the list.
-
Select Delete Selected Line Items.
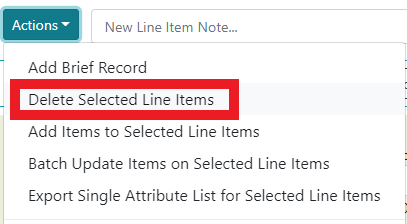
-
A dialog will ask to confirm that you wish to delete your selected line item(s). Choose Apply to delete selected line items, or Exit Dialog to close the dialog without deleting line items.
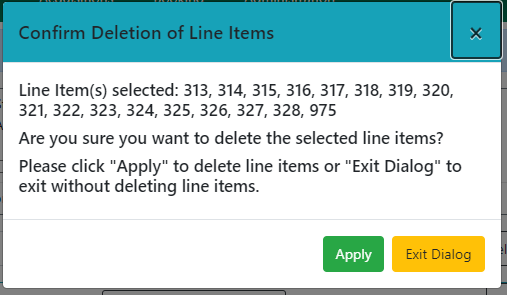
The screen will refresh and your deleted line items will be removed fromthe list.
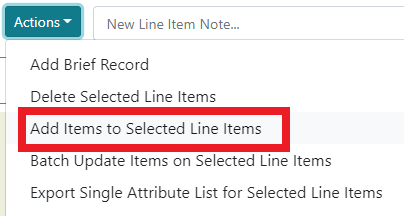
Add Items to Selected Line Items
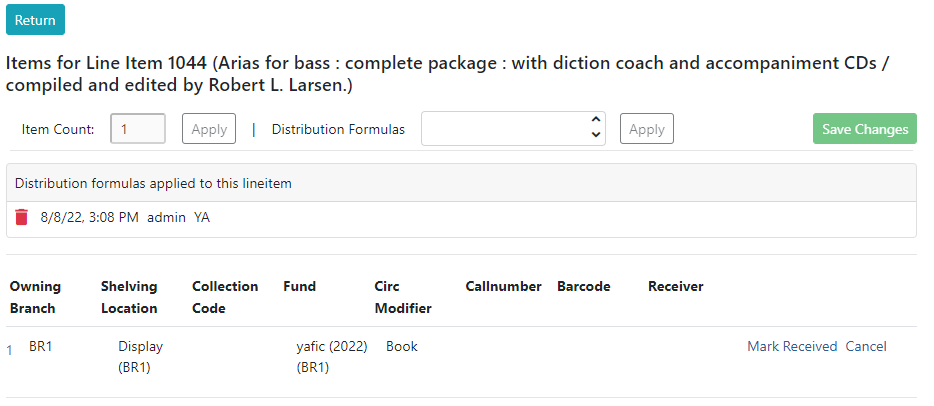
Line items must have at least one individual item attached for an order to be activated. You may add items to individual line items or to a group of selected line items. Items may be added up until the point a line item is marked as on order. To add items to a single line item, see below under Item Details Interface.
To add items in batch to one, several, or all line items, take the following steps:
-
Select individual line item(s) by checking the box next to the line item title.
-
Alternatively, select all line items in the page by checking the box labeled Line Items in Page.
-
Alternatively, select all line items in the purchase order or selection list by checking the box labeled All Line Items.
-
-
Select the Actions menu in the upper left of the list.
-
Select Add Items to Selected Line Items.
-
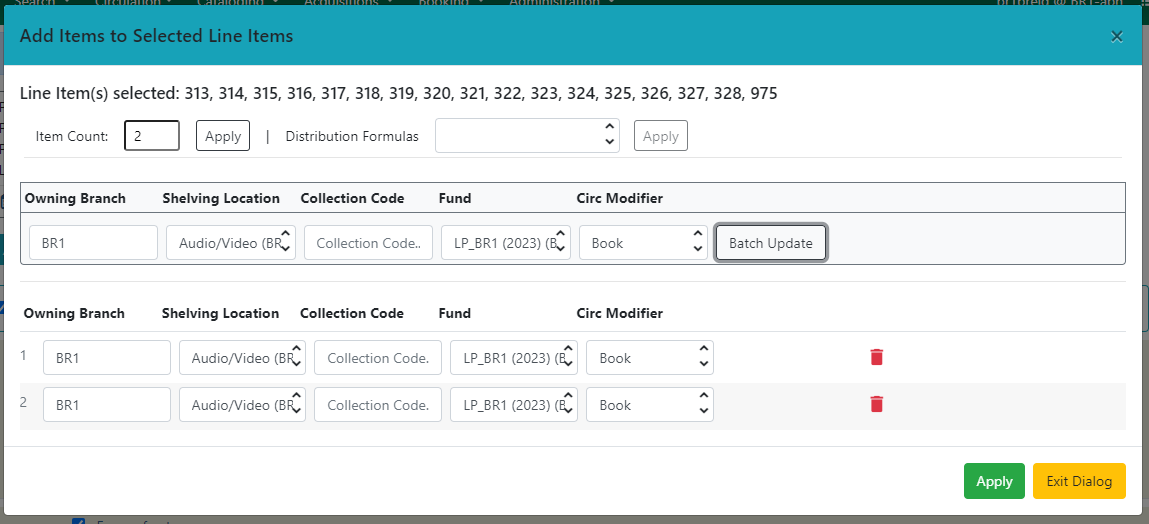
A dialog will open showing the ID(s) for your chosen line item(s).
-
Enter the number of items to add to each line item in the Item Count field and then select Apply.
-
If you wish to apply a distribution formula, select one from the dropdown and then select Apply.
-
Distribution formulas allow you to specify the number of items that should be distributed to specific branches. They can also serve as templates allowing you to predefine settings for your items.
-
Note that if you make any individual item or batch updates, those values will override values set by the distribution formula.
-
You will only see distribution formulas permitted by your permissions and working location(s).
-
For more information on creating a distribution formula, see the documentation on Distribution Formulas.
-
-
All fields in this modal can be edited independently of one another. You may have Library Settings in play to set default values, and therefore may not need to set values here. Fields available in the interface include:
-
Owning Branch
-
Shelving Location
-
Collection Code
-
Fund
-
All items must be assigned a fund for a purchase order to be activated.
-
Funds in this interface will be color coded yellow if they have exceeded their warning percent, and red if they are at or above their stop percent. Note that this may cause slowness issues for libraries with a large number of active funds.
-
-
Circ Modifier
-
-
All elements can be applied in batch using the Batch Update line. Select your desired values from the dropdowns and then select Batch Update to apply those values to all items.
-
You can delete individual items by selecting the trash can icon on the right of the line.
-
Once you have made your selections, select Apply in the lower right of the dialog to create the new items according to your selections. Select Exit Dialog to close the dialog without saving changes.
-
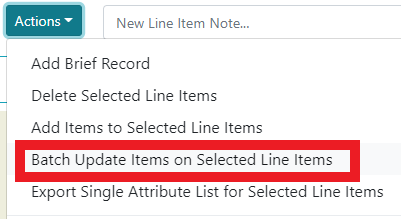
Batch Update Items on Selected Line Items
You can batch update line items as well.
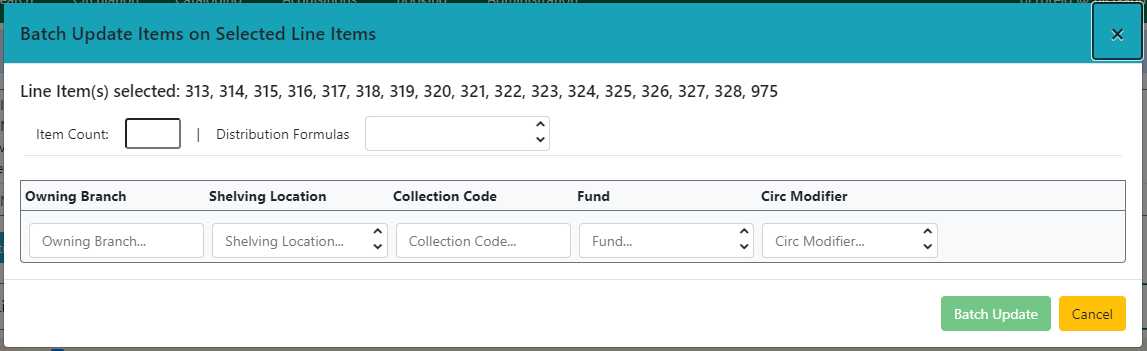
| Batch Updates will overwrite any/all existing item information on your selected line items, including item counts. This cannot be undone. Proceed with caution. |
To update items in batch for one, several, or all line items, take the following steps:
-
Select individual line item(s) by checking the box next to the line item title.
-
Alternatively, select all line items in the page by checking the box labeled Line Items in Page.
-
Alternatively, select all line items in the purchase order or selection list by checking the box labeled All Line Items.
-
-
Select the Actions menu in the upper left of the list.
-
Select Batch Update Items on Selected Line Items.
-
A dialog will open showing a list of IDs for your chosen line item. For each of the fields below, only enter values in fields that you wish to update. If you do not enter a new value in a field, that field will retain whatever its current value is. Note that this modal will NOT show you current field values, it is only for adding or updating values.
-
If you wish to change the number of items on your selected line items, enter the number of items to update on each line item in the Item Count field and then select Apply.
-
If you do not wish to change the count of items on each line item, leave this field unset.
-
-
If you wish to apply a distribution formula, select one from the dropdown and then select Apply.
-
Distribution formulas allow you to specify the number of items that should be distributed to specific branches. They can also serve as templates allowing you to predefine settings for your items.
-
Note that if you make any individual item or batch updates, those values will override values set by the distribution formula.
-
You will only see distribution formulas permitted by your permissions and working location(s).
-
For more information on creating a distribution formula, see the documentation on Distribution Formulas.
-
-
All fields in this modal can be edited independently of one another. You may have Library Settings in play to set default values, and therefore may not need to set values here. Fields available in the interface include:
-
Owning Branch
-
Shelving Location
-
Collection Code
-
Fund
-
All items must be assigned a fund for a purchase order to be activated.
-
Funds in this interface will be color coded yellow if they have exceeded their warning percent, and red if they are at or above their stop percent. Note that this may cause slowness issues for libraries with a large number of active funds.
-
-
Circ Modifier
-
-
-
Once you have made your selections, select Batch Update in the lower right of the dialog to overwrite your selected line items with the updates you have set. Select Exit Dialog to close the dialog without saving changes.
Export Single Attribute List
You can export and download ISBNs, ISSNs, or UPCs as a file from all or selected line items in a selection list or purchase order. A list of ISBNs, for example, could be uploaded to vendor websites when placing orders.
To export a single attribute list:
-
Open your selection list or purchase order.
-
Choose line items to mark for Single Attribute Export.
-
Option A: If you only want to export values for some line items, select individual line items using the checkboxes on each line. You can also use the Line Items in Page to select all items in your current page.
-
Option B: If you want to export values for all line items, use the All Line Items checkbox to select all items in the selection list or purchase order
-
-
Navigate to the Actions menu in the upper left of your selection list or purchase order.
-
Select the action Export Single Attribute List for Selected Line Items.
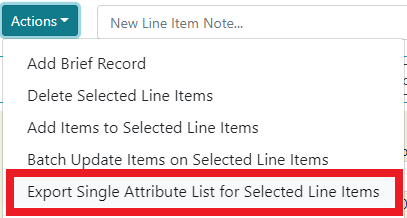
-
You will be presented with a confirmation dialog asking you to choose the attribute to export (ISBN, ISSN, or UPC). Choose an attribute from the dropdown and select Download. Select Cancel to exit without exporting attributes.
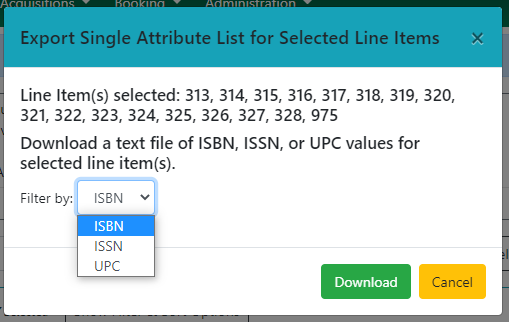
-
A text file containing a list of your selected attributes will be downloaded.
Note that you can select attributes to export independent of the Line Item Order Identifier, but attributes must be in the Line Item Bibliographic Record in order to be available for export and download. If a line item is missing an attribute, that line item will be skipped for purposes of the export.
Line Item Details
The screenshot below shows an on-order item in a purchase order.
This line item shows:
-
Title & other bibliographic information associated with the line item
-
This is hyperlinked, and if you open it you can edit bibliographic information associated with the line item (more information below).
-
-
Source of the bibliographic information. This will be blank if the source is a brief record you created.
-
Line item information
-
Line Item Status - this will display the status of the line item. Statuses are:
-
New
-
Selector Ready
-
Order Ready
-
Pending Order
-
On Order
-
Received
-
Delayed
-
Canceled
-
-
Order identifiers
-
Order identifiers are one of three types: UPC, ISBN, or ISSN.
-
You can select your preferred identifier type from the dropdown.
-
If the record has more than one identifier available for the selected type, you will see a red numeral in parentheses. The numeral tells you how many identifiers are available, and you can select which identifier to use from the dropdown.
-
If your vendor requires a specific identifier, such as a 13-digit ISBN, you can select that here and it will be sent with EDI order information.
-
-
Line Item Price - this is the estimated price of a single copy of a line item. The price is used to calculate fund encumbrances.
-
Line Item Actions - Actions for this specific line item (more information below).
-
-
Item status details & pricing line
-
This shows you how many items are associated with the line item, as well as a count of how many items are received, invoiced, canceled, or delayed.
-
This line also shows the status of any money associated with the line item.
-
Estimated - this shows the estimated price, which is calculated based on the line item price multiplied by the count of items associated with the line item.
-
Encumbered - when a line item is on order, its charges are encumbered against the fund assigned to the line item.
-
Paid - when a line item is invoiced and marked paid, its charges are debited from the fund assigned to the line item. A paid line item will display ‘Paid’ and the amount in red text.
-
-
-
Other line item details
-
The Line Item ID - this is a unique identifier for this line item
-
Items in catalog - displayed in bold red font, this shows how many extant items of this title are in the local Evergreen catalog and owned at or below the same location as the purchase order. I.e., if your purchase order is owned at Branch 1, the item count will include items owned at Branch 1. Items which are marked lost or missing are not included in this item count.
-
Items - select this to open to the Item Details interface (more information below).
-
Expand - select this to show a preview version of the Item Details interface.
-
If the preview is already displayed, this link will display Collapse instead. Select Collapse to hide the preview display.
-
You can also use the Expand All / Collapse All button at the top of the line item grid which will show (or hide) the preview display for all line items.
-
-
Notes - this will let you add a note or alert to a line item, as wellas view any extant notes or alerts on the line item. The count of notesand alerts is shown in parentheses.
-
Catalog link
-
Catalog - if the line item is linked to a catalog record, this link will display and selecting it will open a new tab to show you the record within the catalog interface.
-
Link to Catalog - if the line item is not linked to a catalog record, this link will display and selecting it will open a dialog. This dialog will populate with bibliographic information from your line item. Select Submit to execute the search, and then select View MARC to see the MARC record in your catalog. Select Link to link this line item to your selected MARC record.
-
-
Worksheet - select this to open the Worksheet interface (more information below).
-
Link to Purchase Order or Selection List - if your purchase order was generated from a selection list, you will see a link here to open the selection list. Similarly, the selection list will show a link to the purchase order.
-
Request(s) - select this to open a new tab that will show any patron purchase requests associated with this line item.
-
Invoice(s) - select this to open an Acquisitions Search window with a search scoped to display all invoices associated with the line item ID. From the search results you can open and view details of a particular invoice.
-
For more information see the Acquisitions Search documentation.
-
-
Claim Policy - this will show the claim policy associated with the line item.
-
For more information see the Claim Policy documentation.
-
-
Provider - the name of the Provider is displayed. Selecting the Provider name will open the Provider Details interface.
-
Import Queue - if your line item is associated with an import queue, this will open the import queue in a new tab
-
Line items will also display cover images, if available, to the left of the line item.
Line Item Worksheet
The line item worksheet interface shows details about the specific line item in a printable format.
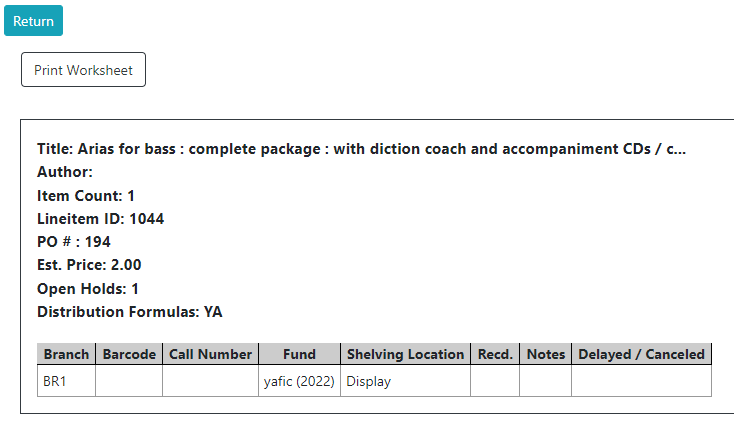
Details on the worksheet can include:
-
Title of the line item
-
Author of the line item
-
Count of individual items on order
-
Line item ID - this is a unique identifier for the line item
-
Purchase order number, if the line item is associated with a purchase order
-
Open holds, if the associated local catalog record has open holds
-
Distribution formulas, if applicable
-
Line item notes and/or alerts, if applicable
-
A table showing details of each item associated with the line item, including:
-
Assigned branch
-
Item barcode
-
Item call number
-
Fund
-
Item shelving location
-
Receiving information
-
Timestamps of receiving are locale- and timezone-aware
-
-
Item notes
-
Delayed / Canceled information
-
You can print your worksheet by selecting Print Worksheet. Select Return to return to your purchase order or selection list.
Line Item Bibliographic Information
If you select the hyperlinked title of a line item, you will open an interface that shows you the bibliographic details of the line item. This is presented as a tabbed interface:
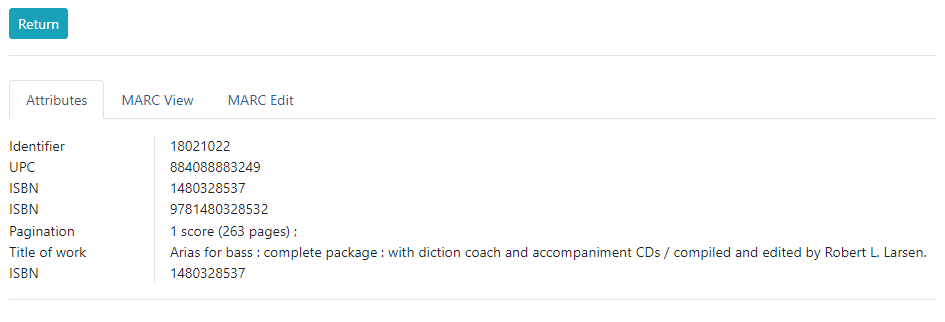
-
Attributes shows a read-only summary of the MARC information using labels
-
MARC View shows a read-only summary of the MARC information displaying MARC fields and subfields in a flat text display
-
MARC Edit opens the Angular MARC Editor which allows you to make any changes to the line item MARC Record. Select Save Changes to save your changes.
-
If the line item has already been linked to a bibliographic record in the catalog, any changes made in this MARC Edit tab will not be propagated to the live catalog record. You will see a banner reminding you that any changes you make to the line item bibliographic record will not change the linked catalog record.

-
Select Return to return to your purchase order or selection list.
Item Details Interface
The Item Details interface is where you add individual items to a line item.
To access the Item Details interface, open a selection list or purchase order and navigate to the line item you’re interested in. Select the Items link.

From within the Item Details interface you can add items to the line item by entering the number of items you wish to add and then selecting Apply. This will append items to your line item.
Details available in the interface include:
-
Owning Branch
-
Shelving Location
-
Collection Code
-
Fund
-
All items must be assigned a fund for a purchase order to be activated.
-
Funds in this interface will be color coded yellow if they have exceeded their warning percent, and red if they are at or above their stop percent. Note that this may cause slowness issues for libraries with a large number of active funds.
-
-
Circ Modifier
-
Call Number
-
Barcode
All elements except Barcode can be applied in batch using the Batch Update line. Select your desired values from the dropdowns and then select Batch Update to apply those values to all items. If you do not assign call numbers and barcodes to items, they will be assigned placeholder values when you activate a purchase order. For more information see Activating a Purchase Order, below.
You can also choose to use a distribution formula in this interface. Distribution formulas allow you to specify the number of items that should be distributed to specific branches. They can also serve as templates allowing you to predefine settings for your items.
Select a distribution formula from the dropdown and then select Apply. Note that if you make any individual item or batch updates, those values will override values set by the distribution formula.
For more information on creating a distribution formula, see the documentation on Distribution Formulas.
Items which are on order may be marked as received from the worksheet using the Mark Received link or canceled using the Cancel link.
Once you have added and updated all of your items, select Save Changes in the upper right corner and then Return in the upper left corner. If you select Return without selecting Save Changes, you will be warned about exiting this interface without saving changes.
Line Item Notes & Alerts
To add a note to a line item, navigate to the line item and select the Notes and Alerts link.
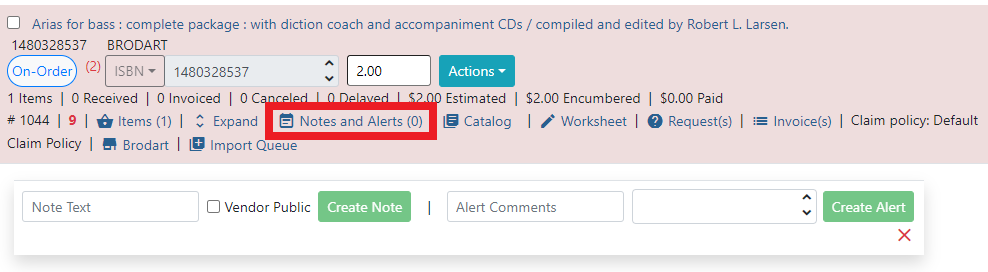
You will see any existing notes or alerts as well as an option to create a new note or alert.
Notes are free text and if you are using EDI they can be sent to the vendor by selecting the Vendor Public checkbox. For non-EDI orders, notes would need to be manually entered on the vendor’s ordering site.
Alerts are chosen from a dropdown. An alert will create a pop up notice when an item with an alert is received. Alert values are set in Acquisitions Administration.
To delete a line item alert, select Delete on the right hand side. You will not get a confirmation dialog, so make sure you really want to delete the note or alert!
Line item alerts are displayed when receiving a line item on a purchase order.
Line Item Actions
Each line item has an Actions button.

Selecting this button will show the Line Item Actions Menu. You will see all actions in both the selection list and purchase order interface, and regardless of the status of your line item. Actions which are unavailable will be disabled.
Line item actions include:
-
Mark Received - this marks the line item and all of its individual items as Received
-
Mark Un-Received - this marks the line item and all of its individual items as Un-Received
-
Update Barcodes - this opens the catalog Item Editor for the individual item(s) and lets you update barcodes associated with each of the items.
-
This action is only available after you have records loaded in the local catalog.
-
-
Open Holdings View - this opens the catalog Holdings View for the linked catalog record.
-
This action is only available after you have records loaded in the local catalog.
-
-
Claims - this will open a dialog showing existing claims made against the line item and/or allowing you to claim items if they meet the criteria established by the claim policy associated with that line item.
-
For more information see the Claim Policy documentation.
-
-
View History - this opens a grid displaying the history of the line item, including timestamps and usernames of editors.
Selection Lists
Selection lists allow you to create, manage, and save lists of items that you may want to purchase. To view your selection lists, navigate to Acquisitions → Selection Lists. This will take you to the Acquisitions Search interface with the tab Selection List Search selected, and a search will automatically be executed for all selection lists owned by the logged-in user.
You can change this default search to include other search parameters. For more information please see the documentation on Creating a New Default Search.
You can also use the Acquisitions Search interface to search for and retrieve selection lists created by other users. For more information please see the Acquisitions Search documentation.
Create a Selection List
Selection lists can be created in four areas within Acquisitions. Selection lists can be created when you add brief records, use the Load MARC Order Records interface, or find records through MARC Federated Search. In each of these interfaces, you will be able to add records to a new or existing selection list.
Selection lists can also be created through the selection lists search interface:
-
Navigate to Acquisitions → Selection Lists. This will open the Selection Lists Search interface.
-
Choose the New Selection List button at the top of the grid
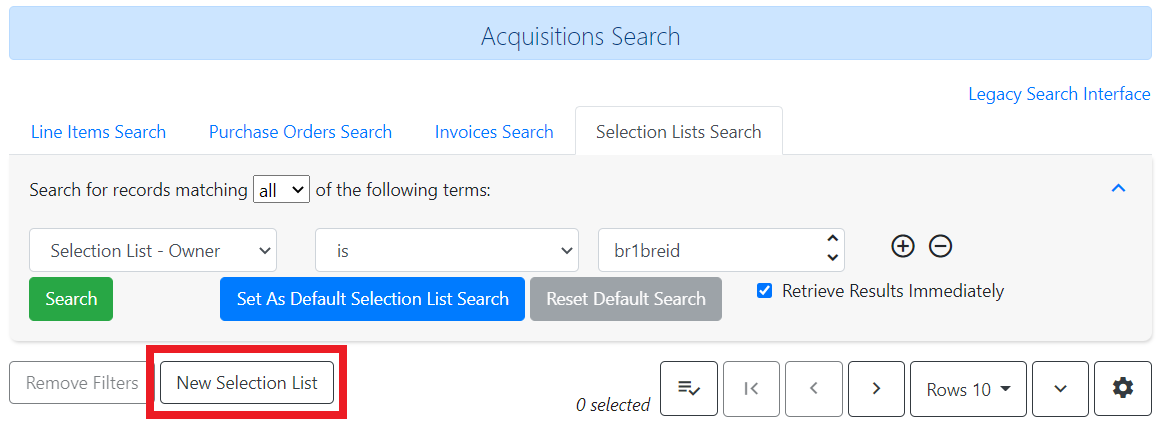
-
Enter the name of the selection list in the dialog that appears.
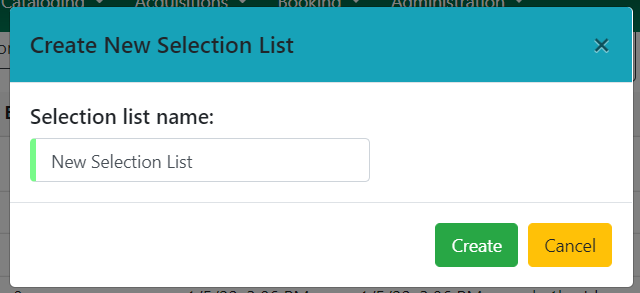
-
Select Create to create your new selection list. Select Cancel to exit without creating a list.
Once your new selection list is created, you can search for it and retrieve it via the selection lists Search interface.
Clone Selection Lists
Cloning selection lists enables you to copy one selection list into a new selection list. The new selection list is independent of the original and each can be changed or even deleted without affecting the other.
-
Navigate to Acquisitions → Selection Lists. This will open the Selection Lists Search interface.
-
(optional) Use the Search feature to narrow down the selection lists displayed in the grid.
-
Use the checkbox on the left of a line to choose the selection list you wish to clone
-
You may only clone one selection list at a time.
-
-
Select the Actions dropdown at the top right of the grid and choose Clone Selected.
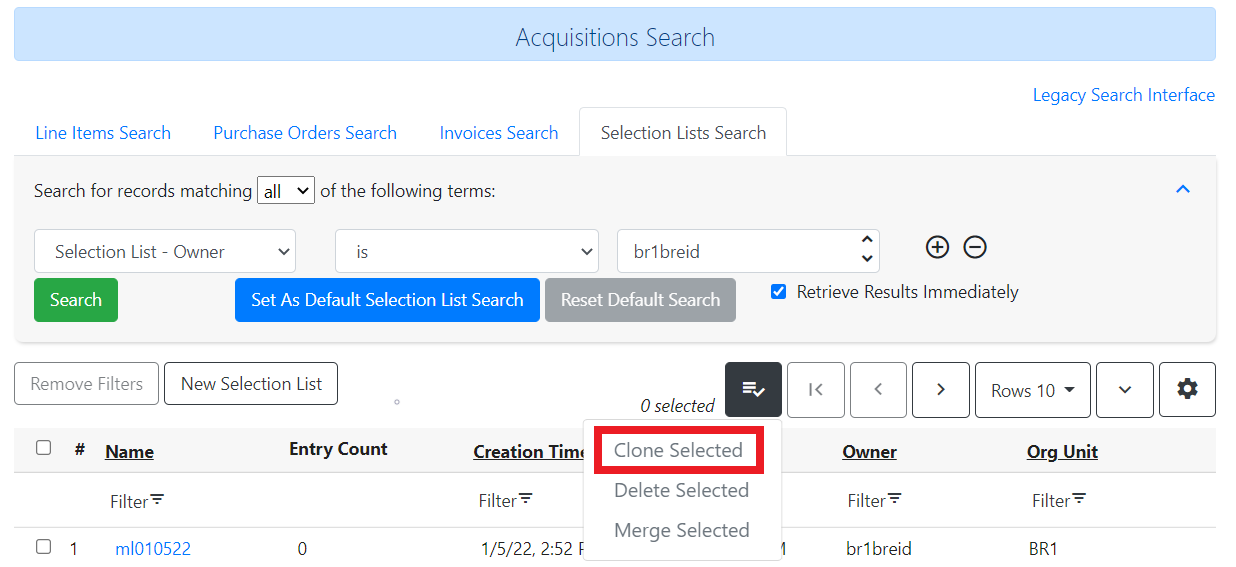
-
Enter the name of the new selection list in the modal that appears.
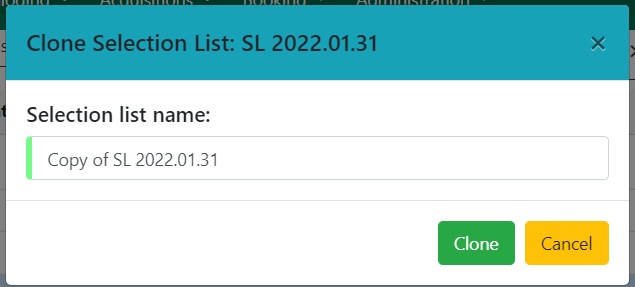
-
Select Clone to complete the cloning process. Select Cancel to exit without cloning.
You can search for and retrieve the cloned selection list via the selection lists search interface.
Merge Selection Lists
You can merge two or more selection lists into one selection list.
-
Navigate to Acquisitions → Selection Lists. This will open the Selection Lists Search interface.
-
(optional) Use the Search feature to narrow down the selection lists displayed in the grid.
-
Use the checkbox on the left of a line to choose the selection lists you wish to merge
-
Select the Actions dropdown at the top right of the grid and choose Merge Selected.

-
Choose the lead selection list from the drop down menu. This is the list to which the items on the other list(s) will be transferred.
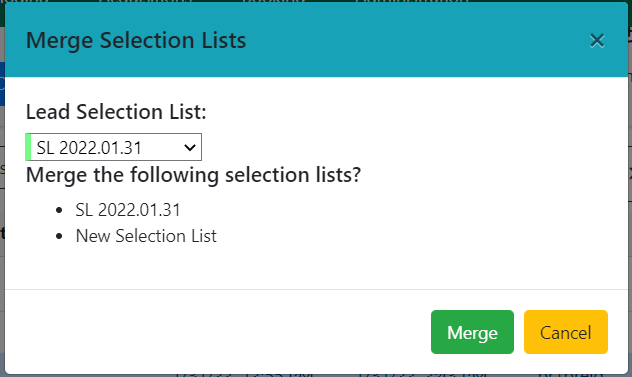
-
Select Merge to complete the merge process. Select Cancel to exit without merging.
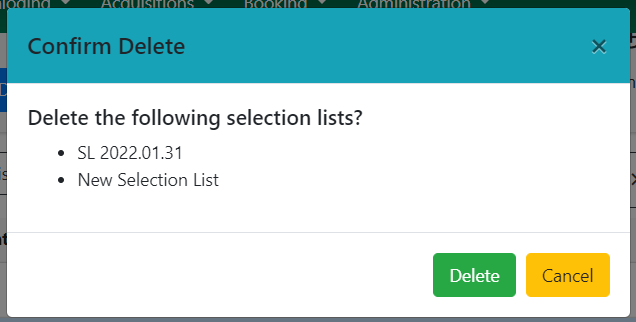
Delete Selection Lists
You can delete selection lists that you do not want to save. Deleting a selection list also deletes its line items. You will not be able to retrieve these items through Acquisitions Search after you have deleted the selection list.
-
Navigate to Acquisitions → Selection Lists. This will open the Selection Lists Search interface.
-
(optional) Use the Search feature to narrow down the selection lists displayed in the grid.
-
Use the checkbox on the left of a line to choose the selection list(s) you wish to delete.
-
Select the Actions dropdown at the top right of the grid and choose Delete Selected.
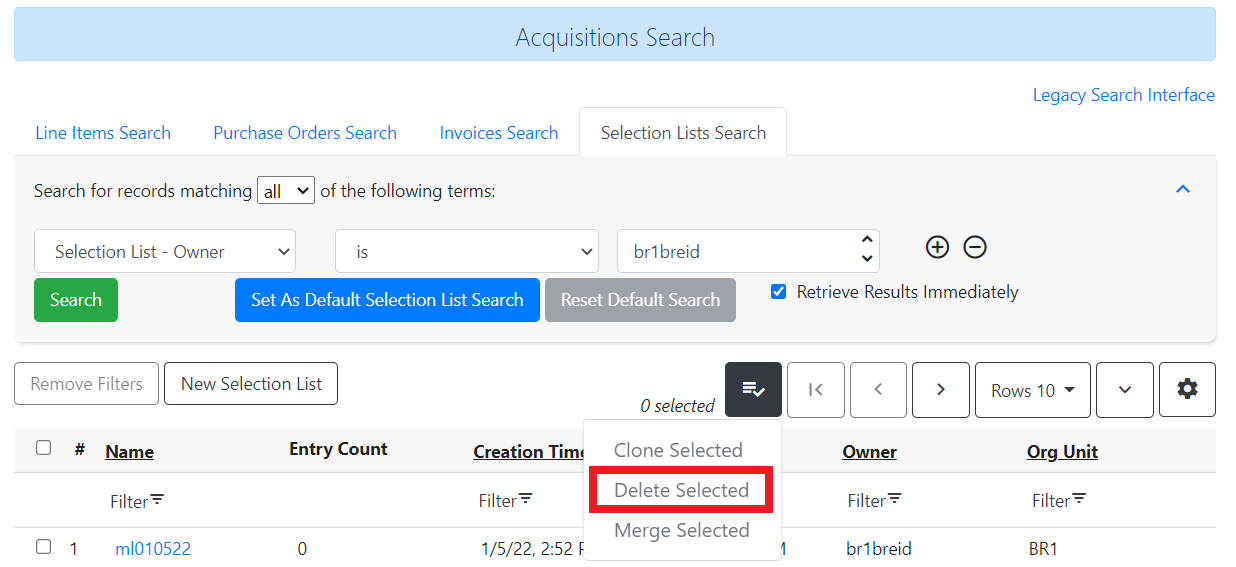
-
You will be presented with a confirmation dialog listing your chosen selection list(s).
-
Select Delete to complete the deletion process. Select Cancel to exit without deleting.
Add Line Items to a Selection List
You can add line items to a selection list in one of several ways:
-
Add a brief record from within the selection list itself.
-
Add a brief record from the New Brief Record interface.
-
Upload MARC order records from the Load MARC Order Records interface.
-
Add records through the MARC Federated Search interface.
-
Use the View/Place Orders menu item from the bibliographic record in the staff catalog.
-
Note that this will put you in the old Dojo interface and you will need to know the name of your existing selection list to enter it in the typeahead.
-
-
From the Patron Requests interface.
To add a line item from within a selection list:
-
Open the selection list.
-
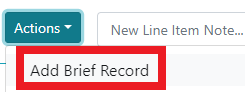
Select the Actions button in the upper left of the interface.
-
Choose Add Brief Record.
-
In the Add Brief Record interface, fill out the form. These fields map to specified MARC fields, noted in the table below.
-
As of 3.10 there is an open bug on the Identifier field and it is recommended that you skip this field
-
Price must contain a numeric value and will map to the line item price field . Select Add Record when you are finished filling out the form. You will be returned to your selection list and a new line item will be created with information from your brief record.
-
Mark Ready for Selector
After a line item has been added to a selection list or purchase order, you can mark it as Ready for Selector. A selector can then search for line items with the status Selector Ready for review and approval. This step is optional but may be useful to individual workflows, specifically those workflows where a library divides responsibility between the staff member who builds a selection list and the staff member who approves those items and sends them on to a purchase order.
-
Open the selection list.
-
Choose line items to mark Selector Ready.
-
Option A: If you only want to mark some line items as Selector Ready, select individual line items using the checkboxes on each line. You can also use the Line Items in Page to select all line items in your current page.
-
Option B: If you want to mark all line items as Selector Ready, use the All Line Items checkbox to select all line items in the selection list.
-
-
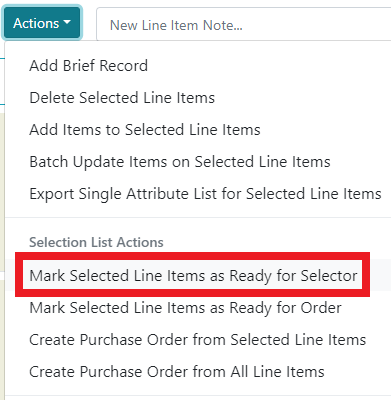
Select the Actions button in the upper left of the interface.
-
Choose Mark Selected Line Items as Ready for Selector.
-
You will be presented with a confirmation dialog. Choose Confirm to mark the line items as Selector Ready or choose Cancel to exit without marking line items as Selector Ready.
-
The marked line item(s) will be highlighted pink, and their status will change to Selector-Ready.

-
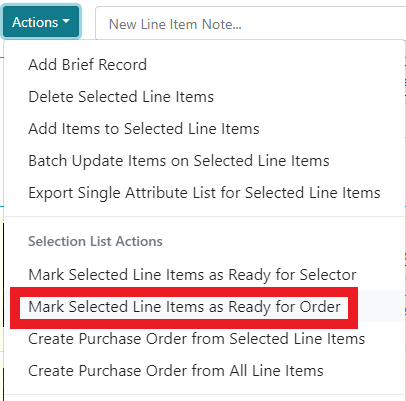
Once a Selector has reviewed the line items, they can either send them to a purchase order (see following section) or navigate to Actions → Mark Selected Line Items as Ready for Order as an intermediate step.
-
This action will update selected line item(s) to a status of Order Ready but it will not automatically add them to a purchase order.

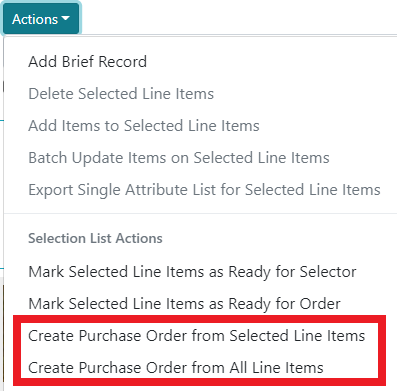
Send Selection List Line Items to Purchase Order
Use the actions menu to send a selection list or its line items to a purchase order.
-
Open the selection list.
-
Choose line items to send to a purchase order.
-
Option A: If you only want to send some line items to a purchase order, select individual line items using the checkboxes on each line. You can also use the Line Items in Page checkbox to select all line items in your current page, or the All Line Items checkbox to select all line items in the selection list.
-
Select the Actions button in the upper left of the interface.
-
Choose Create Purchase Order From Selected Line Items.
-
-
Option B: If you want to send all line items to a purchase order, you do not need to preselect items.
-
Select the Actions button in the upper left of the interface.
-
Choose Create Purchase Order From All Line Items.
-
-
-
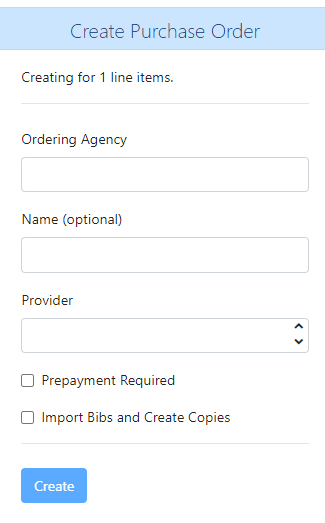
You will be taken to a Create Purchase Order interface, with the following fields:
-
Ordering Agency (required) - the organizational unit that owns the purchase order. This does not need to be the same as the organizational unit that created the selection list.
-
This dropdown will only show locations allowed by your working location and permissions
-
-
Name - the name of the purchase order. If you leave this field blank, the purchase order name will be the same as the autogenerated purchase order number.
-
Provider (required) - the Provider who will be supplying the order.
-
Prepayment Required - check this box to indicate that the purchase order requires prepayment.
-
Import Bibs and Create Copies - check this box to import on-order bibs and items into the catalog when you create the purchase order.
-
-
Once you have filled out the fields, click Create.
-
If you did not select Import Bibs and Create Copies, you will be taken to the purchase order interface and all line items will be in the status Pending-Order.
-
If you did select Import Bibs and Create Copies, you will be presented with a record import interface to import records from a file at the time of your purchase order creation.
-
This interface is similar to the MARC Batch Import/Export and Load MARC Order Records interfaces. Please see documentation about those interfaces for more information.
-
Once you have loaded your records, you will see your purchase order with all line items in the status Pending-Order.
-
-
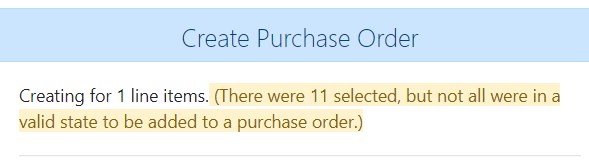
You can only link selection list line items to one purchase order. If you attempt to create a purchase order from selection list line items that are already part of a purchase order, those line items will be ignored when creating the purchase order and you will see the following warning message in the Create Purchase Order interface:
After you create your purchase order, if you navigate back to your selection list you will see that all line items sent to a purchase order are marked Pending-Order. The selection list will continue to update line items as they move through the Acquisitions process.
Purchase Orders
Purchase orders allow you to keep track of orders and, if EDI is enabled, communicate with your provider.
To view your purchase orders, navigate to Acquisitions → Purchase Orders. This will take you to the Acquisitions Search interface with the tab Purchase Orders Search selected, and a search will automatically be executed for all purchase orders owned by the logged-in user.
You can change this default search to include other search parameters. For more information please see the Creating a New Default Search documentation.
You can also use the Acquisitions Search interface to search for & retrieve purchase orders created by other users. For more information please see theAcquisitions Search documentation.
Creating a Purchase Order
You can create a purchase order from a selection list, from the Load MARC Order Records interface, or you can create a new purchase order from scratch.
To create a new purchase order from scratch:
-
Navigate to Acquisitions → Create Purchase Order.
-
Fill out the Create Purchase Order form:
-
Ordering Agency (required) - the organizational unit that owns the purchase order. This does not need to be the same as the organizational unit that created the selection list.
-
This dropdown will only show locations allowed by your working location and permissions.
-
-
Name - the name of the purchase order. If you leave this field blank, the purchase order name will be the same as the autogenerated purchase order number. Specifics about purchase order naming are in the following section of this document.
-
Provider (required) - the Provider who will be supplying the order.
-
Prepayment Required - check this box to indicate that the purchase order requires prepayment.
-
-
Select Create.
You will be taken to the purchase order interface where you will be able to add line items and take actions with your purchase order.
Naming a Purchase Order
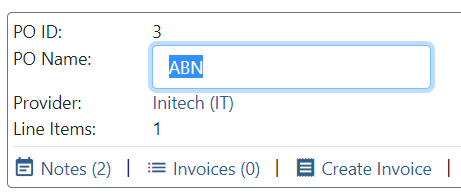
You can choose to give your purchase order a name. If you don’t give your purchase order a name, the system ID number will be used as the purchase order name.
When creating a purchase order or editing an existing purchase order, the purchase order name must be unique for the ordering agency. Evergreen will display a warning to users if they attempt to create or edit purchase order names that match the names of already existing purchase orders at the same ordering agency.
Purchase order names are case sensitive.
Duplicate PO Name Detection When Creating a New Purchase Order
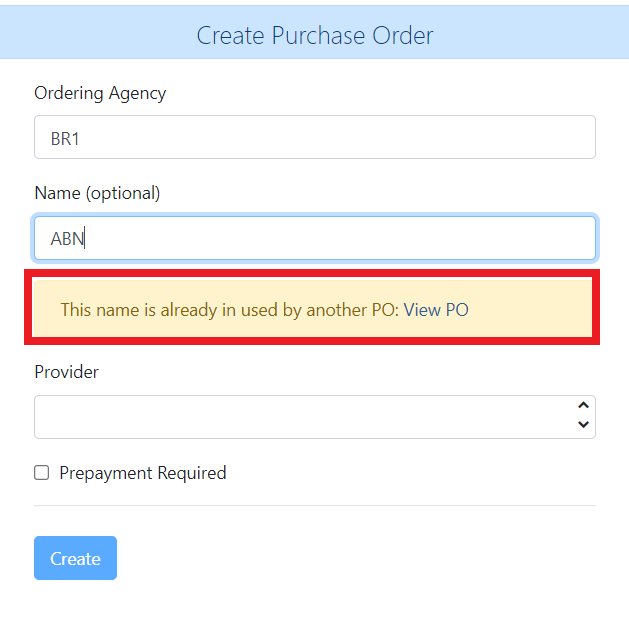
When a duplicate purchase order name is detected during the creation of a new purchase order, you will be given an alert, shown above. Select View PO to view the purchase order with the matching name. The purchase order will open in a new tab.
Return to the Create Purchase Order tab, and within the Name (optional) field, enter a different, unique name for the new purchase order.
If the purchase order name is unique for the ordering agency, you can continue filling in the remaining fields and click Create.
If the purchase order name is not unique for the ordering agency, the Create button will remain inactive until the purchase order is given a unique name.
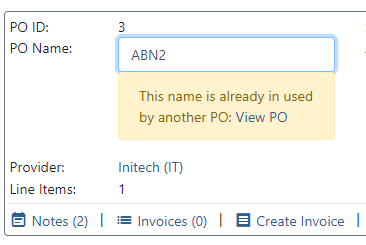
Duplicate PO Name Detection When Editing an Existing Purchase Order
Within the purchase order, the name field is located at the top left-hand side of the purchase order, indicated by PO Name. The name itself is a link. Click on the name and enter the new name in the box.
If the new purchase order name is unique for the ordering agency, the purchase order will be updated to reflect the new name once you click outside the box.
If the purchase order name is not unique for the ordering agency, the purchase order will not be updated with the new name and you will be given an alert. Select View PO to view the purchase order with the matching name. The purchase order will open in a new tab. Return to your original purchase order and give it a unique name.
Purchase Order Actions
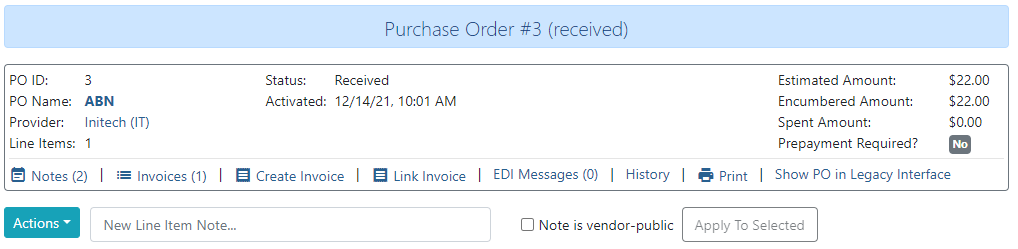
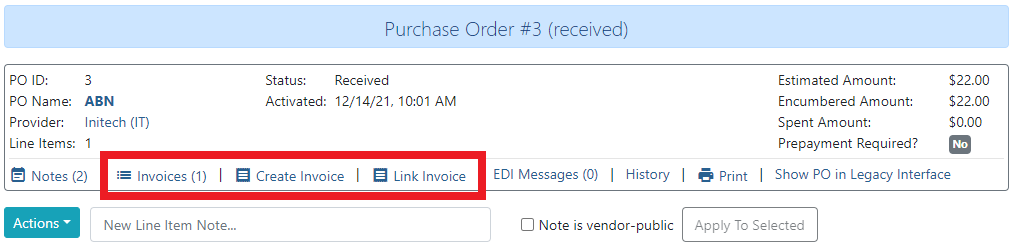
Across the top of your purchase order are several links and actions associated with the purchase order.
-
Notes - select this to add a free text note to the purchase order.
-
Selecting Vendor Public will make this note viewable to the vendor if you use EDI ordering.
-
The parentheses in the Notes link indicates the number of notes on the purchase order.
-
-
Invoices - select this to see all invoices associated with this purchase order.
-
The parentheses in the Invoices link indicates the number of invoices associated with this purchase order.
-
-
Create Invoice - select this to create a new invoice for this purchase order.
-
Link Invoice - select this to link the purchase order to an existing invoice.
-
EDI Messages - select this to see any EDI messages associated with this purchase order.
-
The parentheses in the EDI Messages link indicates the number of EDI messages associated with this purchase order.
-
-
History - select this to view the history of the purchase order.
-
Print - select this to view a printable copy of the purchase order. From within the printable view you can select Print Purchase Order to print the purchase order.
-
Cancel Order - select this to cancel the full order. You will only see this option if your order is already activated (i.e. in “on order” status). Orders in pending status cannot be canceled.
-
Show PO in Legacy Interface - select this if you need to perform an action not supported in the new interface, or if you otherwise wish to see your purchase order in the legacy (Dojo) interface.
-
You will only see this option if the Library Setting Display Links to Deprecated Acquisitions Interfaces is enabled for your workstation location.
-
Other actions related to purchase orders are accessible via the Actions button. Actions related to purchase orders in this menu include:
-
Load Bibs and Items - if your purchase order is still in a Pending state and contains titles which are not already in your catalog, you can select this to open an interface to load bibs and items into the catalog.
-
Loading parameters include templates, matching options, and quality parameters in the same manner that the regular MARC Batch Import tool uses.
-
This will create records and items based on the information already included with the line items. For example, if your line items only contain brief record information, this is what will be loaded into the catalog.
-
Once you complete entering in the parameters for the record import interface, select Submit. A progress bar will appear and the purchase order screen will refresh when the load is complete.
-
NOTE: Activating an order will also load bibs and items, unless you choose to activate the order without loading items.
-
-
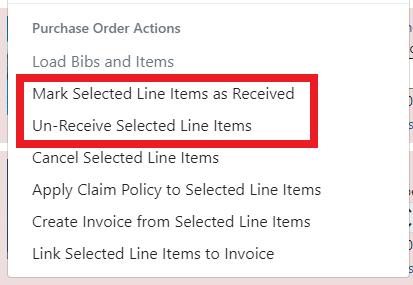
Mark Selected Line Items as Received - this will mark selected items as received.
-
Un-Receive Selected Line Items - this will mark selected items as “un-received” and return them to an on order status.
-
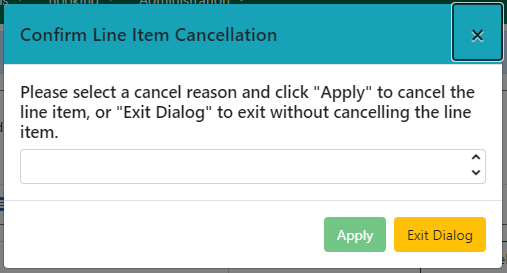
Cancel Selected Line Items - this will open a dialog asking you to confirm the cancellation and select a cancel or delay reason. Choose your cancel or delay reason from the dropdown, and select Apply to cancel or delay the selected line items with the chosen reason.
-
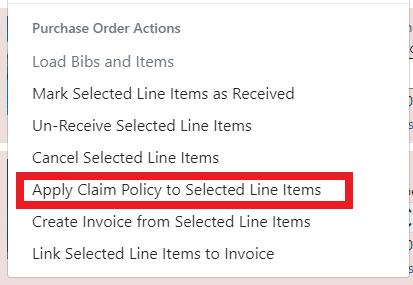
Apply Claim Policy to Selected Line Items - this will open a dialog asking you to choose the claim policy to apply to your selected line items. Choose your claim policy from the dropdown, and select Apply. Note that by default, the provider’s claim policy will be used on a purchase order.
-
Create Invoice from Selected Line Items - this will open a new tab with an invoice made up of your selected line items. See the Invoices documentation for more information.
-
Link Selected Line Items to Invoice - this will open a dialog asking you to select a provider and invoice number. Select Link Invoice to link your selected line items to the chosen invoice.
All of these actions, except Load Bibs and Items, will be applied to selected line items. You can select one, several, or all line items.
Actions that apply to line items regardless of whether they are in a selection list or purchase order are detailed above, under Line Item Actions.
Adding Line Items to a Purchase Order
If you created your purchase order from a selection list or from the Load MARC Order Records interface, your purchase order will already have line item information listed.
To add individual line items from within a purchase order:
-
Open the purchase order
-
Select the Actions button in the upper left of the interface
-
Choose Add Brief Record
-
In the Add Brief Record interface, fill out the form. These fields map to specified MARC fields, noted in the table below.
-
There is an open bug on the Identifier field and it is recommended that you skip this field
-
Price must contain a numeric value and will map to the line item price field
-
-
Select Add Record when you are finished filling out the form. You will be returned to your purchase order and a new line item will be created with information from your brief record.
You can also add line items to a purchase order from other interfaces:
-
In the staff catalog bibliographic record, from the View/Place Orders menu item
-
Note that this will put you in the old Dojo interface and you will need to know the name of your existing purchase order to enter it in the typeahead.
-
-
Load Catalog Record IDs interface
-
MARC Federated Search interface
Direct Charges
You can add direct charges to a purchase order. Direct charges are not associated with individual line items, but rather with the purchase order itself. You can add one or several direct charges to a purchase order. If a direct charge is directly linked to an invoice charge, the state of the invoice charge controls how the fund debit is handled.
Direct charges can be created for taxes, shipping fees, handling fees, blanket orders, or other reasons. To create a new direct charge, scroll to the bottom of the purchase order and select New Charge.
-
Charge Type (required) - the type of direct charge
-
Direct charge types are set in Acquisitions Administration → Invoice Item Types
-
-
Fund (required) - the fund to which the charge is assigned
-
Title / Description - a free text field describing the direct charge
-
Author - if an author is associated with the direct charge, enter that information here
-
Note - a free text note associated with the direct charge
-
Estimated Cost (required) - the estimated cost of the charge.

Select Save to save your direct charge. Direct charges will appear on an invoice that you create from the purchase order.
You can edit an existing direct charge by selecting Edit, or remove an existing direct charge by selecting Remove. You will not be asked to confirm removing a direct charge, so only select Remove if you are sure you want to remove the direct charge.
There are circumstances where a direct charge will be debited from a different fund than the one originally entered - e.g., prorating a charge can do this; or where the debited amount be different - e.g., proration, or the invoice charge simply having a different amount. The direct charges list now can display that information in the estimated cost column. The amount actually expended will be labeled Amount Expended.
There is a Disencumber Charge button which will be visible under select circumstances:
-
The purchase order is active (or received) but not canceled
-
The fund debit is not already zero
-
The fund debit is not already linked to an invoice
To see how direct charges are used with blanket orders, see the Blanket Orders documentation.
Activating a Purchase Order
Typically, for a purchase order to be activated, all line items must have items attached. Line items must have a price and be assigned to a fund. If any of these elements are missing, or if there is another reason the purchase order cannot be activated, the purchase order Status will indicate the reason the purchase order cannot be activated.
NOTE: Line item prices may not be null, but they can be set to zero.
NOTE: If activating the purchase order will cause one of your funds to exceed its warning percentage, you will see a warning in the purchase order Status. If activating the purchase order will cause one of your funds to exceed its stop percentage, you will not be permitted to activate the purchase order.
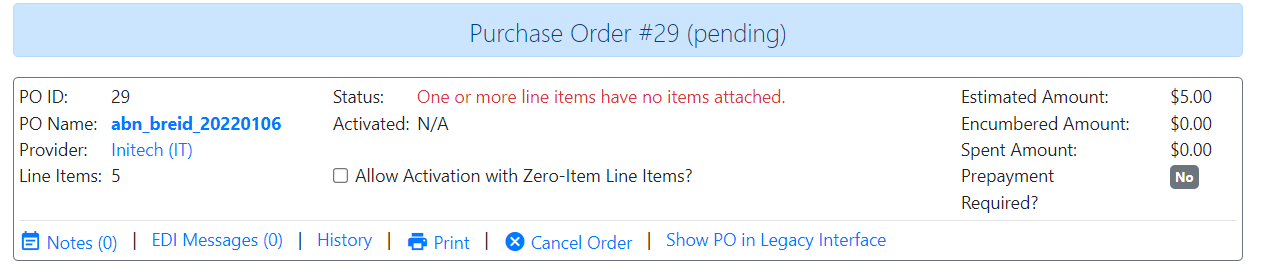
Note that you can opt to allow a purchase order to be activated without items attached. If you wish to do this, select the checkbox Allow Activation with Zero-Item Line Items?
Once your purchase order is in an activatable state, you will see two options to activate the purchase order: Activate Without Loading Items, and Activate Order.
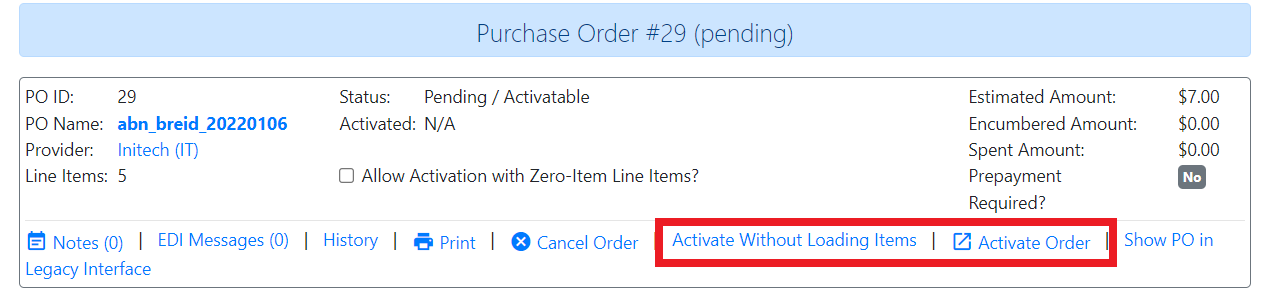
If you select Activate Without Loading Items, the order will be activated but no on-order items will be loaded into your catalog. Once the purchase order has been activated without loading items, it is not possible to load the items. This feature should only be used in situations where the items have already been added to the catalog, such as:
-
Cleaning up pre-acquisitions backlog
-
Direct purchases that have already been cataloged
If you select Activate Order, the purchase order will be activated. Several things will happen when the order is activated:
-
Bibliographic records and items will be loaded into the catalog
-
If you did not already set call numbers and barcodes for items, Evergreen will generate placeholder call numbers and barcodes.
-
Use the Library Settings Acquisitions: Temporary barcode prefix and Acquisitions: Temporary call number prefix to set prefixes for these placeholder values.
-
-
Funds associated with the purchases will be encumbered
-
If you are using EDI ordering, the Activate Order action will send the purchase order to the Provider indicated on the order.
After you click Activate Order, you will be presented with the record import interface if your purchase order contains items or records that are not already in the catalog. This interface will let you load on-order items and/or records into your catalog, and link these with the purchase order.
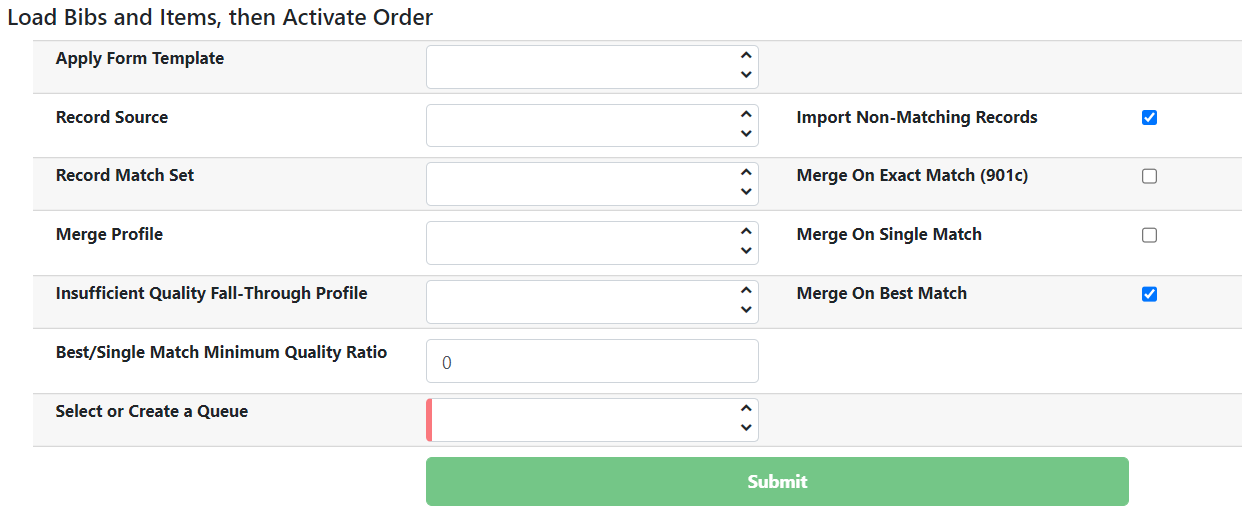
Loading parameters include templates, matching options, and quality parameters in the same manner that the regular MARC Batch Import/Export tool uses.
NOTE: This interface will create records and items based on the information already included with the line items. For example, if your line items only contain brief record information, this is what will be loaded into the catalog.
Once you complete entering in the parameters for the record import interface, select Submit. A progress bar will appear and the purchase order screen will refresh when the load is complete.
Receiving Line Items
Marking line items as received indicates that your library has received the physical items ordered. To receive line items, open the purchase order in question. You can select individual line items, all line items in the page, or all line items on the purchase order. Navigate to the Actions button in the upper left of your purchase order and select Mark Selected Line Items as Received.
The screen will refresh and the selected line items will now be in a Received status. If you have alerts on any line items, you will be presented with a confirmation dialog for each alert in your selected line items. If there are multiple alerts, the dialog will show “Alert X of Y” and you must acknowledge each alert to receive the line item(s) associated with the alert(s).
If you have erroneously received line items, you can select the line items in question and then navigate to the Actions button in the upper left of your purchase order and select Un-Receive Selected Line Items. This will return selected items to an On Order status.
Canceling or Delaying Line Items
Line items may also be marked as Canceled or Delayed. Cancel and delay reasons and parameters are set up in Acquisitions Administration.
To cancel line items or mark them delayed, select one, several, or all line items in the purchase order:
-
Navigate to the Actions button in the upper left of your purchase order and select Cancel Selected Line Items.
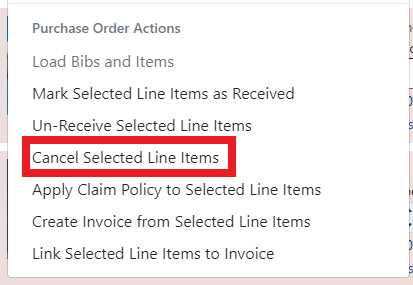
-
You will see a dialog asking you to confirm the line item cancellation and select a cancel or delay reason.
-
Choose your cancel or delay reason from the dropdown, and select Apply to cancel or delay the line item with the selected reason. Select Exit Dialog to exit without canceling items.
Cancel/delay reasons will appear on the worksheet and the printable purchase order.
Items which are marked canceled or delayed with a reason that has Keep Debits set to true will still have their funds encumbered, and can still be marked received at the line item level.
Items which are marked canceled or delayed with a reason that has Keep Debits set to false will have funds released and cannot be marked received at the line item level, and will further attempt to delete any catalog items associated with the canceled line item. Since deleting items requires the DELETE_COPY permission, the cancel or delay will fail with the ACQ_NOT_CANCELABLE error if the user does not have this permission.
NOTE: Using the Actions → Mark Selected Line Items as Received action will always receive canceled line items, regardless of the cancel reason. If the cancel reason had Keep Debits set to false, the act of receiving said line item will recreate the encumbrance.
NOTE: When all the items of a line item are canceled through the Acquisitions interface, the parent line item is also canceled. The cancel reason will be calculated based on the following:
-
The cancel reason for the last item to be canceled if the cancel reason’s Keep Debits setting is true.
-
The cancel reason for any other item on the line item if the cancel reason’s Keep Debits setting is true.
-
The cancel reason for the last item to be canceled if no items on the line item have a cancel reason where the Keep Debits setting is true.
Claiming Line Items
Claiming lets you apply a claim policy to selected line items. Claiming policies are set up in Acquisitions Administration.
NOTE: You will not have the option to mark selected line items claimed until sufficient time has passed according to your claim policy. Applying a claim policy does not initiate a claim, it simply tells the system what to do when or if a claim is initiated.
The default claim policy associated with each Provider is automatically assigned to line items and items ordered from the provider, or you can choose to assign another claim policy to a line item.
-
Select one, several, or all line items in the purchase order.
-
Navigate to the Actions button in the upper left of your purchase order and select Apply Claim Policy to Selected Line Items.
-
You will see a dialog asking you to choose the claim policy to apply. Choose your claim policy from the dropdown, and select Apply to apply the claim policy. Select Exit Dialog to exit without applying a claim policy.
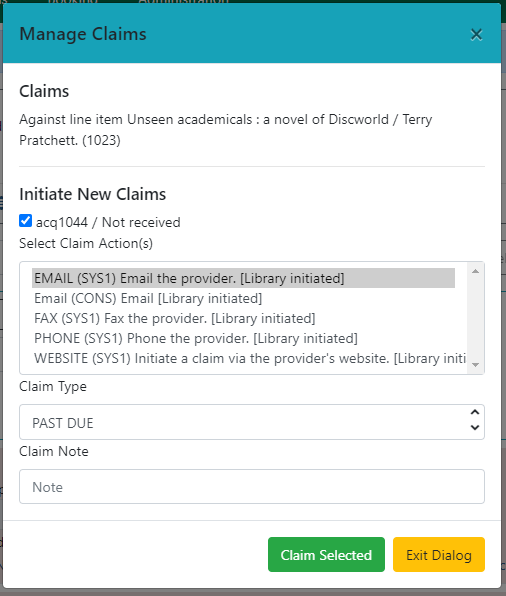
After you order an item, once the time interval defined by the claim policy has passed, you can claim the item. You can claim items individually by navigating to the Line Item Actions Menu and selecting Claims.
A dialog will open allowing you to initiate a new claim against the line item. Select the item barcode(s) you wish to claim, select the Claim Type, and enter a Claim Note if you wish. Click Claim Selected to mark the selected item(s) as claimed. Click Exit Dialog to exit without claiming the item(s)

Claiming can be done in batch via the Acquisitions → Claim Ready Items interface.
Invoicing Line Items
From a purchase order, you have several invoicing options. You can create or link an invoice at any point after your order is placed, whether or not items are received. Open the purchase order and select either Create Invoice to create a new invoice or Link Invoice to link the purchase order to an existing invoice.
To view invoices linked to a purchase order, open a purchase order and select Invoices. The number in parentheses indicates the number of invoices that are attached to the purchase order.
Please see the Invoicing documentation for specific information about invoicing.
Brief Records
Brief records are short bibliographic records with minimal information that are often used as placeholder records until items are received. Brief records can be added to selection lists or purchase orders and can be imported into the catalog. You can add brief records to new or existing selection lists. You can add brief records to new, pending or on-order purchase orders.
Add brief records to a selection list
-
Select Acquisitions → New Brief Record.
-
This version of the brief record interface is still in Dojo.
-
-
Choose a selection list from the drop down menu, or enter the name of a new selection list.
-
Enter bibliographic information in the desired fields.
-
Select Save Record.
Alternatively, you can also add brief records from within an existing selection list.
-
Open or create a selection list. See the section on selection lists for more information.
-
Select Actions and then Add Brief Record.
-
Enter bibliographic information in the desired fields.
-
Select Add Record to add the record to your selection list.
Add brief records to purchase orders
You can also add brief records to new or existing purchase orders.
-
Open or create a purchase order. See the section on purchase orders for more information.
-
Select Actions and then Add Brief Record.
-
Enter bibliographic information in the desired fields.
-
Select Add Record to add the record to your purchase order.
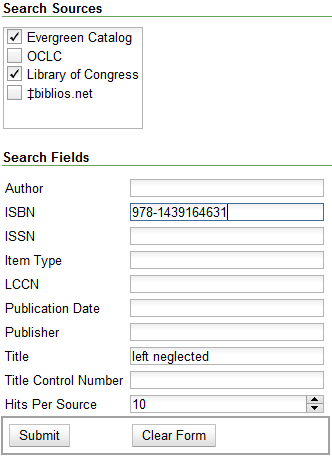
MARC Federated Search
The MARC Federated Search interface enables you to import bibliographic records into a selection list or purchase order from a Z39.50 source.
As of version 3.10 this interface is still in Dojo.
-
Naviate to Acquisitions → MARC Federated Search.
-
Select the boxes of z39.50 services that you want to search. Your local Evergreen catalog is checked by default. Select Submit.
-
A list of results will appear. Select the Copies link to add copy information to the line item.
-
Select the Notes link to add notes or line item alerts to the line item.
-
Enter a price in the Estimated Price field.
-
You can save the line item(s) to a selection list by selecting the line item and then in the upper-left select Actions → Save Items to Selection List. You can also create a purchase order from the line item(s) by selecting the line item and then in the upper-left select Actions → Create Purchase Order.