Circulation - Patron Record
- Searching Patrons
- Retrieve Recent Patrons
- Registering New Patrons
- Patron Self-Registration
- Updating Patron Information
- Renewing Library Cards
- Lost Library Cards
- Resetting Patron’s Password
- Barring a Patron
- Barred vs. Blocked
- Consolidated Patron Notes, Alerts, Blocks, and Messages
- Merging Patrons
- User Buckets
Searching Patrons
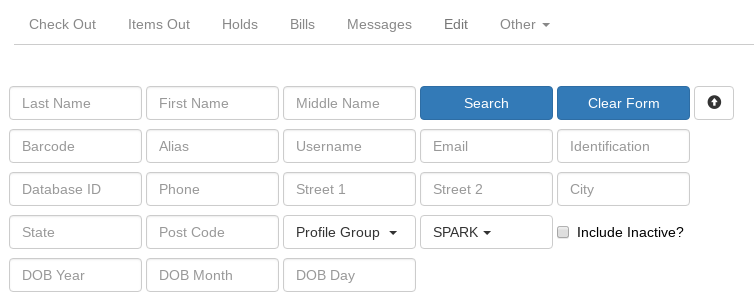
To search for a patron, select Search → Search for Patrons from the menu bar.
The Patron Search screen will display. It will contain options to search on the following fields:
-
Last Name
-
First Name
-
Middle Name

Next to the Clear Form button there is a button with an arrow pointing down that will display the following additional search fields:
-
Barcode
-
Alias
-
Username
-
Email
-
Identification
-
database ID
-
Phone
-
Street 1
-
Street 2
-
City
-
State
-
Postal Code
-
Profile Group
-
Home Library
-
DOB (date of birth) year
-
DOB month
-
DOB day
To include patrons marked ``inactive'', click on the Include Inactive? checkbox.
|
Tips for searching
|
Once you have located the desired patron, click on the entry row for this patron in the results screen. A summary for this patron will display on the left hand side.
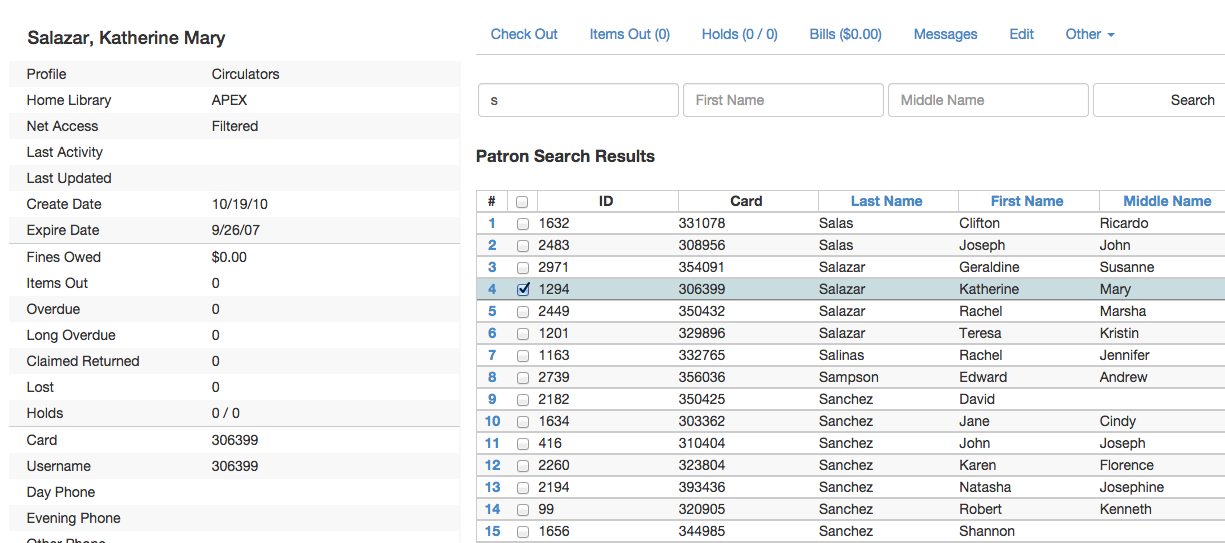
The Patron Search button on the upper right may be used to resume searching for patrons.
Retrieve Recent Patrons
Setting up Retrieve Recent Patrons
-
This feature must be configured in the Library Settings Editor (Administration → Local Administration → Library Settings Editor). The library setting is called "Number of Retrievable Recent Patrons" and is located in the Circulation settings group.
-
A value of zero (0) means no recent patrons can be retrieved.
-
A value greater than 1 means staff will be able to retrieve multiple recent patrons via a new Circulation → Retrieve Recent Patrons menu entry.
-
The default value is 1 for backwards compatibility. (The Circulation → Retrieve Last Patron menu entry will be available.)
-
Retrieving Recent Patrons
-
Once the library setting has been configured to a number greater than 1, the option Retrieve Recent Patrons will appear below the Retrieve Last patron option in the Circulation drop-down from the Menu Bar (Circulation → Retrieve Recent Patrons).
-
When selected, a grid will appear listing patrons accessed by that workstation in the current session. The length of the list will be limited by the value configured in the Library Settings Editor. If no patrons have been accessed, the grid will display "No Items To Display."
Registering New Patrons
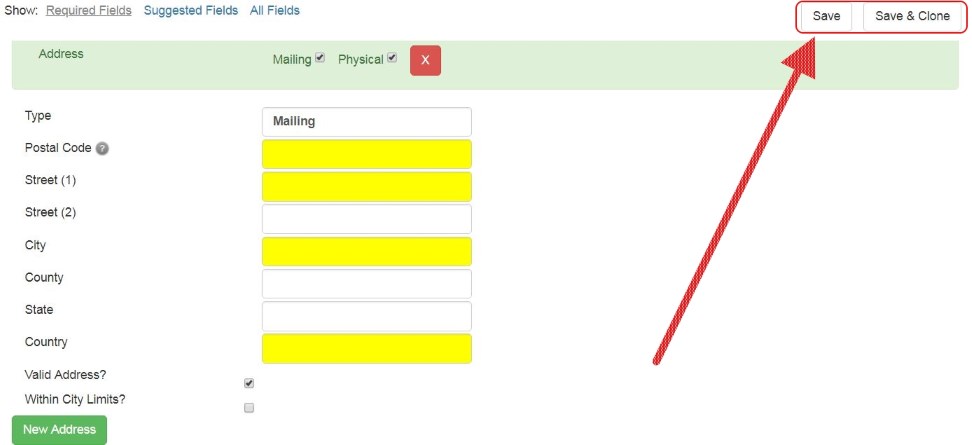
To register a new patron, select Circulation → Register Patron from the menu bar. The Patron Registration form will display.
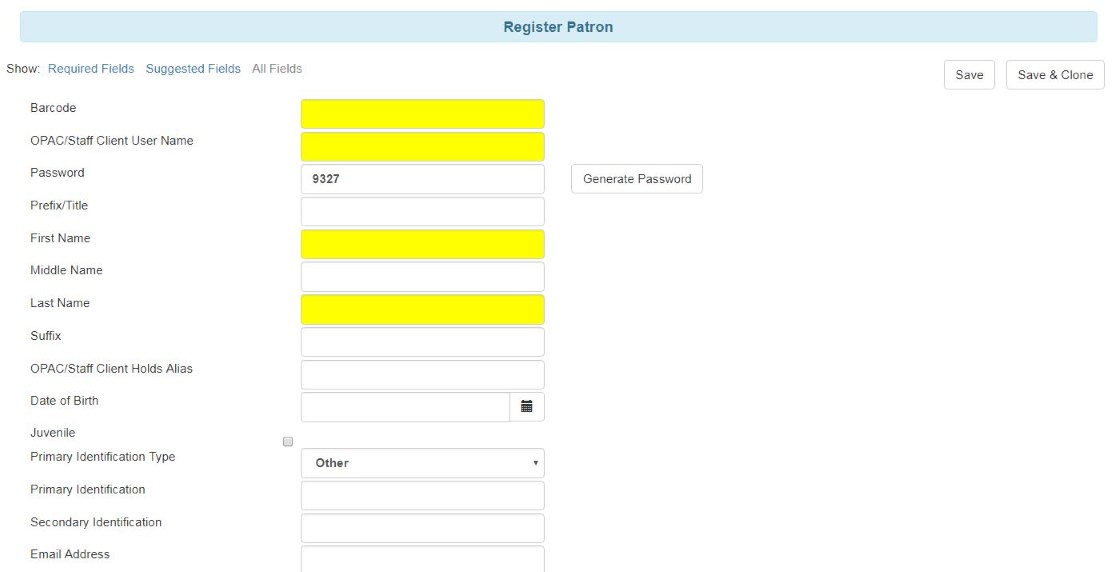
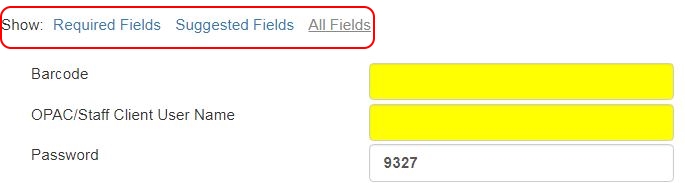
Mandatory fields display in yellow.

The Show: Required Fields and Show: Suggested Fields links may be used to limit the options on this page.
When finished entering the necessary information, select Save to save the new patron record or Save & Clone to register a patron with the same address. When Save & Clone is selected, the address information is copied into the resulting patron registration screen. It is linked to the original patron. Address information may only be edited through the original record.
|
Photo URL field
As of 3.8, a staff user with the UPDATE_USER_PHOTO_URL permission can add or edit a URL that will pull in a patron photo image from an external server. Only https links are supported in this field.
Location of Photo URL field in the Patron Editor:
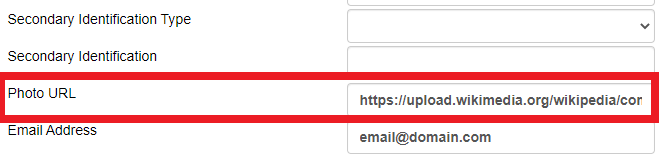
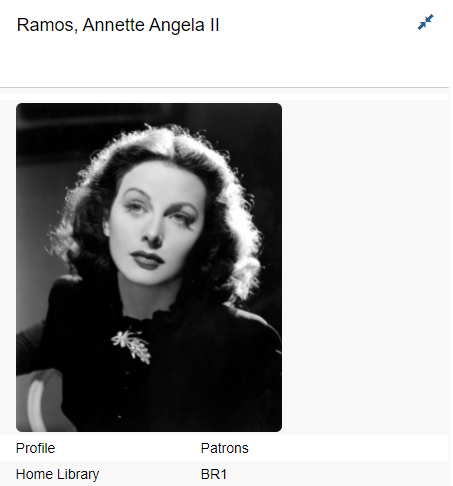
Enter the URL in that field and click Save at the top of the Patron Editor. The image indicated by the URL will display in the Patron Sidebar:
Email field
It’s possible for administrators to set up the email field to allow or disallow
multiple email addresses for a single patron (usually separated by a comma).
If you’d like to make changes to whether multiple email addresses
are allowed here or not, ask your system administrator to change the
ui.patron.edit.au.email.regex library setting.
Preferred Language field
As of 3.9 there is a Patron Preferred Language field in the Patron Registration and Patron Edit interfaces. This field contains a dropdown listing available locales for that Evergreen instance. Locales are configured in the config.i18n_locales table and you can use this feature to send action trigger messages in different languages.
For more information please see Creating Alternate Message Templates.
Patron Self-Registration
Abstract
Patron Self-Registration allows patrons to initiate registration for a library account through the OPAC. Patrons can fill out a web-based form with basic information that will be stored as a “pending patron” in Evergreen. Library staff can review pending patrons in the staff-client and use the pre-loaded account information to create a full patron account. Pending patron accounts that are not approved within a configurable amount of time will be automatically deleted.
Patron Self-Registration
-
In the OPAC, click on the link to Request Library Card
-
Fill out the self-registration form to request a library card, and click Submit Registration.
-
Patrons will see a confirmation message: “Registration successful! Please see library staff to complete your registration.”

Managing Pending Patrons
-
In the staff client select Circulation → Pending Patrons.
-
Select the patron you would like to review. In this screen you have the option to Load the pending patron information to create a permanent library account.
-
To create a permanent library account for the patron, click on the patron’s row, click on the Load Patron button at the top of the screen. This will load the patron self-registration information into the main Patron Registration form.
-
Fill in the necessary patron information for your library, and click Save to create the permanent patron account.
Updating Patron Information
Retrieve the patron record as described in the section Searching Patrons.
Click on Edit from the options that display at the top of the patron record.
Edit information as required. When finished, select Save.
After selecting Save, the page will refresh. The edited information will be reflected in the patron summary pane.
|
Update Hold Notifications
The public catalog and staff client have the ability to update existing holds if a patron or a staff member changes certain notification preferences or contact information. Evergreen will detect these changes and prompt the staff user or patron user and ask if they want to update existing holds with the new contact information and/or notification preferences.
| Email notices are sent at the time of hold capture, the system will not prompt a user when a change to the email address is made - the user will only be prompted if email notifications are turned off or turned on, or if an email address is invalidated by a staff user. |
Staff Client
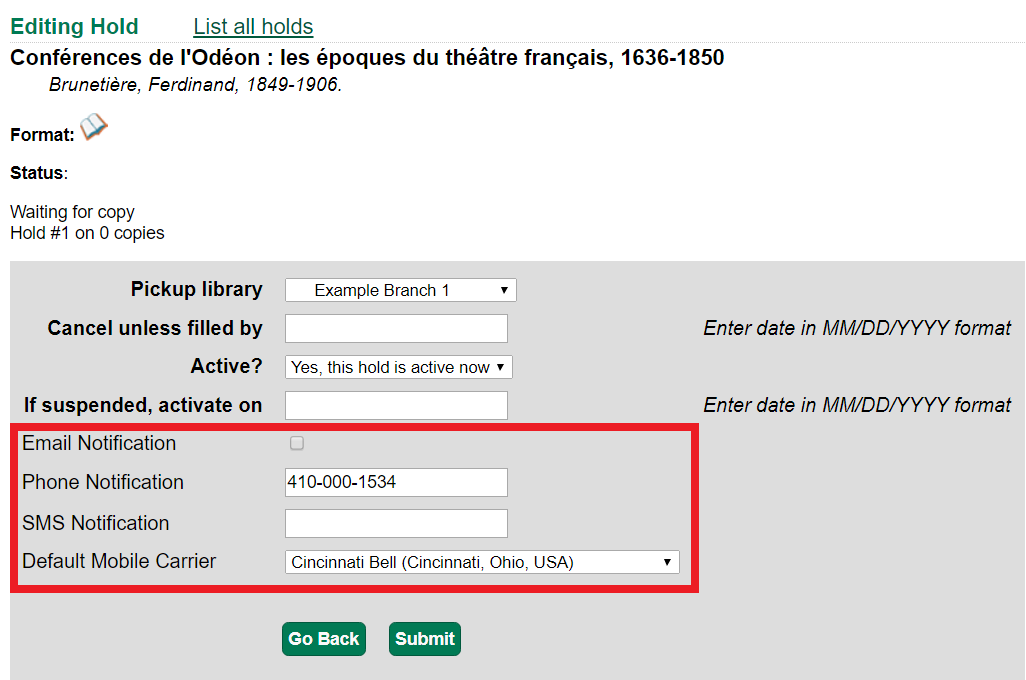
In the web staff client, the staff user should retrieve a patron and select the Edit tab.
If the staff user makes any changes to the any of the following fields, when the staff user clicks Save, Evergreen will check if the patron has current unfulfilled holds.
-
Daytime Phone
-
Evening Phone
-
Other Phone
-
Default Phone Number
-
Default Hold Pickup Location
-
any of the Holds Notices checkboxes
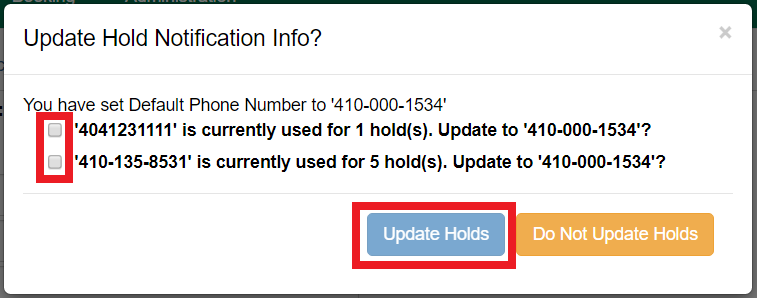
If unfulfilled holds are detected, the staff user will be prompted via a modal to update these holds with the new or updated contact information, or to remove contact information from the holds.
Select the desired holds to update by checking the box next to each different notification grouping and clicking Update Holds. The selected holds will be updated. If the user does not wish to update holds, click Do Not Update Holds.
The Update Holds process will also be triggered if a phone number or email address is invalidated. Once the staff user clicks Save after invalidating a phone number or email address, Evergreen will check for unfulfilled holds and prompt for removing a notification method if necessary.
As part of this work, certain form validation constraints were added to the web client Patron Editor interface. These include the following:
-
If the staff user sets the Holds Notices checkbox to true for Email Notify, Evergreen will enforce entry of a patron Email Address, if Email Address is blank.
-
If the staff user sets the Holds Notices checkbox to true for Phone Notify, Evergreen * will enforce entry of a Default Phone Number, if Default Phone Number is blank.
-
If the staff user sets the Holds Notices checkbox to true for SMS Notify, Evergreen will enforce entry of a Default SMS/Text Number, if the Default SMS/Text Number field is blank. * Additionally, even if the Holds Notices checkbox is false, if a staff user enters a number in the Default SMS/Text Number field, Evergreen will enforce a selection from the Default SMS Carrier dropdown.
Public Catalog
From the Public Catalog MyAccount interface, the patron user should navigate to the Account Preferences tab and then to the Notification Preferences tab.
If the patron user makes any changes to any of the notification fields, when the patron user clicks Save Evergreen will check if the patron has current unfulfilled holds.
If unfulfilled holds are detected, the patron user will be prompted via an interstitial page to update these holds with the new or updated contact information.
Select the desired holds to update by checking the box next to the each notification grouping and click Update. The selected holds will be updated. If the user does not wish to update holds, click Continue without updating.

This work also added a Notify Method column to the Current Items on Hold table, found under the Holds tab, that will show the patron user which notification methods are active, along with which numbers will be used for Phone or SMS notification.

Additionally, patron users can now edit hold notification preferences on individual holds by using the Edit function found in the Current Items on Hold table.
Renewing Library Cards
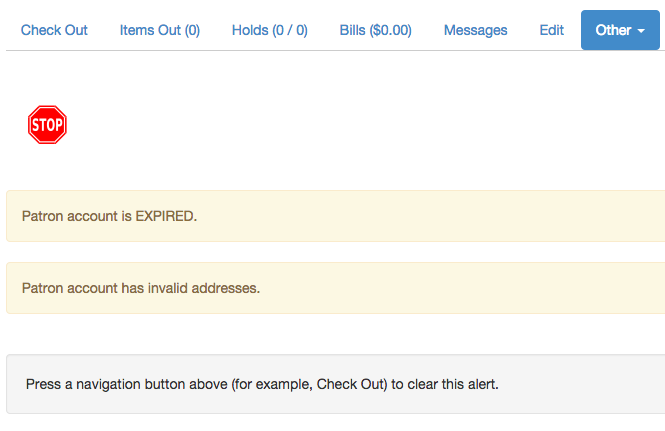
Expired patron accounts when initially retrieved – an alert stating that the ``Patron account is EXPIRED.''
Open the patron record in edit mode as described in the section Updating Patron Information.
Navigate to the information field labeled Privilege Expiration Date. Enter a new date in this box. Or click the calendar icon, and a calendar widget will display to help you easily navigate to the desired date.
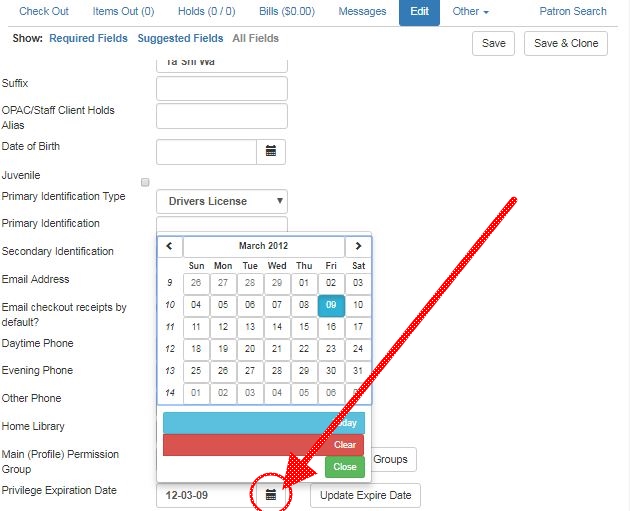
Select the date using the calendar widget or key the date in manually. Click the Save button. The screen will refresh and the ``expired'' alerts on the account will be removed.
Lost Library Cards
Retrieve the patron record as described in the section Searching Patrons.
Open the patron record in edit mode as described in the section Updating Patron Information.
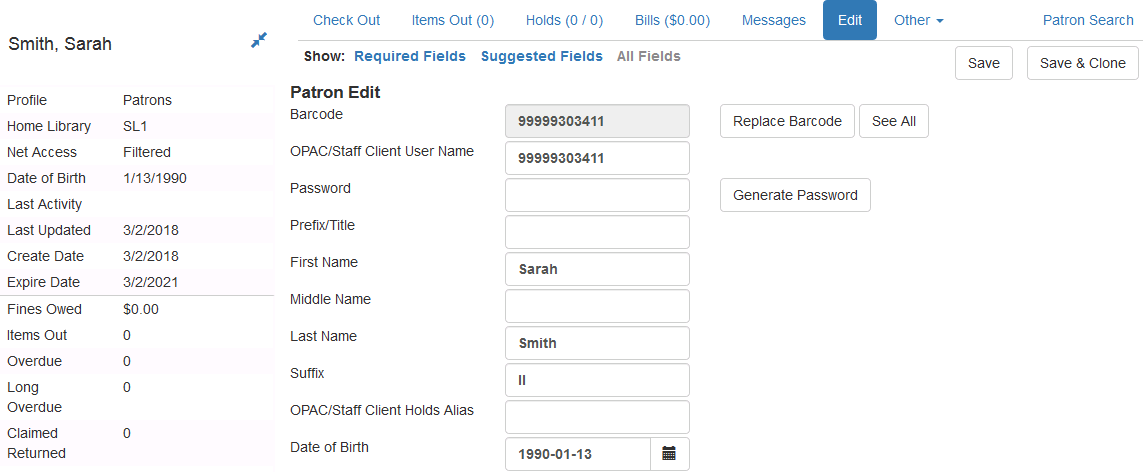
Next to the Barcode field, select the Replace Barcode button.

This will clear the barcode field. Enter a new barcode and Save the record. The screen will refresh and the new barcode will display in the patron summary pane.
If a patron’s barcode is mistakenly replaced, the old barcode may be reinstated. Retrieve the patron record as described in the section Searching Patrons. Open the patron record in edit mode as described in the section Updating Patron Information.
Select the See All button next to the Replace Barcode button. This will display the current and past barcodes associated with this account.
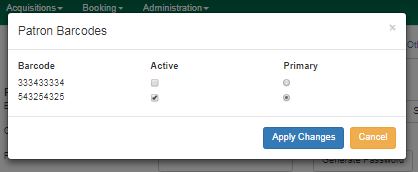
Check the box(es) for all barcodes that should be active for the patron. An active barcode may be used for circulation transactions. A patron may have more than one active barcode. Only one barcode may be designated primary. The primary barcode displays in the patron’s summary information in the Library Card field.
Once you have modified the patron barcode(s), Save the patron record. If you modified the ``primary'' barcode, the new primary barcode will display in the patron summary screen.
Resetting Patron’s Password
A patron’s password may be reset from the OPAC or through the staff client. To reset the password from the staff client, retrieve the patron record as described in the section Searching Patrons.
Open the patron record in edit mode as described in the section Updating Patron Information.
Select the Generate Password button next to the Password field.
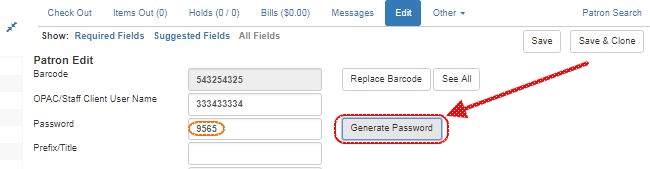
| The existing password is not displayed in patron records for security reasons. |
A new number will populate the Password text box. Make note of the new password and Save the patron record. The screen will refresh and the new password will be suppressed from view.
Barring a Patron
A patron may be barred from circulation activities. To bar a patron, retrieve the patron record as described in the section Searching Patrons.
Open the patron record in edit mode as described in the section Updating Patron Information.
Check the box for Barred in the patron account.
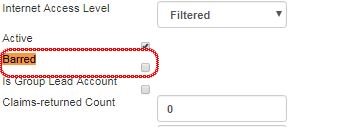
Save the user. The screen will refresh.
| Barring a patron from one library bars that patron from all consortium member libraries. |
To unbar a patron, uncheck the Barred checkbox.
Barred vs. Blocked
Barred: Stops patrons from using their library cards; alerts the staff that the patron is banned/barred from the library. The check-out functionality is disabled for barred patrons (NO option to override – the checkout window is unusable and the bar must be removed from the account before the patron is able to checkout items). These patrons may still log in to the OPAC to view their accounts.
Blocked: Often, these are system-generated blocks on patron accounts.
Some examples:
-
Patron exceeds fine threshold
-
Patron exceeds max checked out item threshold
A notice appears when a staff person tries to checkout an item to blocked patrons, but staff may be given permissions to override blocks.
Consolidated Patron Notes, Alerts, Blocks, and Messages
Evergreen provides a variety of options for adding notifications to patron accounts. Notes, Alerts, Blocks, and Messages can all be applied to a patron account and managed in the Notes tab that is present in every account. It is also possible to add a custom Standing Penalty to a patron’s account in the Notes tab.
The visibility and functionality of each option varies and can depend on the configuration of the Standing Penalty type.
Managing Notes, Alerts, and Blocks
As with other patron functions, Notes, Alerts, and Blocks are controlled by the existing UPDATE_USER and VIEW_USER permissions. A staff member who has permissions to view or edit a user will be able to view and edit
notes for that user.
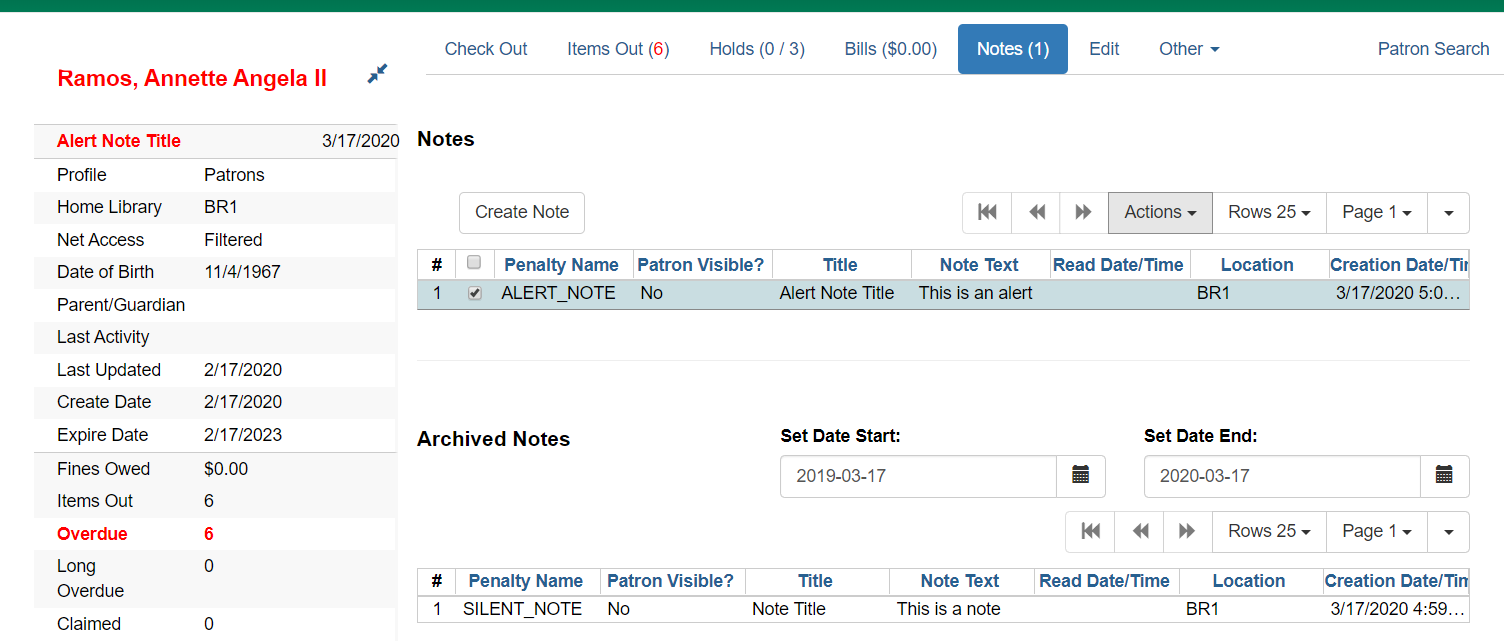
In the Notes tab of a patron account, the top portion of the screen displays active notes, alerts, and blocks while the bottom portion of the screen will display those that have been archived. The archived notes, alerts, and blocks from the last year display by default. The calendar pickers can be used to view older archived notes, alerts, or blocks.
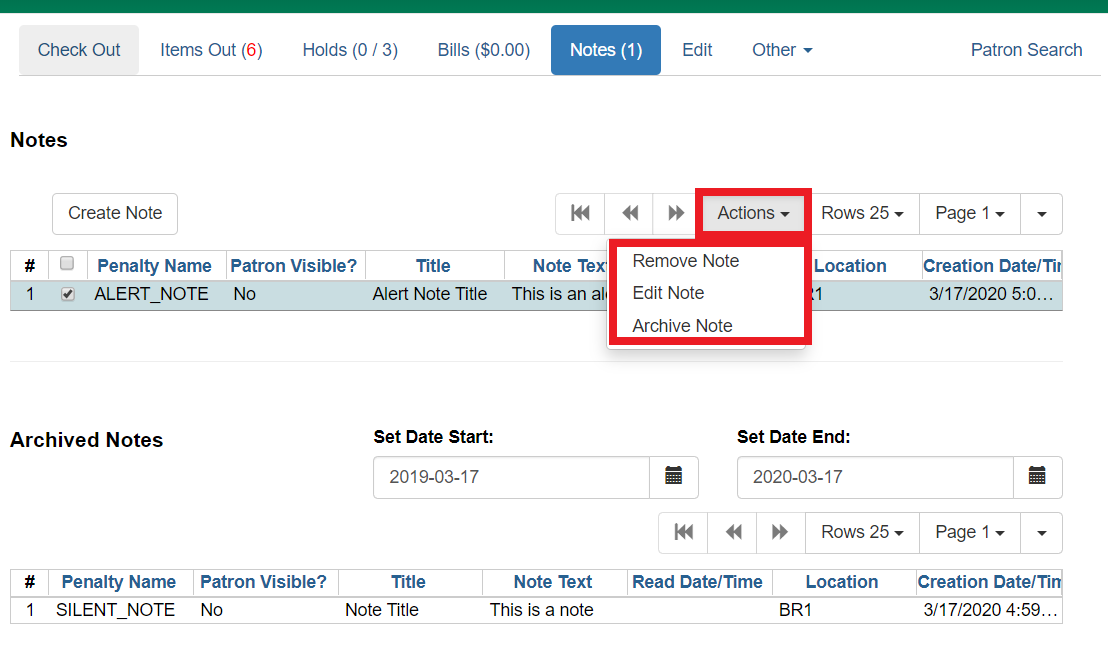
New notes, alerts, and blocks can be added by clicking the Create Note button. This process and the functionality of each type of notification are further detailed in this documentation. Library staff can Edit, Remove, and Archive notes, alerts, and blocks by selecting them from the list and then going to the Actions menu (you can also right-click on a selection to view the Actions menu).
-
Edit Note - allows staff to modify the original note, alert, or block
-
Patron visible notes, alerts, and blocks that have been read by the patron cannot be edited by staff.
-
When a note, alert, or block is edited, the note will retain the original context org unit instead of the current workstation library.
-
-
Remove Note - will permanently delete the note, alert, or block. There will not be a record of it on the patron account once it has been removed.
-
Patron visible notes, alerts, and blocks that have been read by the patron cannot be deleted by staff.
-
-
Archive Note - will move the note, alert, or block to the Archived Notes section of the screen.
-
Archiving a block will remove the block from the patron account.
-
Once archived, notes, alerts, and blocks cannot be deleted from the Notes tab. Archived patron visible notes will continue to display in the patron’s OPAC account unless they are deleted from the Other → Message Center interface.
-
Notes
Notes can be added to patron accounts. Notes can be visible in the patron OPAC account or they can be visible only to library staff.
Note Display
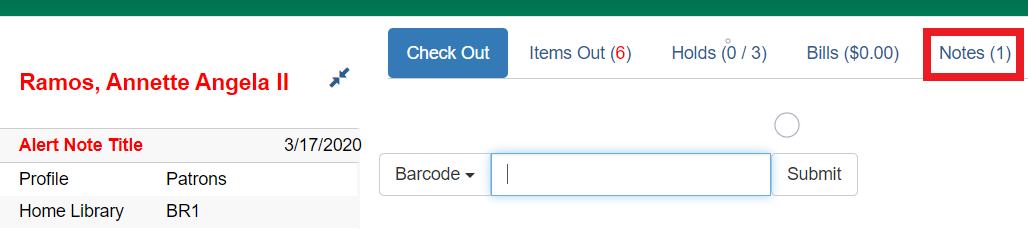
When a note is present on a patron account, staff will see a counter on the tab ribbon that indicates how many un-archived notes, alerts, and blocks are on the account that are visible at the workstation at which the staff member is logged in. To view the note, click on the Notes tab.
The Notes tab contains a list of all of the notes, alerts, and blocks present on a patron’s account. The top portion of the screen displays active notes, alerts, and blocks, while the bottom portion of the screen will display those that have been archived within the past year (by default). Notes only appear in the Notes tab, whereas Alerts and Messages can appear elsewhere.
Create a Note
To create a new Note:
-
Go to the Notes tab in the patron account and click Create Note.
-
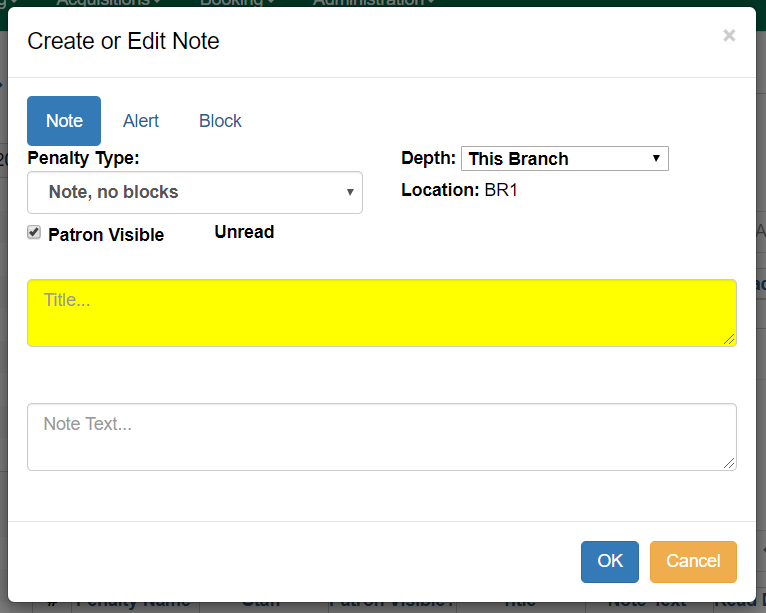
A modal will appear where you can create a new Note. Required fields are highlighted in yellow.
-
Select Note at the top of the screen.
-
Check the box next to Patron Visible for a note that will display in the patron’s OPAC account. Leave it unchecked to create a note that is staff visible only.
-
The Depth drop down menu controls the visibility of the note. Values correspond to OPAC labels, and by default they are This Branch, Local Library System, and Everywhere.
-
By default, the Location will be set to the library the staff member’s workstation is registered to. The note will be visible to the workstation library, as well as all Org Units that are ancestors and descendants in the Org Unit hierarchy.
-
-
Enter a title or subject for the note in the Title… field. The title field is required.
-
Enter the main content of the note in the Note Text… field.
-
Enter your initials if your library requires initials when creating notes on patron accounts.
-
Click OK to create the note.
Messages and Message Center
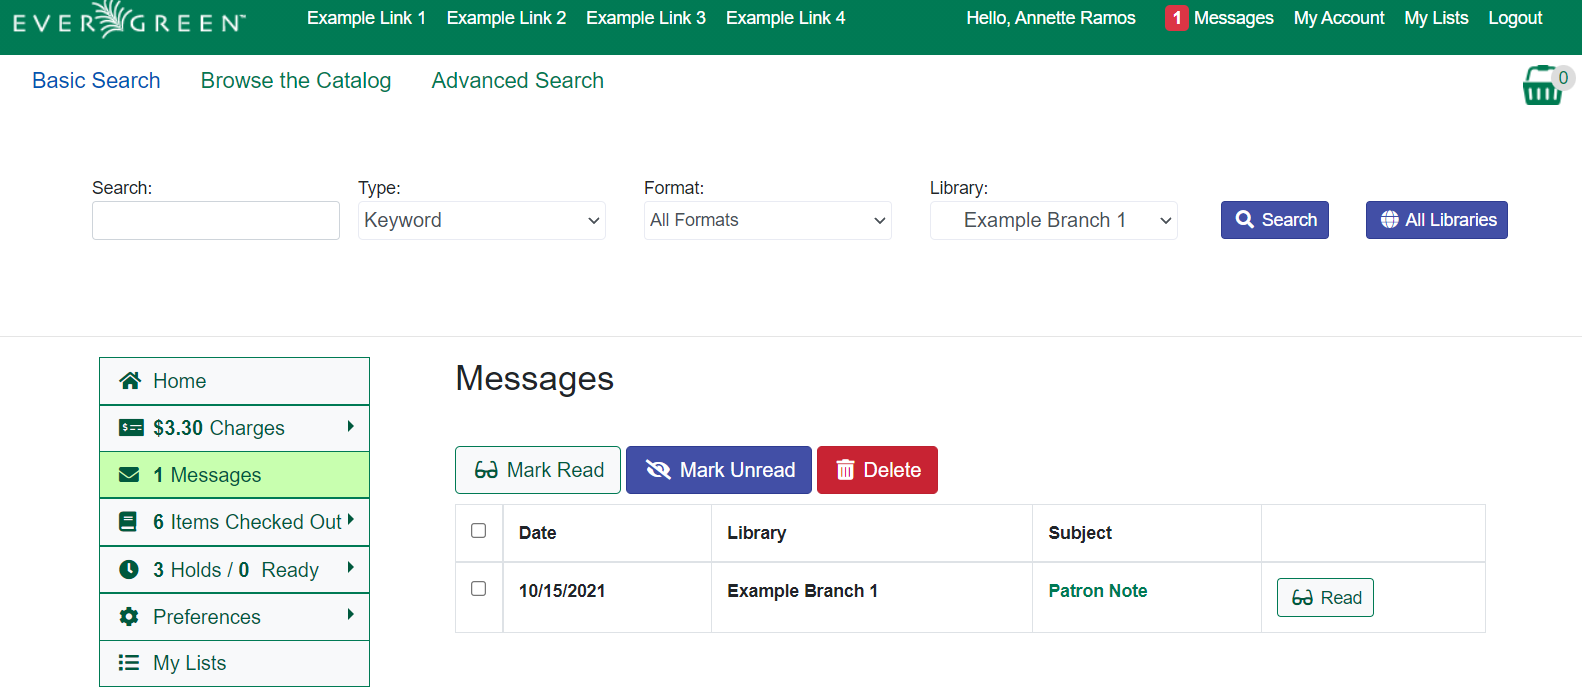
When a patron visible Note is created on an account, Evergreen automatically creates a Message that then displays in the patron’s OPAC account. The original Note can be viewed in the Notes tab. The Message can be viewed in the staff interface under Other → Message Center.
The Message Center provides an interface for staff to view all patron visible notes that have been added to a patron account. Staff can double click on a message to view the full title and content of the message, as well as the date and time the message was created and the date and time that the message was read. Staff can also see if a patron has deleted the message from their OPAC account in the Deleted? column.
| Deleting a message from this interface will remove it from the patron’s view. If the message is linked to a note in the Notes tab, the note will continue to appear in the Notes tab. |
| Deleting a patron visible note from the Notes tab will also remove the message from the patron’s OPAC account. If the message is linked to a note in the Notes tab, the note will continue to appear in the Notes tab. |
Alerts
Alerts can be applied to patron accounts to notify library staff when the patron account is retrieved. Alerts can be visible in the patron OPAC account or they can be visible only to library staff. For versions 3.7 and prior, Alert Messages are only visible to staff and are created and edited from the Patron Edit interface.
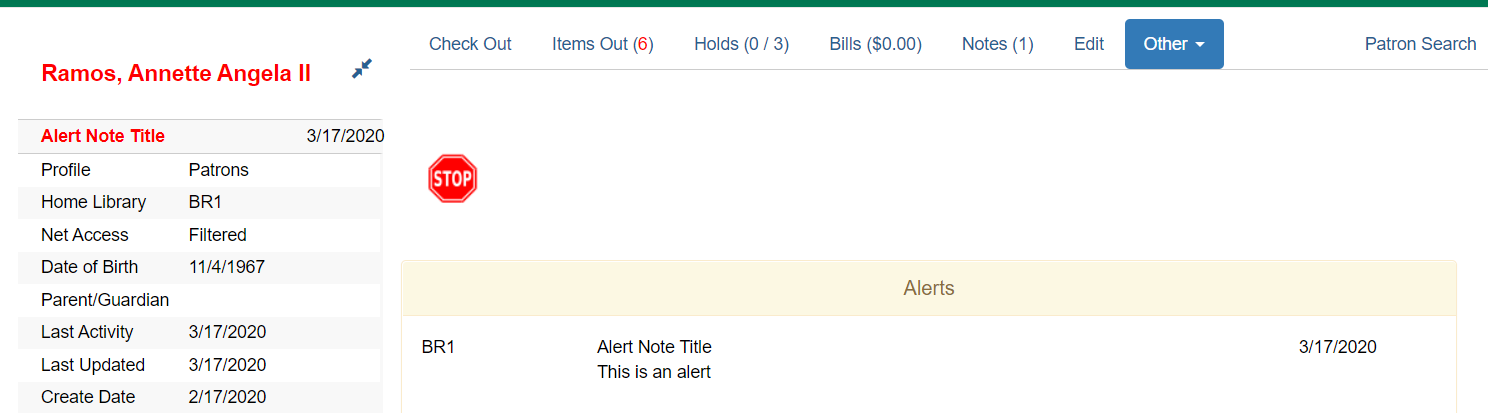
Alerts Display
When an alert is present on a patron account, a Stop sign and the alert text is displayed when the patron account is viewed. The alert title also displays in the patron account summary on the left hand side of the screen and there is an indicator in the patron summary that indicates how many un-archived notes, alerts, and blocks are on the account that are visible at the workstation at which the staff member is logged in. Alerts can also be displayed by going to Other → Display Alerts.
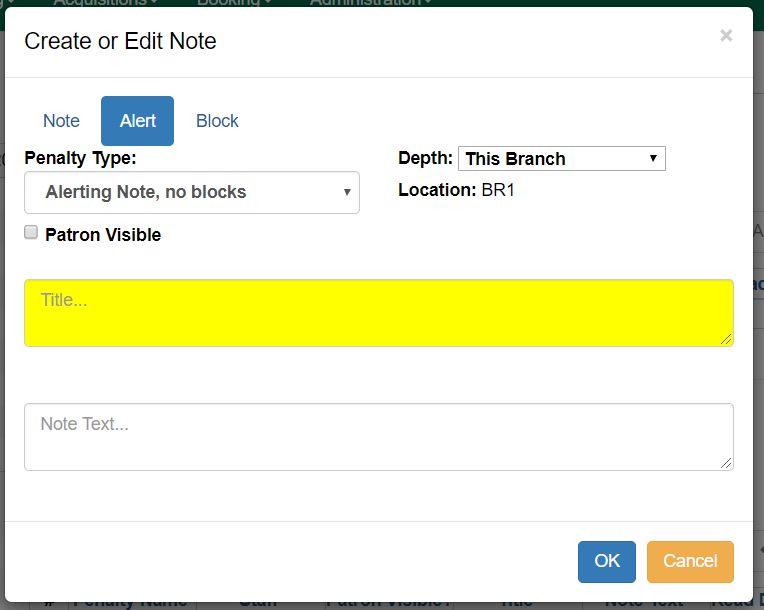
Create an Alert
To create a new Alert:
-
Go to the Notes tab in the patron account and click Create Note.
-
A modal will appear where you can create a new Alert. Required fields are highlighted in yellow.
-
Select Alert at the top of the screen.
-
The Depth drop down menu controls the visibility of the note. Values correspond to OPAC labels, and by default they are This Branch, Local Library System, and Everywhere.
-
By default, the Location will be set to the library the staff member’s workstation is registered to. The note will be visible to the workstation library, as well as all Org Units that are ancestors and descendants in the Org Unit hierarchy.
-
-
Enter a title or subject for the alert in the Title… field. The Title field is required.
-
Enter the main content of the alert te in the Note Text… field.
-
Enter your initials if your library requires initials when creating alerts on patron accounts.
-
Click OK to create the alert.
Blocks
Blocks can be manually added to a patron account to take away certain library privileges from the patron for as long as the block remains on the account. The following privileges can be blocked on patron accounts as determined by configuration in the Standing Penalties interface in the Local Administration menu.
-
CIRC - Users cannot check out items
-
HOLD - Users cannot place holds on items
-
RENEW - Users cannot renew items
-
CAPTURE - This penalty prevents a user’s holds from being captured. If the HOLD penalty has not been applied to a user’s account, then the patron can place a hold, but the targeted item will not appear on a pull list and will not be captured for a hold if it is checked in.
-
FULFILL - This penalty prevents a user from checking out an item that is on hold. If the HOLD and CAPTURE penalties have not been applied to a user’s account, then the user can place a hold on an item, and the itemcan be captured for a hold. However, when he tries to check out the item, the circulator will see a pop up box with the name of the penalty type, FULFILL. The circulator must correct the problem with the account or must override the penalty to check out the item.
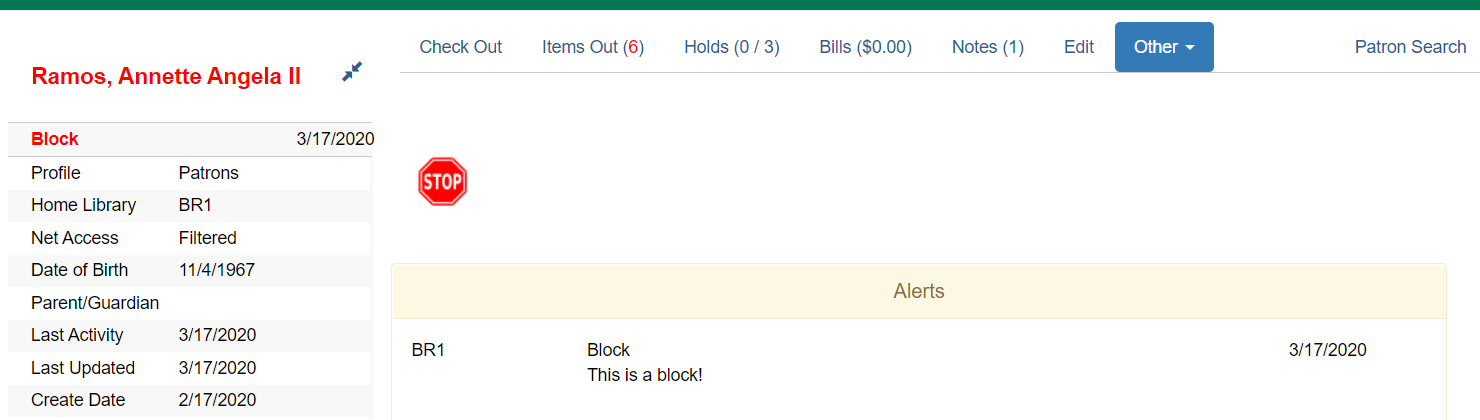
Block Display
When a block is present on a patron account, a Stop sign and the block text is displayed when the patron account is viewed. The block title also displays in the patron account summary on the left hand side of the screen and there is an indicator in the patron summary that indicates how many un-archived notes, alerts, and blocks are on the account that are visible at the workstation at which the staff member is logged in. Blocks can also be displayed by going to Other → Display Alerts.
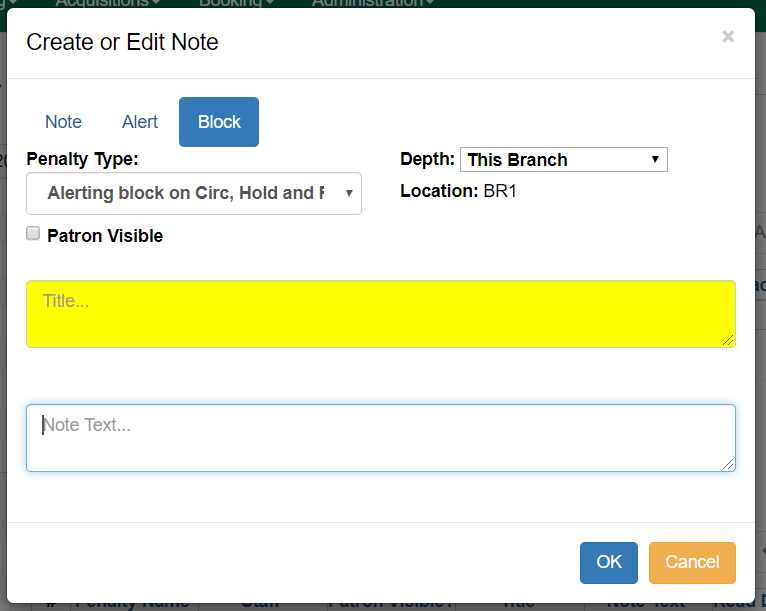
Create a Block
To create a new Block:
-
Go to the Notes tab in the patron account and click Create Note.
-
A modal will appear where you can create a new Block. Required fields are highlighted in yellow.
-
Select Block at the top of the screen.
-
The default Block is a block on CIRC, HOLD, RENEW
-
Other Penalty Types can be selected from the drop down menu. These Penalty Types are configured in Local Administration → Standing Penalties.
-
-
The Depth drop down menu controls the visibility of the note. Values correspond to OPAC labels, and by default they are This Branch, Local Library System, and Everywhere.
-
By default, the Location will be set to the library the staff member’s workstation is registered to. The note will be visible to the workstation library, as well as all Org Units that are ancestors and descendants in the Org Unit hierarchy.
-
-
Enter a title or subject for the alert in the Title… field. The Title field is required.
-
Enter the main content of the block in the Note… field.
-
Enter your initials if your library requires initials when creating blocks on patron accounts.
-
Click OK to create the block.
Administration for Patron Notes, Alerts, Blocks, and Messages
Library Settings
Library Settings are found under Administration → Local Administration → Library Settings Editor. There is one new Library Setting related to patron notes in Evergreen:
-
GUI: Require staff initials for entry/edit of patron standing penalties and notes
|
This Library Setting replaces two previous settings:
|
Values from these deprecated settings will be migrated to the new setting via the upgrade script.
If a value was set for “Require staff initials for entry/edit of standing penalties and messages”, that value will be the new value for the new Library Setting.
If there was no value set for “Require staff initials for entry/edit of standing penalties and messages”, but there was a value for “Require staff initials for entry/edit of patron notes”, then the value from the legacy “patron notes” setting will be the value for the new Library Setting.
If two different values are set for the legacy settings, the value from the legacy “standing penalties and messages” setting will become the value for the new Library Setting and the “patron notes” value will be recorded in a text file as part of the upgrade script.
Merging Patrons
Occasionally you may encounter a case where a patron has more than one account in the system. This most commonly occurs when a new library system has joined a consortium. It is possible to merge the patron accounts together and retain most of the data from both records.
|
Merging patron accounts is not reversible. Make sure that the accounts are truly duplicates before you merge. |
Merge Two Patron Accounts:
-
Do a patron search; Search → Search for Patrons.
-
In the patron search results, check the two patron records that need to be merged.
-
Select the Merge Patrons button.

-
A new pop-up will open to display the two records side by side for comparative purposes. Select Use as lead on the account that should be the primary account after the merge.
-
Select Merge at the bottom of the screen.
-
Evergreen will merge the two accounts and then return to the patron search screen.
|
Post-Merge Data: The configuration of your library settings will determine if barcodes are retained or stay active. Your settings will also retain or delete the patron’s addresses. Information from the subordinate account like checkouts, statistics, notes, holds, and fines will be moved to the lead account. If one of the patron accounts was barred, that information will only be retained if the barred status was on the lead account. If the subordinate account was barred, and you wish to retain that status, you will need to go in and reapply the barred status on the newly merged account. If the subordinate account was in a patron group, that group connection will not be retained on the merged account. Group membership will be retained if the lead account was the group member. |
Patron Merge Permissions and Settings
The ability to merge patron accounds is controlled by the permission, 'MERGE_USERS'.
There are four Library Settings involved in data retention and behavior during a patron merge. For discussion of how to edit settings see the Library Settings Editor.
-
Patron Merge Address Delete - Delete address(es) of subordinate user(s) in a patron merge.
-
When set to "True," only the addresses of the lead record are retained when merging patrons. Addresses from the merged patron record are deleted.
-
If set to “False,” both addresses are retained. You can manually set retained addresses as inactive or delete them using the X button next to the address.
-
-
Patron Merge Barcode Delete - Delete barcode(s) of subordinate user(s) in a patron merge.
-
When set to "True," only the barcode(s) from the lead record are retained when merging patrons. Barcodes from the merged patron records are deleted.
-
-
Patron Merge Deactivate Card - Mark barcode(s) of subordinate user(s) in a patron merge as inactive.
-
When set to "True," only the barcode of the lead record remains active when merging patrons. Barcodes from the merged patron record are deactivated if not deleted by the setting for Patron Merge Barcode Delete.
-
If barcodes from both are retained, they can be found on the patron record by clicking on the See All button next to the barcode field. If the inactive barcode is used, Evergreen will provide an alert and will not allow checkouts without acknowledgement of the issue.
-
-
Cloned patrons get address copy - In the Patron editor, copy addresses from the cloned user instead of linking directly to the address.
-
This setting will not control the ability to merge accounts regardless of if the account is group lead or not. There will be no alert.
-
User Buckets
User Buckets allow staff to batch delete and make batch modifications to user accounts in Evergreen. Batch modifications can be made to selected fields in the patron account:
-
Home Library
-
Profile Group
-
Network Access Level
-
Barred flag
-
Active flag
-
Juvenile flag
-
Privilege Expiration Date
-
Statistical Categories
Batch modifications and deletions can be rolled back or reversed, with the exception of batch changes to statistical categories. Batch changes made in User Buckets will not activate any Action/Trigger event definitions that would normally be activated when editing an individual account.
User accounts can be added to User Buckets by scanning individual user barcodes or by uploading a file of user barcodes directly in the User Bucket interface. They can also be added to a User Bucket from the Patron Search screen. Batch changes and batch edit sets are tied to the User Bucket itself, not to the login of the bucket owner.
Create a User Bucket
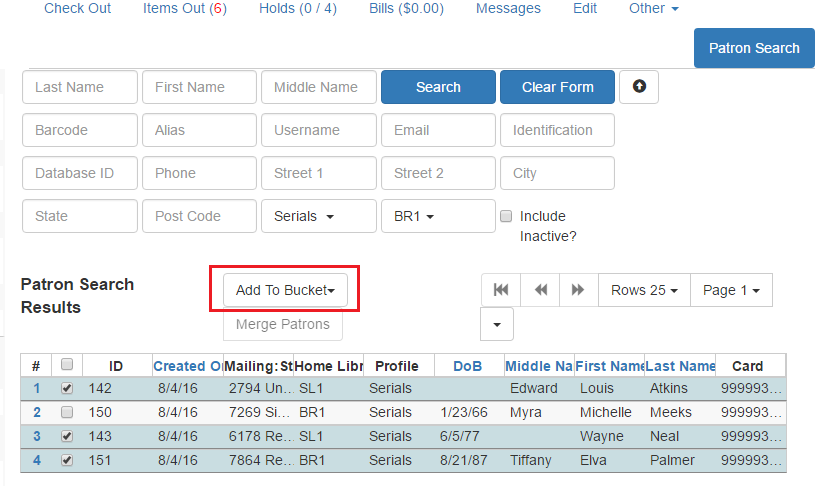
To add users to a bucket via the Patron Search screen:
-
Go to Search→Search for Patrons.
-
Enter your search and select the users you want to add to the user bucket by checking the box next to each user row. You can also hold down the CTRL or SHIFT on your keyboard and select multiple users.
-
Click Add to Bucket and select an existing bucket from the drop down menu or click New Bucket to create a new user bucket.
-
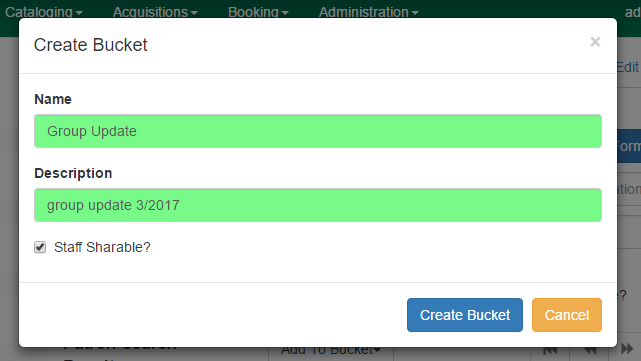
If creating a new user bucket, a dialog box called Create Bucket will appear where you can enter a bucket Name and Description and indicate if the bucket is Staff Shareable?. Click Create Bucket.
-
-
After adding users to a bucket, an update will appear at the bottom-right hand corner of the screen that says "Successfully added # users to bucket [Name]".
To add users to a bucket by scanning user barcodes in the User Bucket interface:
-
Go to Circulation→User Buckets and select the Pending Users tab at the top of the screen.
-
Click on Buckets and select an existing bucket from the drop down menu or click New Bucket to create a new user bucket.
-
If creating a new user bucket, a dialog box called Create Bucket will appear where you can enter a bucket Name and Description and indicate if the bucket is Staff Shareable?. Click Create Bucket.
-
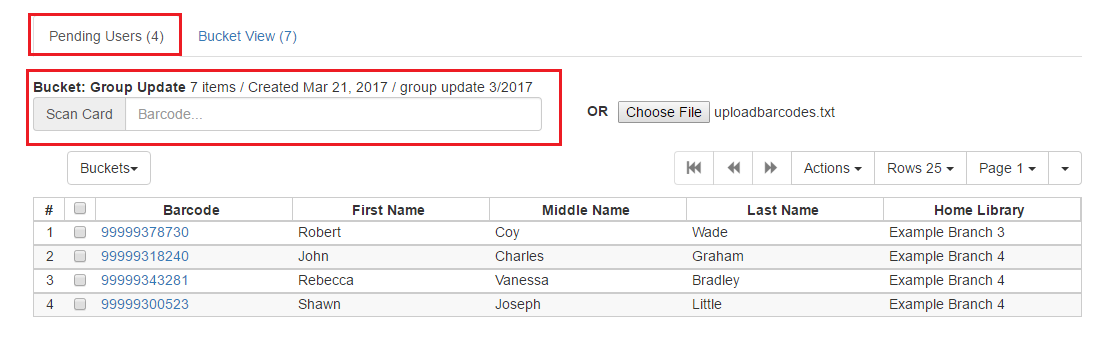
After selecting or creating a bucket, the Name, Description, number of items, and creation date of the bucket will appear above the Scan Card field.
-
-
Scan in the barcodes of the users that you want to add to the selected bucket into the Scan Card field. Each user account will be added to the Pending Users tab. Hit ENTER on your keyboard after manually typing in a barcode to add it to the list of Pending Users.
-
Select the user accounts that you want to add to the bucket by checking the box next to each user row or by using the CTRL or SHIFT key on your keyboard to select multiple users.
-
Go to Actions→Add To Bucket or right-click on a selected user account to view the Actions menu and select Add To Bucket. The user accounts will move to the Bucket View tab and are now in the selected User Bucket.
To add users to a bucket by uploading a file of user barcodes:
-
Go to Circulation→User Buckets and select the Pending Users tab at the top of the screen.
-
Click on Buckets and select an existing bucket from the drop down menu or click New Bucket to create a new user bucket.
-
If creating a new user bucket, a dialog box called Create Bucket will appear where you can enter a bucket Name and Description and indicate if the bucket is Staff Shareable?. Click Create Bucket.
-
After selecting or creating a bucket, the Name, Description, number of items, and creation date of the bucket will appear above the Scan Card field.
-
-
In the Pending Users tab, click Choose File and select the file of barcodes to be uploaded.
-
The file that is uploaded must be a .txt file that contains a single barcode per row.
-
-
The user accounts will automatically appear in the list of Pending Users.
-
Select the user accounts that you want to add to the bucket by checking the box next to each user row or by using the CTRL or SHIFT key on your keyboard to select multiple users.
-
Go to Actions→Add To Bucket or right-click on a selected user account to view the Actions menu and select Add To Bucket. The user accounts will move to the Bucket View tab and are now in the selected User Bucket.
Batch Edit All Users
To batch edit all users in a user bucket:
-
Go to Circulation→User Buckets and select the Bucket View tab.
-
Click Buckets and select the bucket you want to modify from the list of existing buckets.
-
After selecting a bucket, the Name, Description, number of items, and creation date of the bucket will appear at the top of the screen.
-
-
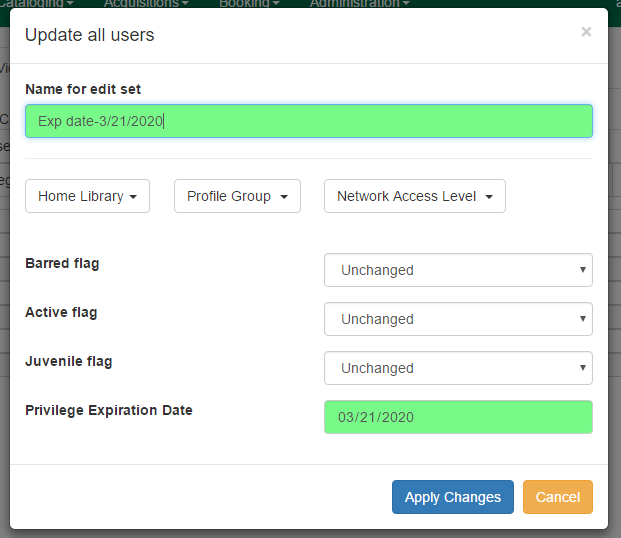
Verify the list of users in the bucket and click Batch edit all users. A dialog box called Update all users will appear where you can select the batch modifications to be made to the user accounts.
-
Assign a Name for edit set. This name will allow staff to identify the batch edit for future verification or rollbacks.
-
Set the values that you want to modify. The following fields can be modified in batch:
-
Home Library
-
Profile Group
-
Network Access Level
-
Barred flag
-
Active flag
-
Juvenile flag
-
Privilege Expiration Date
-
-
Click Apply Changes. The modification(s) will be applied in batch.
Batch Modify Statistical Categories
To batch modify statistical categories for all users in a bucket:
-
Go to Circulation→User Buckets and select the Bucket View tab.
-
Click Buckets and select the bucket you want to modify from the list of existing buckets.
-
After selecting a bucket, the Name, Description, number of items, and creation date of the bucket will appear at the top of the screen.
-
-
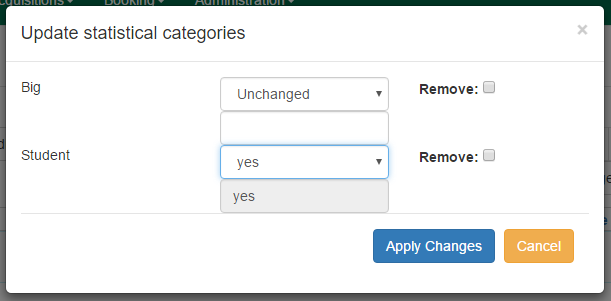
Verify the list of users in the bucket and click Batch modify statistical categories. A dialog box called Update statistical categories will appear where you can select the batch modifications to be made to the user accounts. The existing patron statistical categories will be listed and staff can choose:
-
To leave the stat cat value unchanged in the patron accounts.
-
To select a new stat cat value for the patron accounts.
-
Check the box next to Remove to delete the current stat cat value from the patron accounts.
-
-
Click Apply Changes. The stat cat modification(s) will be applied in batch.
Batch Delete Users
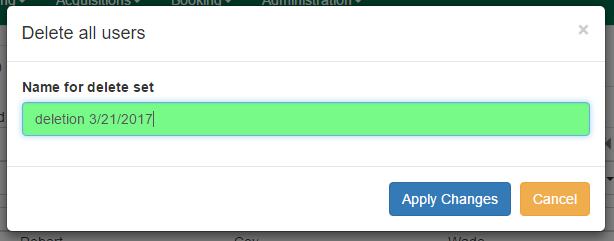
To batch delete users in a bucket: . Go to Circulation→User Buckets and select the Bucket View tab. . Click on Buckets and select the bucket you want to modify from the list of existing buckets. .. After selecting a bucket, the Name, Description, number of items, and creation date of the bucket will appear at the top of the screen. . Verify the list of users in the bucket and click Delete all users. A dialog box called Delete all users will appear. . Assign a Name for delete set. This name will allow staff to identify the batch deletion for future verification or rollbacks. . Click Apply Changes. All users in the bucket will be marked as deleted.
| Batch deleting patrons from a user bucket does not use the Purge User functionality, but instead marks the users as deleted. |
View Batch Changes
-
The batch changes that have been made to User Buckets can be viewed by going to Circulation→User Buckets and selecting the Bucket View tab.
-
Click Buckets to select an existing bucket.
-
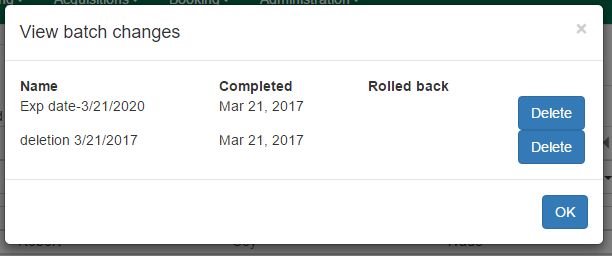
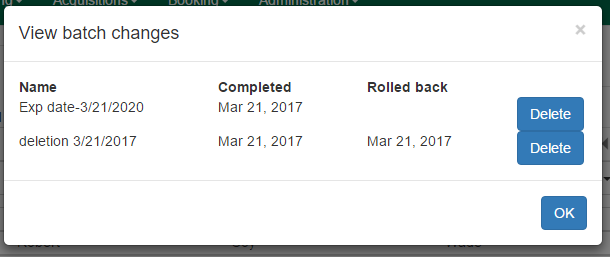
Click View batch changes. A dialog box will appear that lists the Name, date Completed, and date Rolled back of any batch changes made to the bucket. There is also an option to Delete a batch change. This will remove this batch change from the list of actions that can be rolled back. It will not delete or reverse the batch change.
-
Click OK to close the dialog box.
Roll Back Batch Changes
-
Batch Changes and Batch Deletions can be rolled back or reversed by going to Circulation→User Buckets and selecting the Bucket View tab.
-
Click Buckets to select an existing bucket.
-
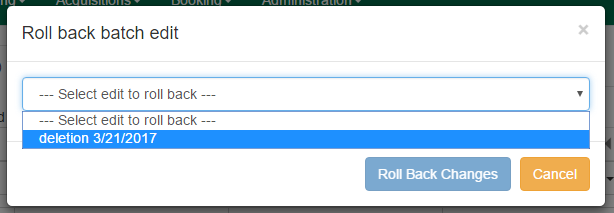
Click Roll back batch edit. A dialog box will appear that contains a drop down menu that lists all batch edits that can be rolled back. Select the batch edit to roll back and click Roll Back Changes. The batch change will be reversed and the roll back is recorded under View batch changes.
| Batch statistical category changes cannot be rolled back. |
Sharing Buckets
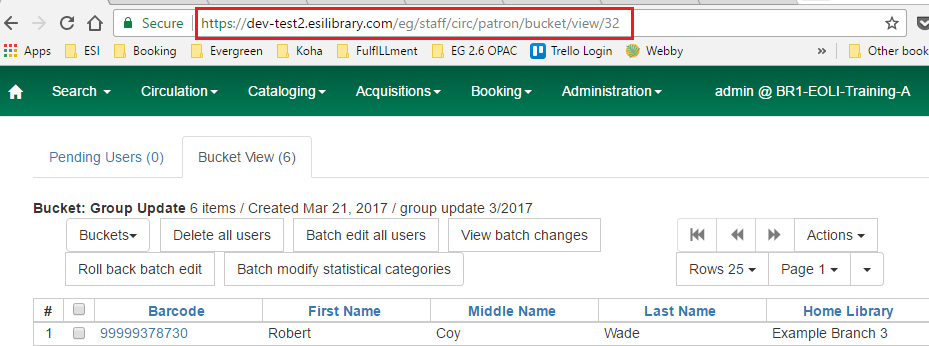
If a User Bucket has been made Staff Shareable, it can be retrieved via bucket ID by another staff account. The ID for each bucket can be found at the end of the URL for the bucket. For example, in the screenshot below, the bucket ID is 32.
A shared bucket can be retrieved by going to Circulation→User Buckets and selecting the Bucket View tab. Next, click Buckets and select Shared Bucket. A dialog box called Load Shared Bucket by Bucket ID will appear. Enter the ID of the bucket you wish to retrieve and click Load Bucket. The shared bucket will load in the Bucket View tab.
Permissions
All permissions must be granted at the organizational unit that the workstation is registered to or higher and are checked against the users' Home Library at when a batch modification or deletion is executed.
Permissions for Batch Edits:
-
To batch edit a user bucket, staff accounts must have the VIEW_USER, UPDATE_USER, and CONTAINER_BATCH_UPDATE permissions for all users in the bucket.
-
To make a batch changes to Profile Group, staff accounts must have the appropriate group application permissions for the profile groups.
-
To make batch changes to the Home Library, staff accounts must have the UPDATE_USER permission at both the old and new Home Library.
-
To make batch changes to the Barred Flag, staff accounts must have the appropriate BAR_PATRON or UNBAR_PATRON permission.
Permissions for Batch Deletion:
-
To batch delete users in a user bucket, staff accounts must have the UPDATE_USER and DELETE_USER permissions for all users in the bucket.