How to Contribute Documentation
We want everyone to be able to contribute documentation to the Evergreen project. We’ve made it as easy as possible. Please follow these simple steps to get your computer ready for contributions!
Here is a video going over this process. AsciiDoc and Antora : Presented by Lynn Floyd, Evergreen Indiana and Blake Henderson, MOBIUS at the Evergreen International Online Pre-Conference 2021.
Create a GitHub account
| Screenshots of the Github website might be out of date. Their website might look different today. |
-
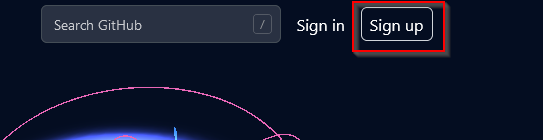
Open a web browser and go to: https://github.com/
-
Create an account by clicking "Sign Up"
-
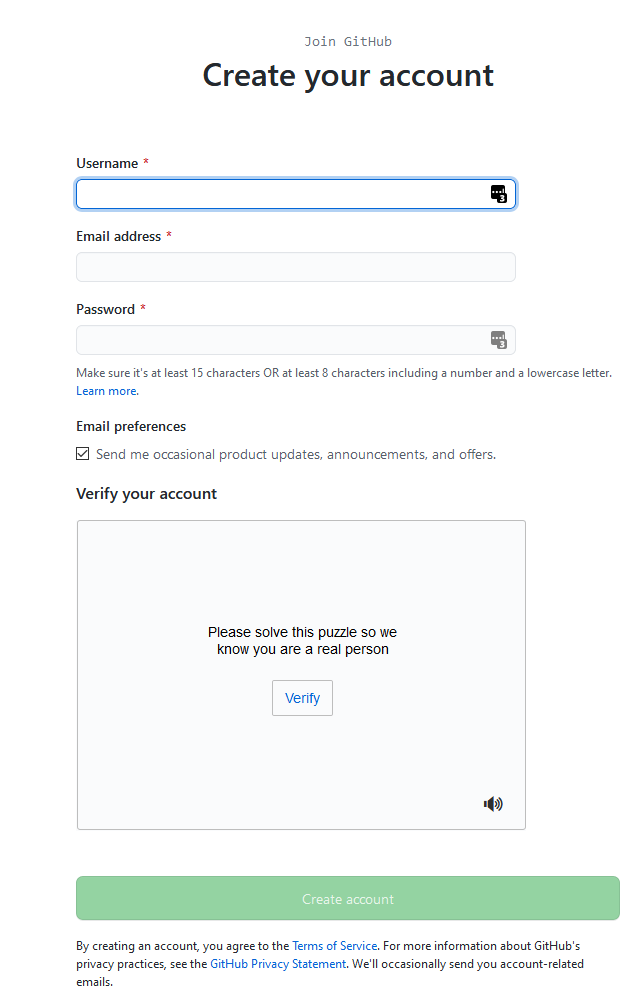
Fill in your information
Fork the Community Evergreen code repository
We will need to make a copy of the Evergreen documentation. This will allow you to make edits to your copy.
-
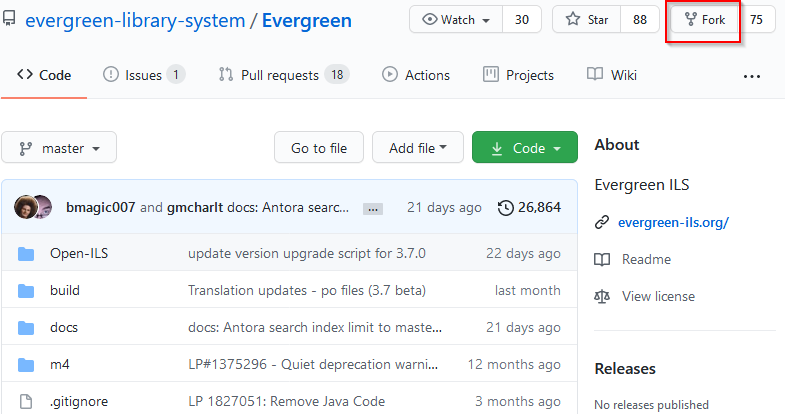
Find the Evergreen repository (evergreen-library-system/Evergreen) https://github.com/evergreen-library-system/Evergreen
-
Click on "Fork"
-
This process will make a copy of the repository into your personal GitHub account.
Install the GitHub Desktop Software
We will need to download and install the GitHub Desktop software onto your computer. This software will act as liaison between your computer and GitHub.
-
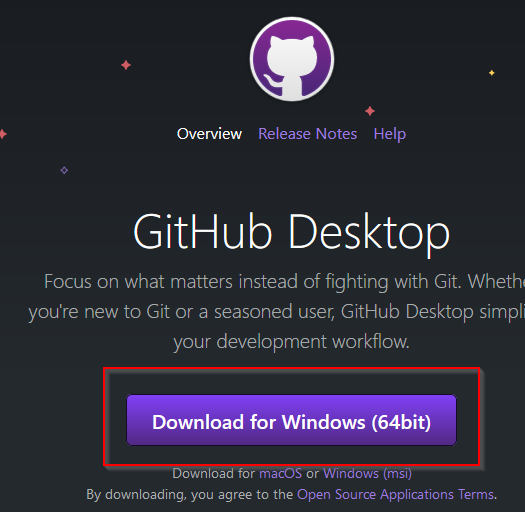
Open the web page where you can download the free installer https://desktop.github.com/
-
Save the file to your computer.
-
Execute the installer file.
Clone your Evergreen repository
Once the Github Desktop software is installed, it should automatically launch itself. If not, you will find the software on your desktop or Start Menu.
-
Sign the Github Desktop software into your GitHub Account
-
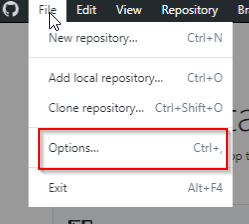
Click "File" → "Options"
-
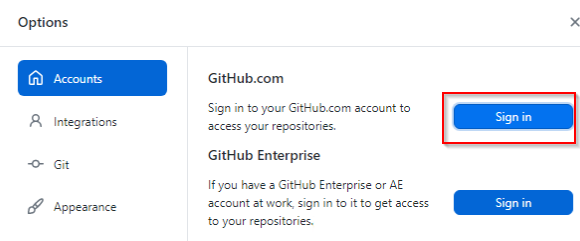
Click on "Accounts" → "Sign In"
-
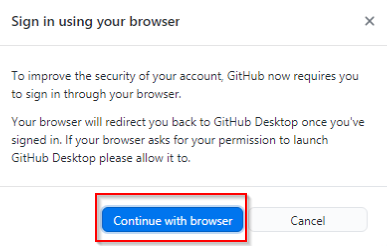
Click on "Continue in Browser"
-
Sign into your account (if you were already signed in, then you can ignore this instruction)
-
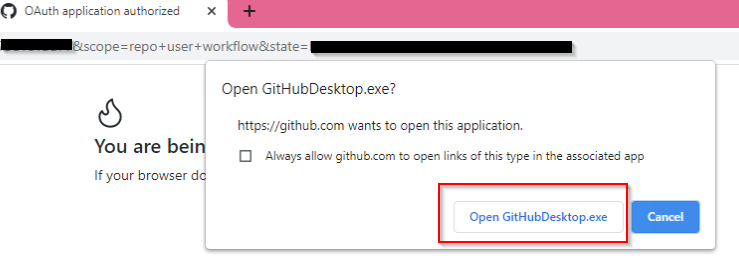
Once signed in, you will be prompted by your browser to launch the GitHub Desktop Application again
-
-
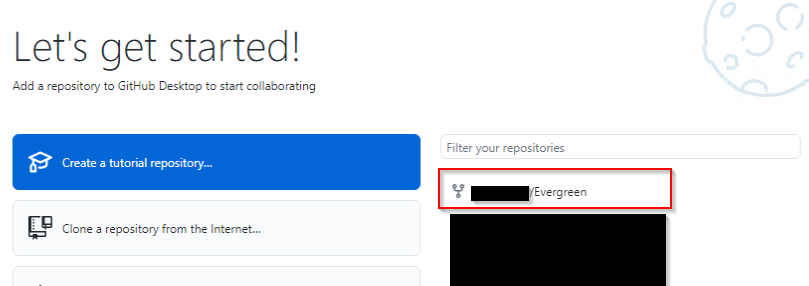
Now that the GitHub Desktop software has been authenticated with your account, you should notice that you have your Forked Evergreen repository listed as an option.
-
Click on the Evergreen repository and then click the button at the bottom "Clone XXXX/Evergreen"

-
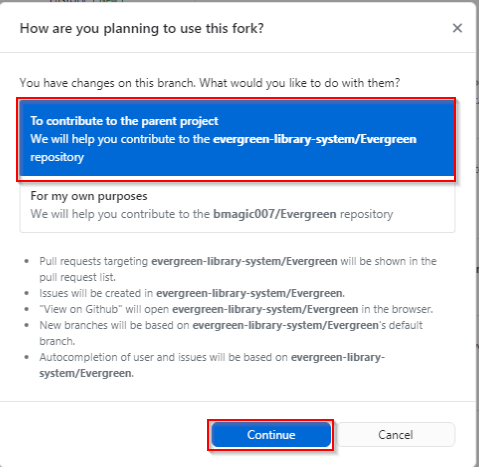
Once Cloned, you will be asked this question (pictured below). Choose "To contribute to the parent project" and click "Continue"
| From now on, you won’t need to perform the previous steps. You can skip to "Make a Branch" to make new changes in the future. |
Make a Branch
A Git repository has a concept of a "branch". Which means you are making changes that do not affect the rest of the community. You are making changes to the documentation in your own private branch. You can invite others to work on your branch as well.
-
From the GitHub Desktop Software, click on "Branch" → "New branch"

-
Supply a name for your branch. It’s a good idea to name it with a good summary of what your changes will contain.

-
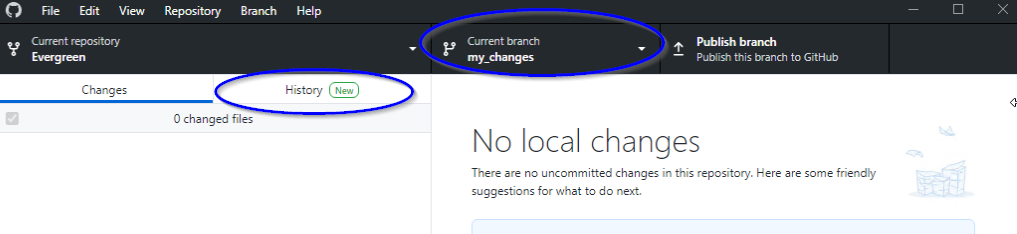
Confirm that you are working in your branch
Make your edits
The Evergreen documentation is written in AsciiDoc. AsciiDoc is plain old text with some basic formatting stuff around it. AsciiDoc is great because it takes away so much of the pain of formatting the words and allows you to focus more on the content rather than the formatting. Looking at AsciiDoc text can be a bit confusing at first but please stick with it. It will make more sense in no time!
There are many tools that help you edit/write AsciiDoc. Here are a few:
Name |
Link |
Supports live preview |
Supports live preview with Evergreen images |
AsciiDocFX |
Yes |
Yes |
|
VSCode |
Yes - Needs fiddling to get it to work |
No |
|
AsciiDoctor Chrome Plugin |
No |
No |
I’m using AsciiDocFX to edit this document!
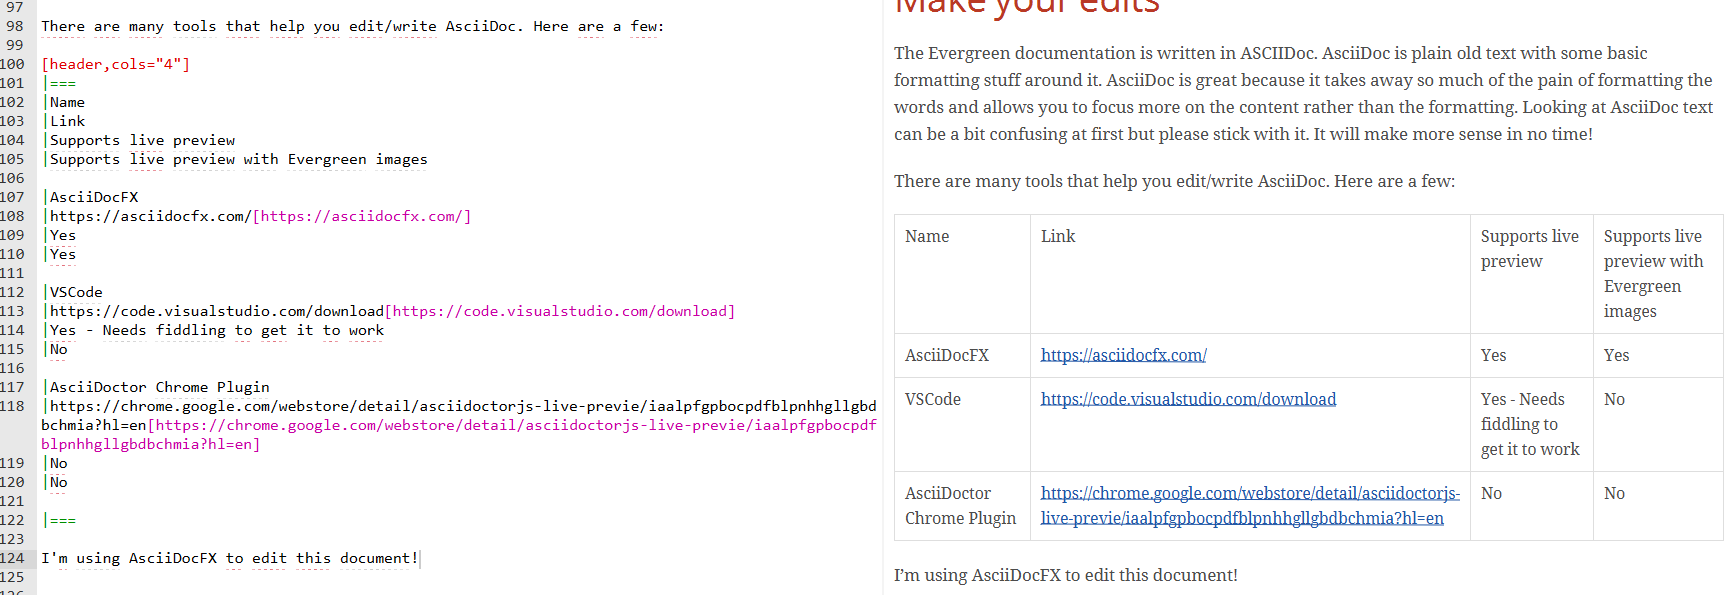
The document test is on the left and the instant preview of the rendered version of our document is displayed on the right.
| The Evergreen documentation website renders the pages with our own Evergreen style and flair. These other tools will give you a basic idea of what your document will look like but it will never be exactly like the end-result on the final Evergreen Documentation website. |
A quick word on images
Each section of the Evergreen documentation is divided into "modules". Each module has a special place where we save our image files. Images are then referred to in the documentation.
For example:
This document is here:
Evergreen/docs/modules/shared/pages/how_to_contribute_docs.adocAnd the images are here:
Evergreen/docs/modules/shared/assets/images/how_to_contribute_docs/When you are editing your document, you will refer to your image like this:
image::how_to_contribute_docs/filename.pngCommit your changes
Now that you’ve completed your changes on your computer, you need to commit them to the repository and push those changes to the cloud. This is done using the GitHub Desktop software.
-
Open the GitHub Desktop Software
-
Be sure and double check that you are on your branch
-
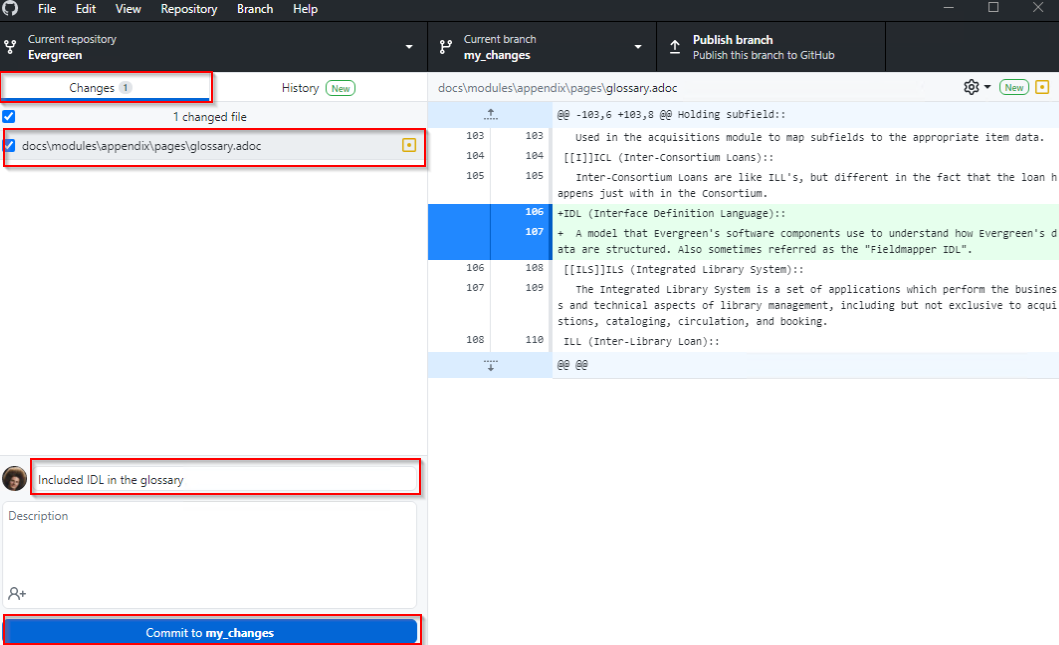
GitHub Desktop will display a summary of your changes on the left pane
-
If you click on one of the files that you’ve edited, GitHub Desktop will display the specific changes to that file in the right pane
-
Supply a commit message
Your commit message needs to be supplied in the highlighted box (bottom left)
When you are satisfied with your commit message (and description), click on "Commit to <branch name>"
Commit to the GitHub Cloud
Now that you have committed a change to your copy of the repository, you will no longer see any changes in the "Changes" section. You can see your commit in the "History" tab. In order for everyone in the Evergreen community to see your changes, will need to publish it to the internet.
Click on "Publish branch"

Make a "Pull Request"
This is a way to flag down the Evergreen community core committers and let them know that this change is pending approval.
-
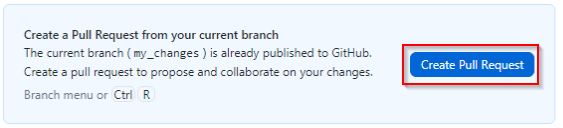
From the GitHub Desktop software, you should be prompted to "Create a Pull Request"
-
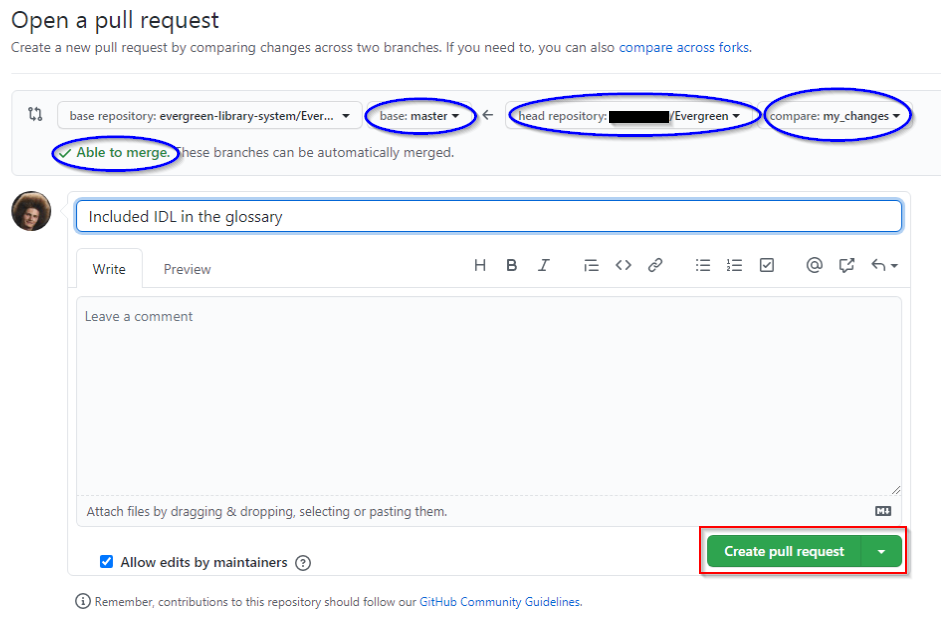
This will open your default web browser and prompt you to confirm some of the details
-
It’s nice to see "Able to merge"
-
Confirm that this pull request is compared with master on the left and with your branch on the right
-
Click on "Create pull request"
Follow up on Launchpad
The Evergreen Community bug tracking platform is called Launchpad. You can see the main page here: https://launchpad.net/evergreen. It’s common Evergreen workflow to track and discuss any needed Evergreen changes on Launchpad. If your documentation change has an associated Launchpad bug, be sure and update the bug with details about your contribution on GitHub! This gives more ways for the community to find your contribution.