Serials Administration
The serials module can be administered under a new menu option: Administration→Serials Administration. The new Serials Administration menu currently allows staff to configure Serial Copy Templates and Pattern Templates.
Serial Copy Templates
Serials copy templates enable you to specify item attributes that should be applied by default to copies of serials. Serials copy templates are associated with distributions in a subscription and are applied when serials copies are received. Serial copy templates can also be used as a binding template to apply specific item attributes to copies that are being bound together.
Creating a Serial Copy Template
To create a serial copy template, go to Administration→Serials Administration→Serial Copy Templates:
-
Click Create Template in the upper-right hand corner. A dialog box will appear.
-
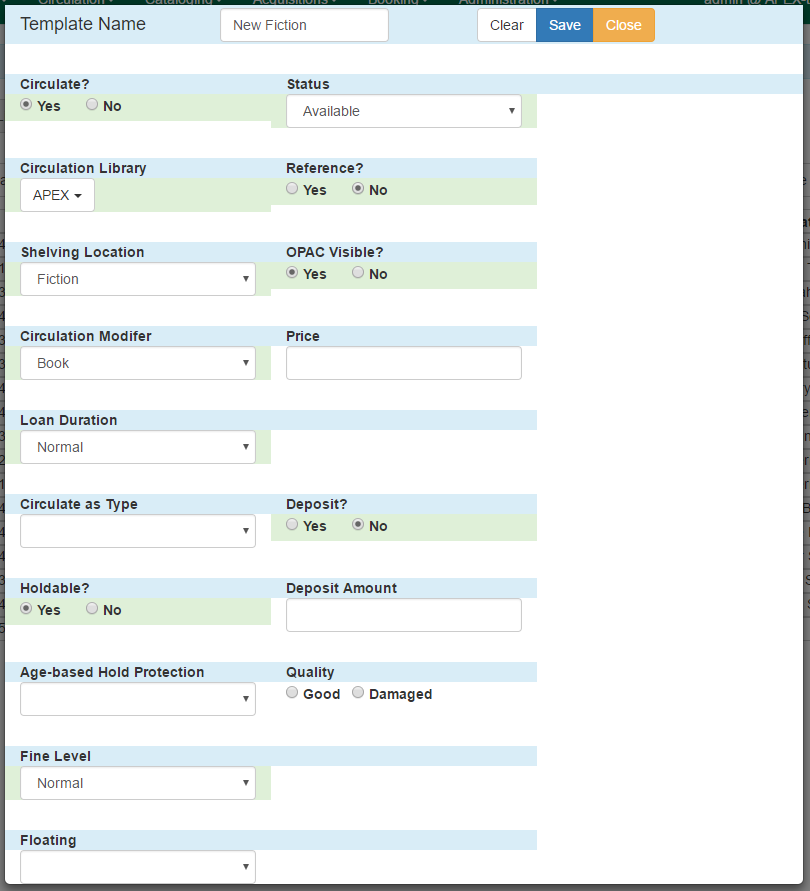
Within the dialog box assign the template a Template Name and set any item attributes that you want in the template:
-
Circulate?: indicate if the items can circulate.
-
Circulation Library: Select the circulation library from the drop down menu.
-
Shelving Location: Select the shelving location for the item from the drop down menu. This menu is populated from the locations created in Admin→Local Administration→Copy Locations Editor.
-
Circulation Modifier: Select the circulation modifier for the item from the drop down menu. This menu is populated from the modifiers created in Admin→Server Administration→Circulation Modifiers.
-
Loan Duration: Select a loan duration from the drop down menu. This menu is populated from the loan durations created in Admin→Server Administration→Circulation Duration Rules. This field is required.
-
Circulate as Type: Select a Type of record from the drop down menu if you want to control circulation based on the Type fixed field in the MARC bibliographic record. Most libraries choose to control circulation based on Circulation Modifier instead of Circulate as Type in Evergreen.
-
Holdable?: Yes or No-- indicate if holds can be placed on the items.
-
Age-based Hold Protection: Select a rule from the drop down menu. Age-based hold protection allows you to control the extent to which an item can circulate after it has been received. For example, you may want to protect new copies of a serial so that only patrons who check out the item at your branch can use it.
-
Fine Level: Select a fine level from the drop down menu. This menu is populated from the fine levels created in Admin→Server Administration→Circulation Recurring Fine Rules. This field is required.
-
Floating: Select a Floating policy from the drop down menu if the items belong to a floating collection.
-
Status: Select a copy status from the Status drop down menu. This menu is populated from the statuses created in Admin → Server Administration → Copy Statuses.
-
Reference?: Yes or No-- indicate if the item is a reference item.
-
OPAC Visible?: Yes or No-- indicate if the item should be visible in the OPAC.
-
Price: Enter the price of the item.
-
Deposit?: Yes or No-- indicate if patrons must place a deposit on the copy before they can use it.
-
Deposit Amount: Enter a Deposit Amount if patrons must place a deposit on the copy before they can use it.
-
Quality: Good or Damaged-- indicate the physical condition of the item.
-
-
Click Save.
-
The new serial copy template will now appear in the list of templates.
Modifying a Serial Copy Template
To modify a Serial Copy Template:
-
Select the template to modify by checking the box for the template or clicking anywhere on the template row. Go to Actions→Edit Template or right-click on the template row and select Edit Template.
-
The dialog box will appear. Make any changes to the item attributes and click Save.
Deleting a Serial Copy Template
To delete a Serial Copy Template:
-
Select the template to modify by checking the box for the template or clicking anywhere on the template row.
-
Go to Actions→Delete Template or right-click on the template row and select Delete Template.
| Serials copy templates that are being used by subscriptions cannot be deleted. |
Prediction Pattern Templates
Prediction pattern templates allow you to create templates for prediction patterns that can be shared with other staff users in your library branch, system, or throughout the consortium. Prediction patterns are used to predict issues on serials subscriptions. Templates can be created in the Administration module, as described below, and can also be created and shared directly in a subscription.
Creating a Prediction Pattern Template
To create a template, go to Administration→Serials Administration→Prediction Pattern Templates:
-
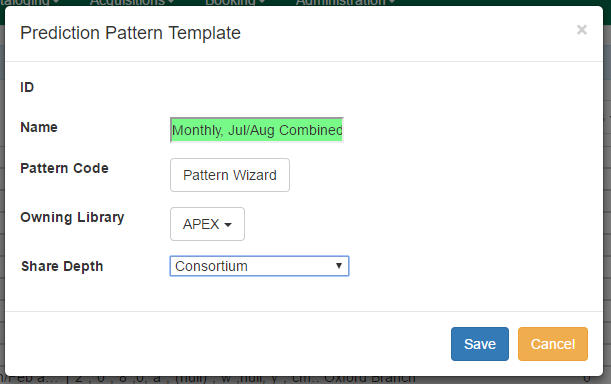
Click New Record in the upper-right hand corner. A dialog box called Prediction Pattern Template will appear.
-
Assign a Name to the template, such as "Monthly", to create a monthly publication pattern.
-
Next to Pattern Code click Pattern Wizard. The Prediction Pattern Code Wizard will appear. This wizard has five tabs that will step you through creating a prediction pattern for your publication.
-
Enumeration Labels
-
If the publication does not use enumeration and instead only uses dates, select the radio button adjacent to Use Calendar Dates Only and click Next in the upper right-hand corner and go to b. Chronology Display in this document.
-
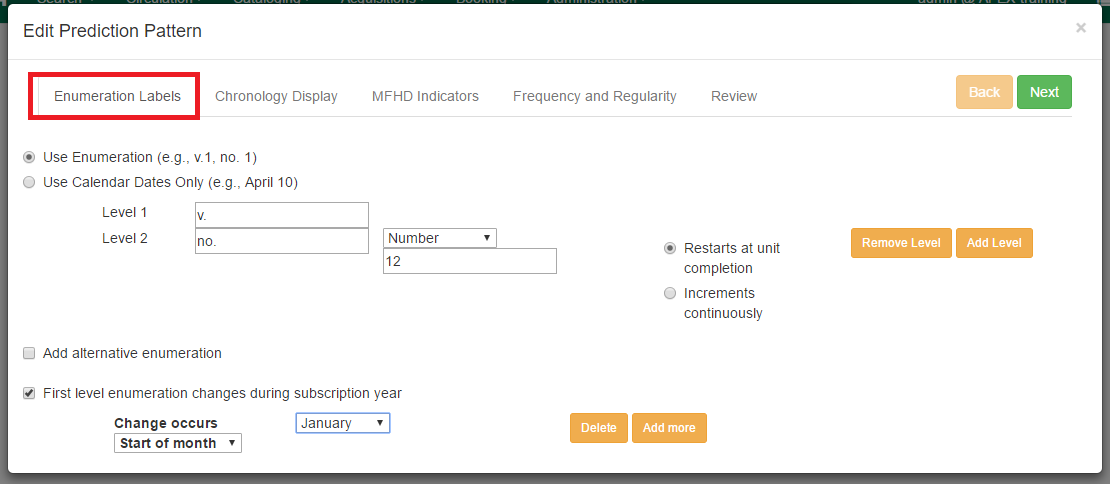
If the publication uses enumerations (commonly used), select the radio button adjacent to Use enumerations. The enumerations conform to $a-$h of the 853,854, and 855 MARC tags.
-
Enter the first level of enumeration in the field labeled Level 1. A common first level enumeration is volume, or "v.". If there are additional levels of enumeration, click Add Level.
-
A second field labeled Level 2 will appear. Enter the second level of enumeration in the field. A common second level enumeration is number, or "no.".
-
Select if the second level of enumeration is a set Number, Varies, or is Undetermined.
-
If Number is selected (commonly used):
-
Enter the number of bibliographic units per next higher level (e.g. 12 no. per v.). This conforms to $u in the 853, 854, and 855 MARC tags.
-
Select the radio button for the enumeration scheme: Restarts at unit completion or Increments continuously. This conforms to $v in the 853, 854, and 855 MARC tags.
-
-
You can add up to six levels of enumeration.
-
-
Check the box adjacent to Add alternative enumeration if the publication uses an alternative enumeration.
-
Check the box adjacent to First level enumeration changes during subscription year to configure calendar changes if needed. A common calendar change is for the first level of enumeration to increment every January.
-
Select when the Change occurs from the drop down menu: Start of the month, Specific date, or Start of season.
-
From the corresponding drop down menu select the specific point in time at which the first level of enumeration should change.
-
Click Add more to add additional calendar changes if needed.
-
-
When you have completed the enumerations, click Next in the upper right-hand corner.
-
-
-
Chronology Display
-
To use chronological captions for the subscription, check the box adjacent to Use Chronology Captions?
-
Choose a chronological unit for the first level. If you want to display the term for the unit selected, such as "Year" and "Month" next to the chronology caption in the catalog, then select the checkbox for Display level descriptor? (not commonly used).
-
To add additional levels of chronology for display, click Add level.
-
Note: Each level that you add must be a smaller chronological unit than the previous level (e.g. Level 1 = Year, Level 2 = Month).
-
-
Check the box adjacent to Use Alternative Chronology Captions? If the publication uses alternative chronology.
-
After you have completed the chronology caption, click Next in the upper-right hand corner.
-

-
MFHD Indicators
-
Compression Display Options: Select the appropriate option for compressing or expanding your captions in the catalog from the compressibility and expandability drop down menu. The entries in the drop down menu correspond to the indicator codes and the subfield $w in the 853 tag. Compressibility and expandability correspond to the first indicator in the 853 tag.
-
Caption Evaluation: Choose the appropriate caption evaluation from the drop down menu. Caption Evaluation corresponds to the second indicator in the 853 tag.
-
Click Next in the upper right hand corner.
-

-
Frequency and Regularity
-
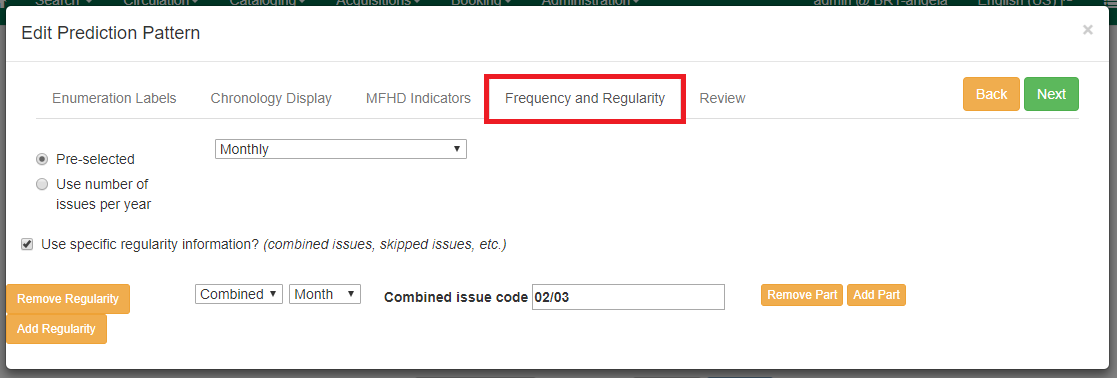
Indicate the frequency of the publication by selecting one of the following radio buttons:
-
Pre-selected and choose the frequency from the drop down menu.
-
Use number of issues per year and enter the total number of issues in the field.
-
-
If the publication has combined, skipped, or special issues, that should be accounted for in the publication pattern, check the box adjacent to Use specific regularity information?.
-
From the first drop down menu, select the appropriate publication information: Combined, Omitted, or Published issues.
-
From the subsequent drop down menus, select the appropriate frequency and issue information.
-
Add additional regularity rows as needed.
-
For a Combined issue, enter the relevant combined issue code. E.g., for a monthly combined issue, enter 02/03 to specify that February and March are combined.
-
-
After you have completed frequency and regularity information, click Next in the upper-right hand corner.
-
-
Review
-
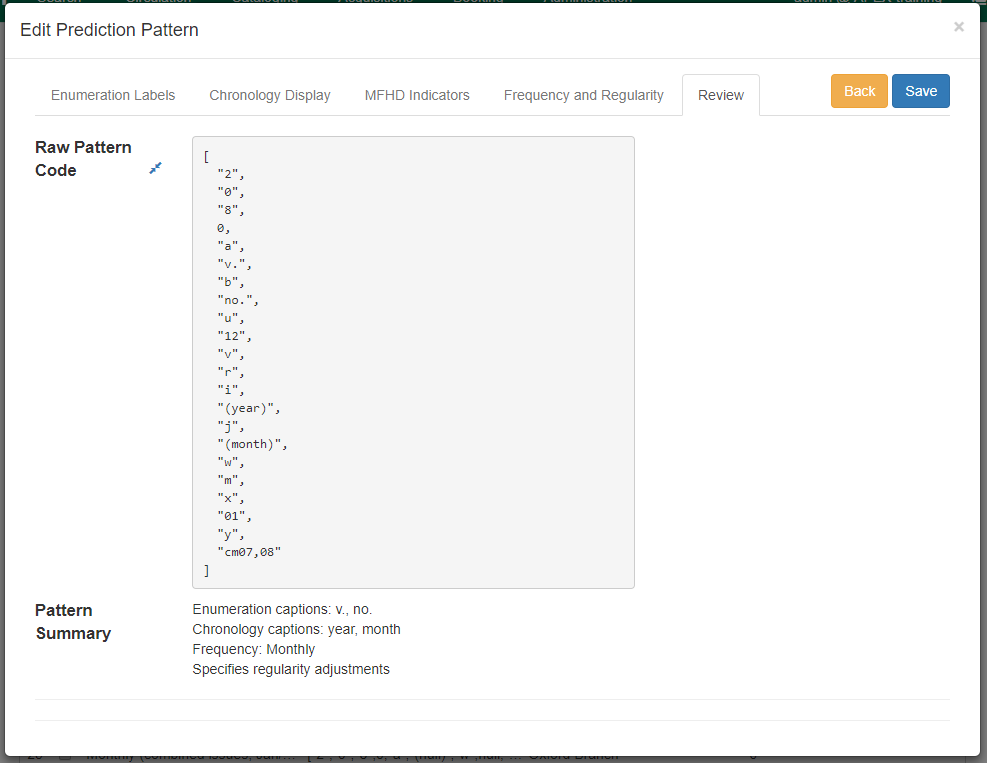
Review the Pattern Summary to verify that the pattern is correct. You can also click on the expand arrow icon to view the Raw Pattern Code.
-
If you want to share this pattern, assign it a name and select if it will be shared with your library, the system, or across the consortium.
-
Click Save.
-
-
Back in the Prediction Pattern Template dialog box, select the Owning Library, which will default to the workstation library.
-
If you want to share the template, set the Share Depth to indicate how far out into your consortium the template will be shared.
-
The Prediction Pattern will now appear in the list of templates and can be used to create predictions for subscriptions.
| Prediction Patterns can be edited after creation as long as all predicted issues have the status of "Expected". Once an issue is moved into a different status, the Prediction Pattern cannot be changed. |