Circulating Items
Check Out
Regular Items
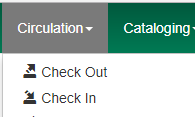
1) To check out an item click Check Out Items from the Circulation and Patrons toolbar, or select Circulation → Check Out.

2) Scan or enter patron’s barcode and click Submit if entering barcode manually. If scanning, number is submitted automatically.

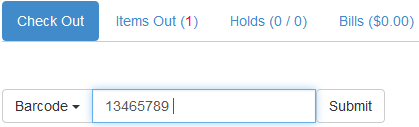
3) Scan or enter item barcode manually, clicking Submit if manual.
4) Due date is now displayed.

5) When all items are scanned, click the Done button to generate slip receipt or to exit patron record if not printing slip receipts.
Pre-cataloged Items
1) Go to patron’s Check Out screen by clicking Circulation → Check Out Items.
2) Scan the item barcode.
3) At prompt, enter the required information click Precat Checkout.
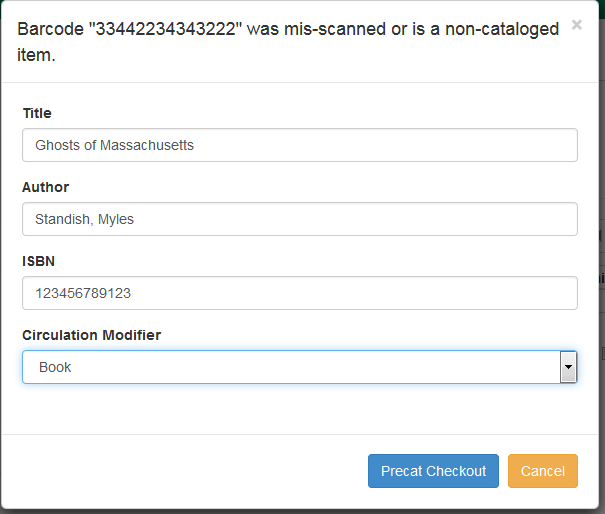
| On check-in, Evergreen will prompt staff to re-route the item to cataloging. |
| This screen does not respond to the enter key or carriage return provided by a barcode scanner when the cursor is in the ISBN field. This behavior prevents pre-cataloged items from being checked out before you are done entering all the desired information. |
| This requires the CREATE_PRECAT permission. All form elements in the dialog other than the Cancel button will be disabled if the current user lacks the CREATE_PRECAT permission. |
Due Dates
Circulation periods are pre-set. When items are checked out, due dates are automatically calculated and inserted into circulation records if the Specific Due Date checkbox is not selected on the Check Out screen. The Specific Due Date checkbox allows you to set a different due date to override the pre-set loan period.
Before you scan the item, select the Specific Due Date checkbox. Enter the date in yyyy-mm-dd format. This date applies to all items until you change the date, de-select the Specific Due Date checkbox, or quit the patron record.

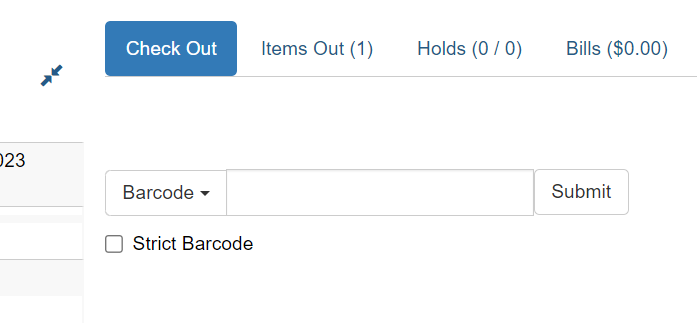
Strict Barcode
The 'Strict Barcode' checkbox can appear next to barcode inputs on the checkout, checkin, renewal, and offline circulation pages.
If checked, it will examine the barcode value to see if it contains only digits and meets the "Mod10" checkdigit algorithm. This checkdigit algorithm is often used by library barcodes that use the "Codabar" symbology.
If the barcode does not meet the conditions, a "bad barcode" alert will be displayed. Staff are given the option to accept and continue using the barcode as input. "Strict Barcode" is only useful for libraries whose barcodes use the Mod10 checkdigit algorithm. However, several other checkdigit algorithms and symbologies are in use by libraries.
Email Checkout Receipts
This feature allows patrons to receive checkout receipts through email at the circulation desk and in the Evergreen self-checkout interface. Patrons need to opt in to receive email receipts by default and must have an email address associated with their account. Opt in can be staff mediated at the time of account creation or in existing accounts. Patrons can also opt in directly in their OPAC account or through patron self-registration. This feature does not affect the behavior of checkouts from SIP2 devices.
Staff Client Check Out
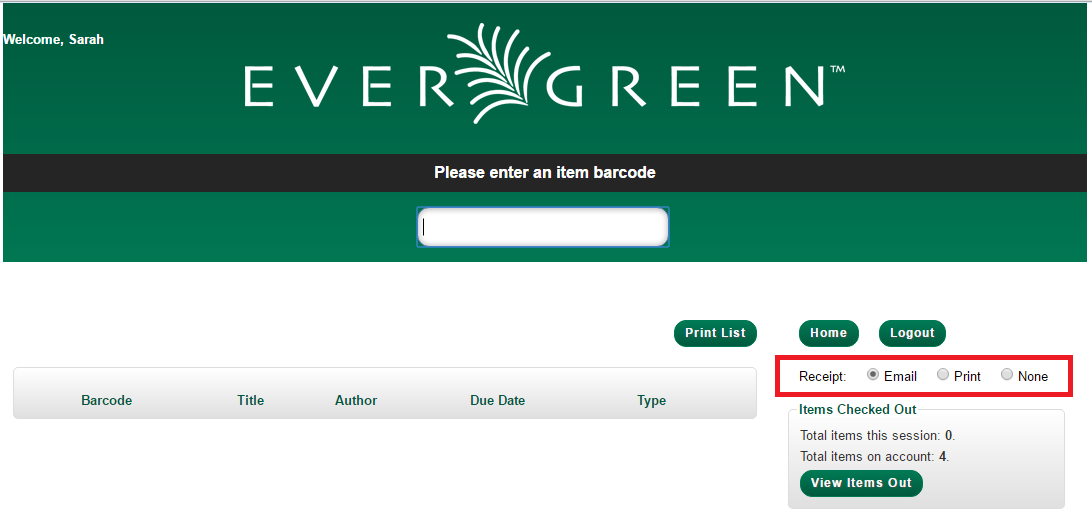
When a patron has opted to receive email checkout receipts by default, an envelope icon representing email will appear next to the receipt options in the Check Out screen. A printer icon representing a physical receipt appears if the patron has not opted in to the default email receipts.

Staff can click Quick Receipt and the default checkout receipt option will be triggered—an email will be sent or the receipt will print out. The Quick Receipt option allows staff to stay in the patron account after completing the transaction. Alternatively, staff can click Done to trigger the default checkout receipt and close out the patron account. By clicking on the arrow next to the Quick Receipt or Done buttons, staff can select which receipt option to use, regardless of the selected default. The email receipt option will be disabled if the patron account does not have an email address.
Self Checkout
In the Self Checkout interface, patrons will have the option to select a print or email checkout receipt, or no receipt. The radio button for the patron’s default receipt option will be selected automatically in the interface. Patrons can select a different receipt option if desired. The email receipt radio button will be disabled if there is no email address associated with the patron’s account.
Opt In
Staff Mediated Opt In At Registration
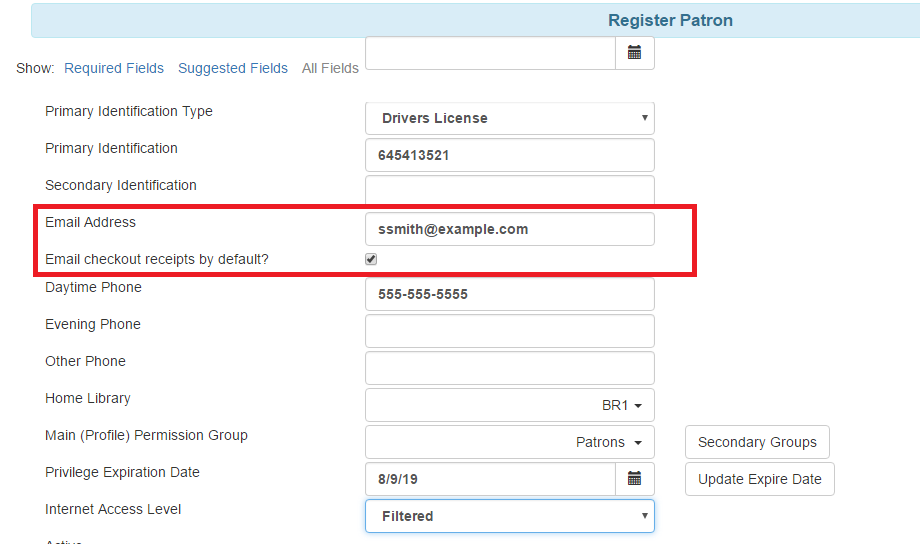
Patrons can be opted in to receive email checkout receipts by default by library staff upon the creation of their library account. Within the patron registration form, there is a new option below the Email Address field to select Email checkout receipts by default?. Select this option if the patron wants email checkout receipts to be their default. Save any changes.
Staff Mediated Opt In After Registration
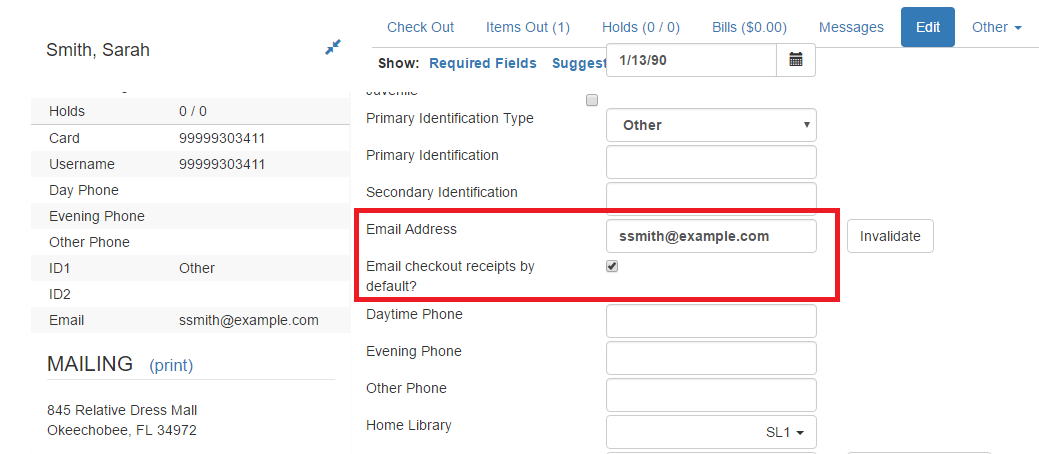
Staff can also select email checkout receipts as the default option in a patron account after initial registration. Within the patron account go to Edit and select Email checkout receipts by default?. Make sure the patron also has an email address associated with their account. Save any changes.
Patron Opt In – Self-Registration Form
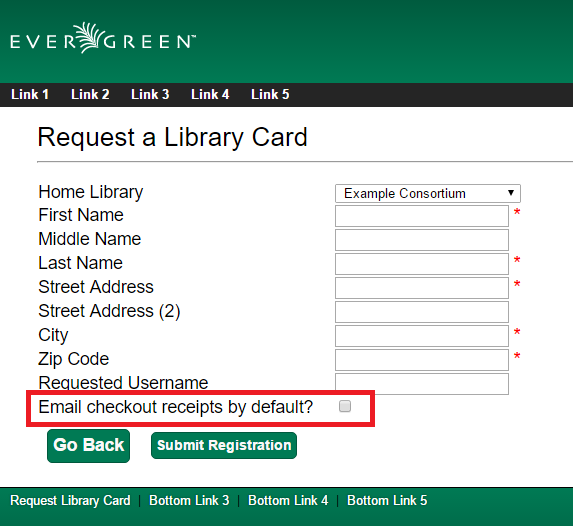
If your library offers patrons the ability to request a library card through the patron self-registration form, they can select email checkout receipts by default in the initial self-registration form:
Patron Opt In - OPAC Account
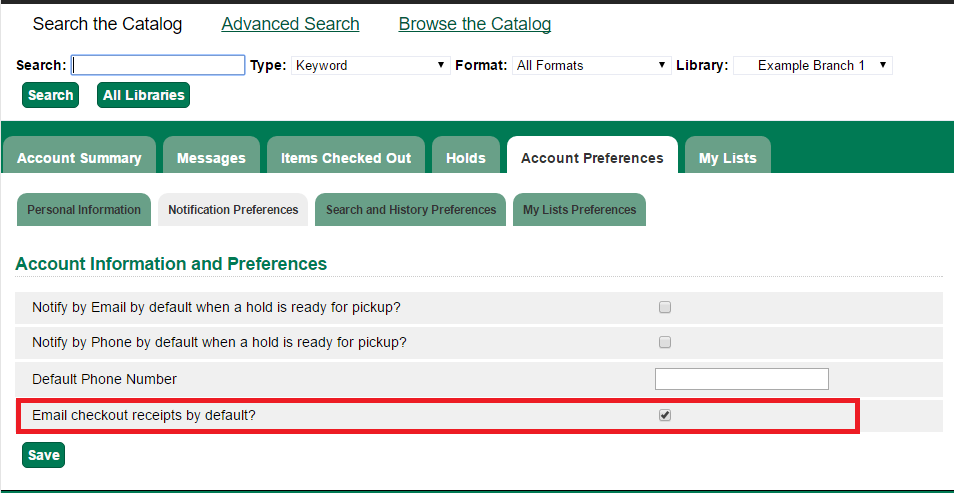
Patrons can also opt in to receive email checkout receipts by default directly in their OPAC account. After logging in, patrons can go to Account Preferences→Notification Preferences and enable Email checkout receipts by default? and click Save.
Email Checkout Receipt Configuration
Email checkout receipts will be sent out through a Notifications/Action Trigger called Email Checkout Receipt. The email template and action trigger can be customized by going to Administration→Local Administration→Notifications/Action Trigger→Email Checkout Receipt.
Check In
Regular check in
1) To check in an item click Check In Items from the Circulation and Patrons toolbar, or select Circulation → Check In.
2) Scan item barcode or enter manually and click Submit.

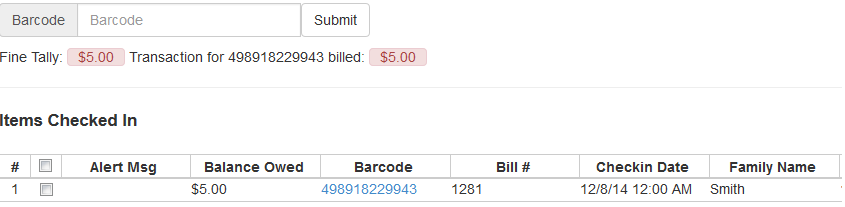
3) If there is an overdue fine associated with the checkin, an alert will appear at the top of the screen with a fine tally for the current checkin session. To immediately handle fine payment, click the alert to jump to the patron’s bill record.
4) If the checkin is an item that can fill a hold, a pop-up box will appear with patron contact information or routing information for the hold.
5) Print out the hold or transit slip and place the item on the hold shelf or route it to the proper library.
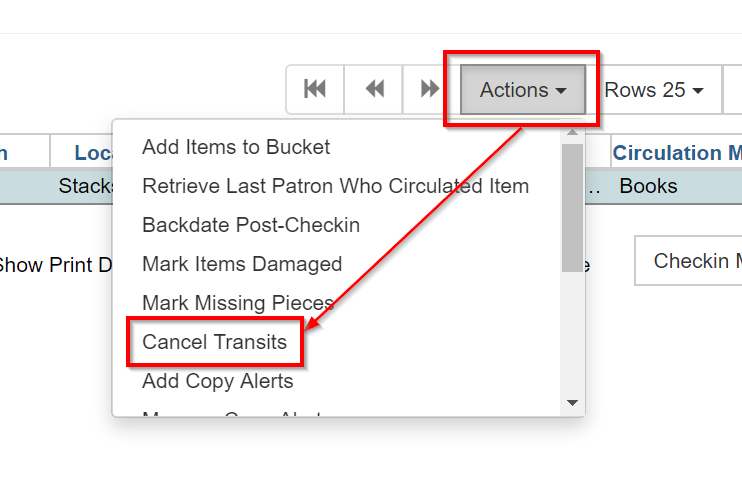
6) If the item is not in a state acceptable for hold/transit (for instance, it is damaged), select the line of the item, and choose Actions → Cancel Transit. The item will then have a status of Canceled Transit rather than In Transit.
Backdated check in
This is useful for clearing a book drop.
1) To change effective check-in date, select Circulation → Check In Items. In Effective Date field enter the date in yyyy-mm-dd format.

2) The new effective date is now displayed in the red bar above the Barcode field.

3) Move the cursor to the Barcode field. Scan the items. When finishing backdated check-in, change the Effective Date back to today’s date.
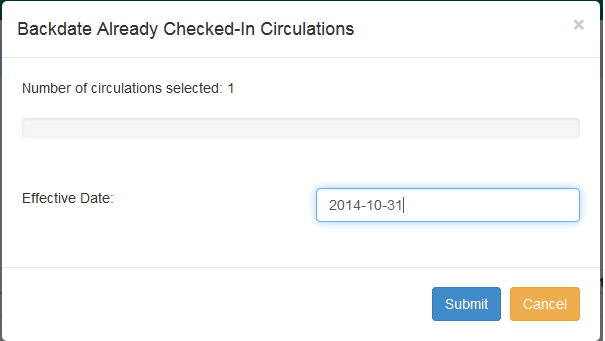
Backdate Post-Checkin
After an item has been checked in, you may use the Backdate Post-Checkin function to backdate the check-in date.
1) Select the item on the Check In screen, click Actions → Backdate Post-Checkin.
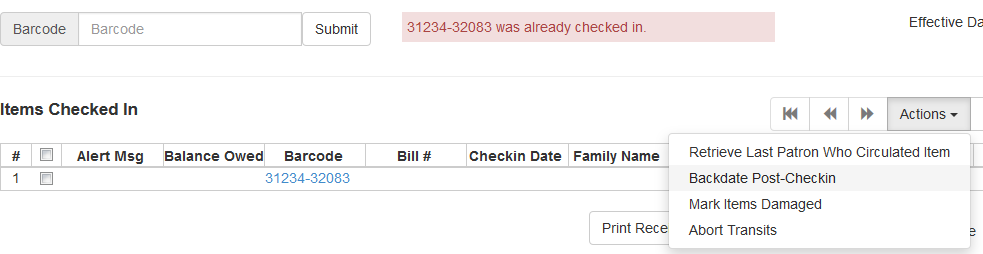
2) In Effective Date field enter the date in yyyy-mm-dd format. The check-in date will be adjusted according to the new effective check-in date.
|
Checkin Modifiers
At the right bottom corner there is a Checkin Modifiers pop-up list. The options are:
These options may be selected simultaneously. The selected option is displayed in the header area. 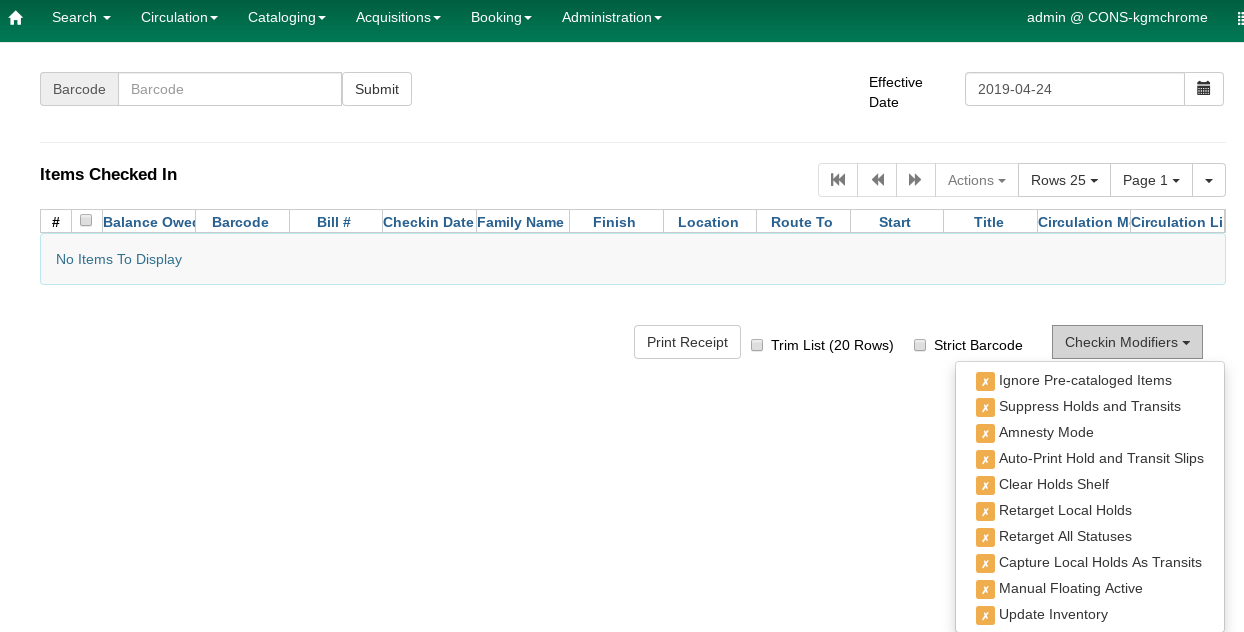
|
Renewal and Editing the Item’s Due Date
Checked-out items can be renewed if your library’s policy allows it. The new due date is calculated from the renewal date. Existing loans can also be extended to a specific date by editing the due date or renewing with a specific due date.
Renewing via a Patron’s Account
1) Retrieve the patron record and go to the Items Out screen.
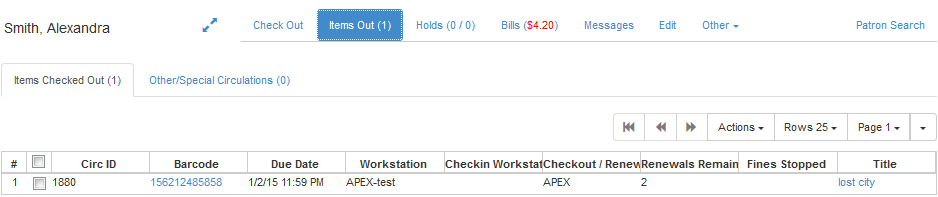
2) Select the item you want to renew. Click on Actions → Renew. If you want to renew all items in the account, click Renew All instead.
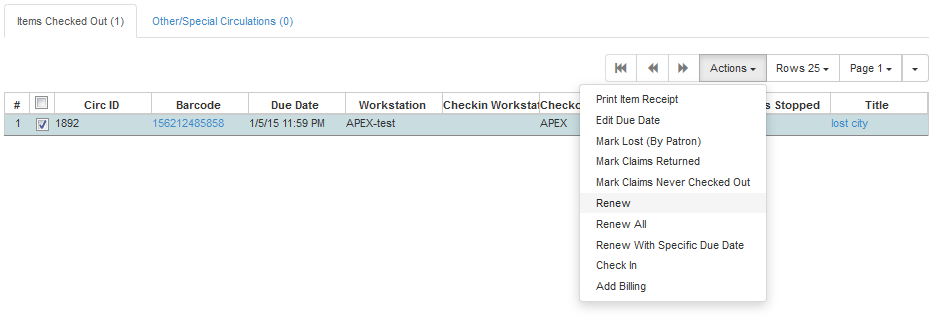
3) If you want to specify the due date, click Renew with Specific Due Date. You will be prompted to select a due date. Once done, click Apply.
Renewing by Item Barcode
1) To renew items by barcode, select Circulation → Renew Items.
2) Scan or manually entire the item barcode.

3) If you want to specify the due date, click Specific Due Date and enter a new due date in yyyy-mm-dd format.

Editing Due Date
1) Retrieve the patron record and go to the Items Out screen.
2) Select the item you want to renew. Click on Actions → Edit Due Date.
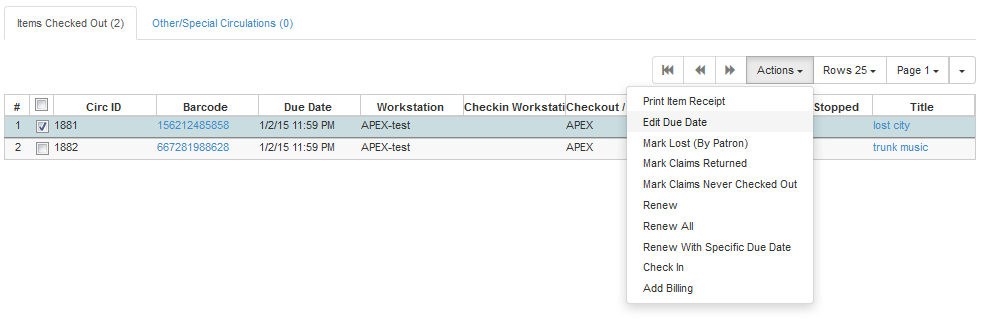
3) Enter a new due date in yyyy-mm-dd format in the pop-up window, then click OK.
| Editing a due date is not included in the renewal count. |
Overriding Errors in Items Out
As of 3.8, there is new work which streamlines handling of overridable events encountered in the Patron Items Out interface of the staff client. The main user-visible part of this work is a new Action Override modal which is presented to the staff user when an overridable action is encountered.
The primary target of the work is for actions from the Items Out part of the Patron interface, but due to code sharing the Checkout interface benefits as well.
There are two kinds of overrides addressed in this work, both in the Patron interface:
-
Action Override - this is when a staff user attempts to make an action (i.e. Renew) succeed after the system had alerted the user to exceptions (i.e. Patron Max Fines).
-
Permission Override - this is when a staff user attempts an action but encounters a permission-denied alert, and thus needs temporary credentials (i.e. a supervisor’s login) to re-attempt the action.
In the case of both overrides, this work attempts to minimize the number of times a staff user has to click through an error. Specifically, if a staff member overrides an exception, they will in most cases be able to instruct Evergreen to “remember” this override for as long as the staff member is working on a specific patron record.
Similarly, if a supervisor enters a permissions override for a specific permission-denied alert, Evergreen will “remember” this override for as long as the staff member is working on a specific patron record.
Both action overrides and permission overrides will be “forgotten” once the patron record is closed and/or the staff user navigates away from that patron record.
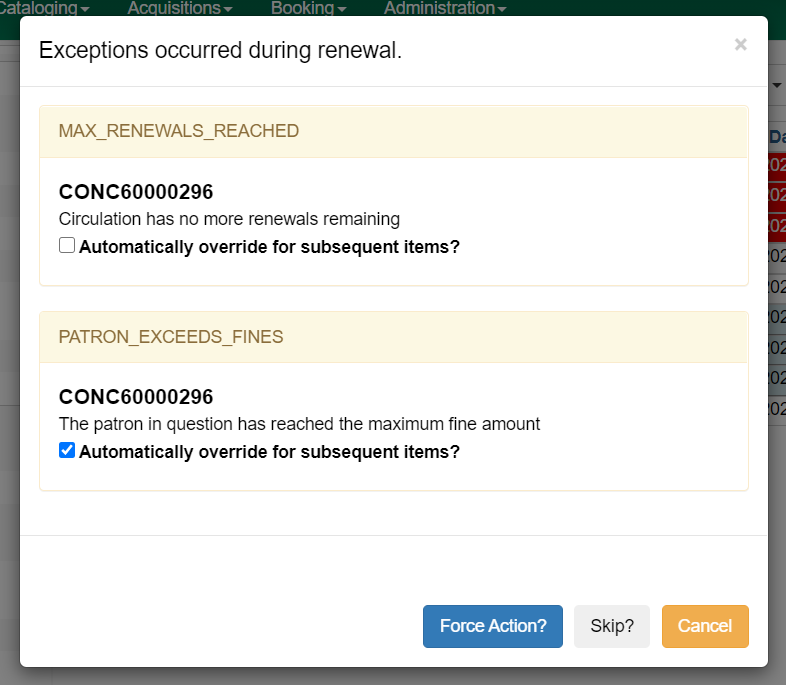
The Override modal has been changed to include new actions as well as a new checkbox for “Automatically override for subsequent items?”
There are three possible actions in the new Override modal:
-
Force Action - this will attempt to override the exception(s). If the box next to “Automatically override for subsequent items?” is checked, Evergreen will remember this and auto-override those specific exception(s) for the rest of the time the staff user is working in this patron record.
-
Skip - this button tells Evergreen to ignore the current item (i.e., skip the renewal action), but if the box next to “Automatically override for subsequent items?” is checked, Evergreen will still remember future overrides on this exception.
-
Cancel - this will close the modal and abort the action. It will not roll back any actions (i.e., if two items are renewed and the modal shows on the third item, clicking cancel will not roll back the renewals that have already completed).
An example of the new Override modal is shown below. In this example, the PATRON_EXCEEDS_FINES exception has been set to automatically override for subsequent items. This means that the next time Evergreen encounters this exception in this specific patron session, Evergreen will automatically attempt to override it. The MAX_RENEWALS_REACHED exception has NOT been set to automatically override for subsequent items. This means that the next time Evergreen encounters this exception in this specific patron session, it will ask again about an override.
In stock Evergreen, the following states will present an exception (i.e. ask for an override) on checkout and/or renew:
-
Shelving Locations with Can Circulate? set to false
-
Item Statuses of Bindery, Claimed Returned, Long Overdue, Lost, Lost and Paid, Missing, On Holds Shelf [for another patron]
-
Item-level data: Certain statuses (above), certain shelving locations (above), deposit = true, reference = true
Certain events are not able to be batch-overridden, such as when an item with an existing open circulation is presented at checkout. Other events are not able to be overridden at all, including ACTOR_USER_NOT_FOUND and ASSET_COPY_NOT_FOUND.
Stock penalty codes (STAFF_C, STAFF_CH, STAFF_CHR, STAFF_H, STAFF_HR, STAFF_R) that can be encountered as events are auto-overrideable by default, and may present an Action Override modal.
Mark Items
Items can have their status changed via the Mark functions on the Actions menus.
Claims Never Checked Out
If a patron believes an item was erroneously checked out on their account and staff cannot locate it to check it in the item can be marked as claims never checked out.
-
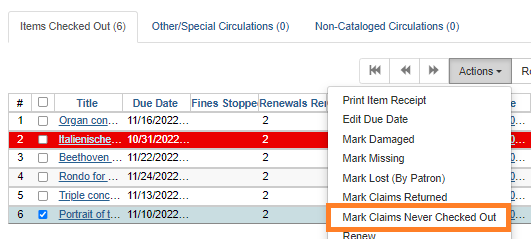
Go to the Items Out tab in the patron account.
-
Select the item and click Actions → Mark Claims Never Checked Out.
-
A pop-up appears where staff can confirm that they wish to mark the item by clicking OK/Continue.
-
The item is checked in and set to Missing. The item is no longer associated with the patron’s account.
Libraries may wish to routinely run reports on items with the status of Missing so they can be searched for and replaced/deleted as appropriate.
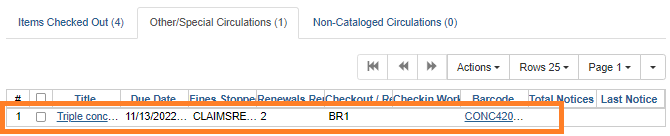
Claims Returned
If a patron believes an item out on their account was returned and staff cannot locate it to check it in the item can be marked as claims returned.
-
Go to the Items Out tab in the patron account.
-
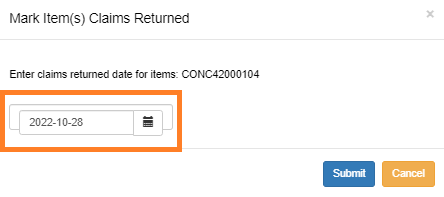
Select the item and click Actions → Mark Claims Returned.

-
Enter the date on which the patron claims they returned the item and click Submit. If the chosen date is in the past any overdue fines will be adjusted accordingly.
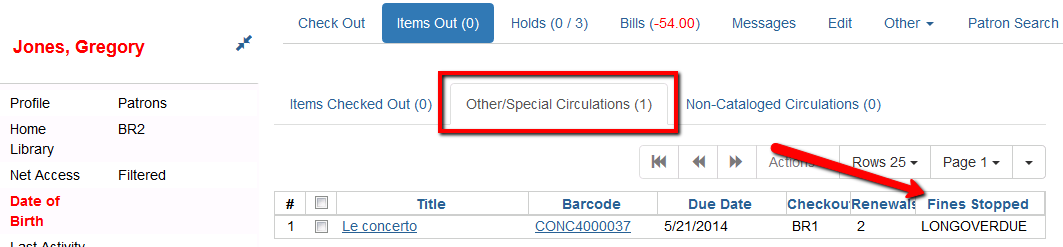
-
The item’s status is updated to Claimed Returned. It remains associated with the patron’s account and is now displayed on the Other/Special Circulations tab. The value in the Claims-returned Count field in the patron record is automatically increased.
Some libraries prefer to use the status Missing. This can be set using the library setting Claim Return: Mark copy as missing.
-
The patron’s Claims-returned Count is automatically increased. This can be viewed in the patron summary and the Edit tab.
Libraries can use the library setting Max Patron Claims Returned Count to set a maximum number of items a patron can claim as returned before a staff override is required.
A claimed returned items is resolved when it is checked in or when the status is updated to Missing or Lost following local library policy. An alert displays on check in to let staff know a claimed returned item has been found. If there is an outstanding bill associated with it, the item will not disappear from the Items Out screen. It will disappear when the outstanding bills are resolved. When an item is located staff may wish to adjust the patron’s Claims-returned Count accordingly on the Edit tab.
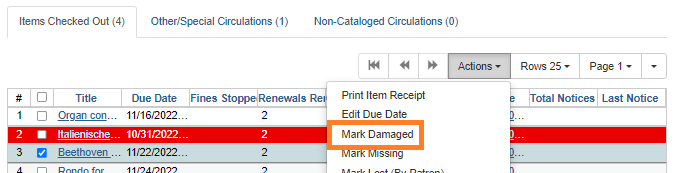
Damaged
If a patron damages an item it can be marked as damaged at check in, via the Item Status interface, or from within a patron’s account.
-
On the appropriate interface select the item and click Actions → Mark Damaged
-
A pop-up appears indicating that the item will be marked damaged. Click Submit.
-
If your library has the library setting Charge item price when marked damaged set to True a second pop-up will appear.
-
If needed, adjust the amount being billed. The processing fee from the library setting Charge processing fee for damaged items is included in the total.
-
Select the bill type from the drop down menu.
-
If needed, add a note.
-
If you are not charging the patron in this particular case, click No Charge.
-
Click Submit.
-
-
The item’s status is updated to Damaged and removed from the patron’s account. If the patron has been billed for the damage the bill will display in the Bills tab. The bill displays as a single charge which includes the processing fee.
A damaged item is resolved when it is checked in to return it to circulation, when the status is updated to Discard/Weed, or when the item is deleted. An alert displays on check in to let staff know a damaged item has been checked in.
|
Checking in a damaged item does not affect any bills that were generated when the item was set to Damaged. |
Discard/Weed
If an item is slated to be removed from the collection it can be marked as discard/weed at check in or via the Item Status interface. Libraries may wish to use the Discard/Weed status when items to be discarded need to be reviewed before being deleted.
-
On the appropriate interface select the item and click Actions → Mark as Discard/Weed.

-
A pop-up appears where staff can confirm that they wish to mark the item by clicking OK/Continue.
-
The item is set to Discard/Weed.
A discarded item is resolved when it is checked in to return it to circulation or deleted from Evergreen.
|
Staff may wish to put discarded items into item buckets to make it easier for subsequent staff to view and work with the items. |
Missing
If an item cannot be located it can be marked as missing via the Item Status interface or from within a patron’s account.
-
On the appropriate interface select the item and click Actions → Mark Missing
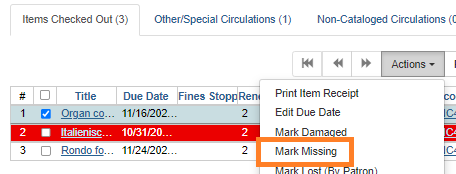
-
A pop-up appears where staff can confirm that they wish to mark the item by clicking OK/Continue.
-
If the item is currently checked out a second pop-up will ask staff to confirm that they wish to check in the item.
-
The item is set to Missing and, if previously checked out, is no longer associated with the patron’s account.
A missing item is resolved when it is found and checked in or when it is deleted from Evergreen.
Missing Pieces
If an item is returned with pieces missing it can be marked as missing pieces from Check In or the Scan Item as Missing Pieces interface. The feature currently functions slightly different depending on which interface it is accessed through.
Mark Missing Pieces via Check In
-
Go to Circulation → Check In.
-
Check the item in.
-
Select the item and click Actions → Mark Missing Pieces.

-
A pop-up appears where staff can confirm that they wish to mark the item by clicking OK/Continue.
-
A print dialog will appear. Staff can print the slip to keep with the item.
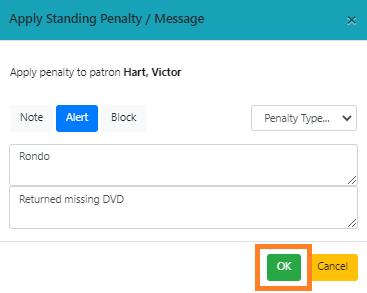
-
The Create Note pop-up will appear. Use the pop-up to create a note, alert, or block on the patron’s account. This note can be set as patron visible so it displays to the patron in My Account.
-
Click OK.
-
The note is applied to the last borrower’s account and the item is set to Damaged and checked back out to the patron’s account.
This method of setting an item as missing pieces is missing the letter that is generated at the end of the process. If that letter is important to your workflow you should always mark items missing pieces via the Scan Item as Missing Pieces interface.
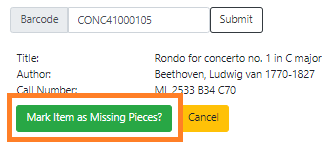
Scan Item as Missing Pieces
-
Go to Circulation → Scan Item as Missing Pieces.
-
Scan the item’s barcode.
-
Click Mark Item as Missing Pieces?.
-
A print dialog will appear. Staff can print the slip to keep with the item.
-
The Create Note pop-up will appear. Use the pop-up to create a note, alert, or block on the patron’s account.
This pop-up is the old Notes pop-up and is missing the functionality that allows staff to select the display depth and set a note as patron visible so it displays to the patron in My Account.
-
Click OK.
-
The note is applied to the last borrower’s account and the item is set to Damaged and renewed on the patron’s account, if there are remaining renewals.
-
A letter is generated that can be edited and then printed and mailed to the patron.
A missing pieces item is resolved when the pieces are returned and the item is checked in or the pieces are never returned and the item is deleted. Notes related to the item must be manually removed from the patron’s account.
|
Libraries can choose to use a different item status for missing pieces instead of Damaged. The library setting Item Status for Missing Pieces is used to set this. |
Lost Items
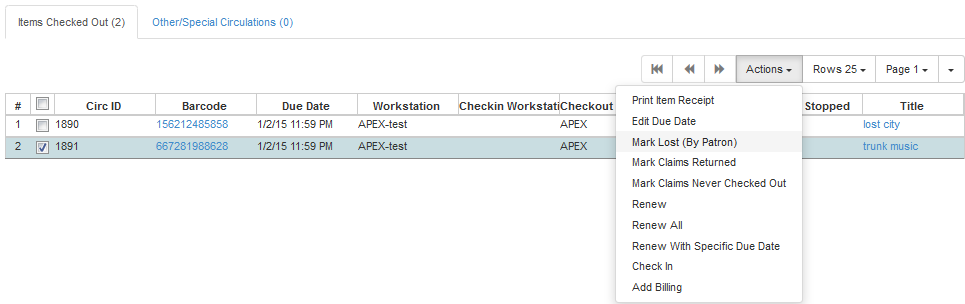
1) To mark items Lost, retrieve patron record and click Items Out.
2) Select the item. Click on Actions → Mark Lost (by Patron).
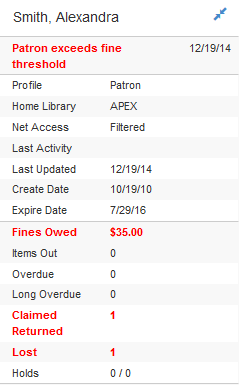
3) The lost item now displays as lost in the Items Checked Out section of the patron record.

4) The lost item also adds to the count of Lost items in the patron summary on the left (or top) of the screen.
| Lost Item Billing |
-
Marking an item Lost will automatically bill the patron the replacement cost of the item as recorded in the price field in the item record, and a processing fee as determined by your local policy. If the lost item has overdue charges, the overdue charges may be voided or retained based on local policy.
-
A lost-then-returned item will disappear from the Items Out screen only when all bills linked to this particular circulation have been resolved. Bills may include replacement charges, processing fees, and manual charges added to the existing bills.
-
The replacement fee and processing fee for lost-then-returned items may be voided if set by local policy. Overdue fines may be reinstated on lost-then-returned items if set by local policy.
Refunds for Lost Items
If an item is returned after a lost bill has been paid and the library’s policy is to void the replacement fee for lost-then-returned items, there will be a negative balance in the bill. A refund needs to be made to close the bill and the circulation record. Once the outstanding amount has been refunded, the bill and circulation record will be closed and the item will disappear from the Items Out screen.
If you need to balance a bill with a negative amount, you need to add two dummy bills to the existing bills. The first one can be of any amount (e.g. $0.01), while the second should be of the absolute value of the negative amount. Then you need to void the first dummy bill. The reason for using a dummy bill is that Evergreen will check and close the circulation record only when payment is applied or bills are voided.
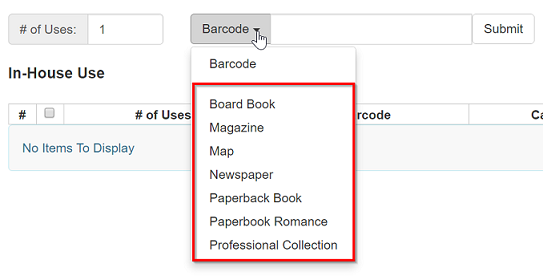
In-house Use (F6)
1) To record in-house use, select Circulation → Record-In House Use, click Check Out → Record In-House Use on the circulation toolbar , or press F6.
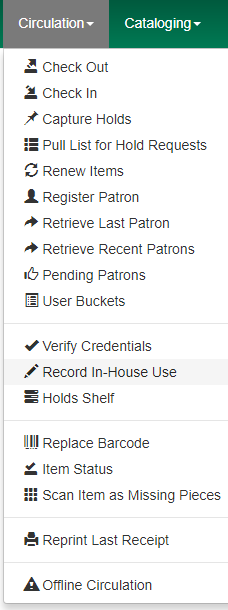
2) To record in-house use for cataloged items, enter number of uses, scan barcode or type barcode and click Submit.

|
There are two independent library settings that will allow copy alerts to display when scanned in In-house Use: Display copy alert for in-house-use set to true will cause an alert message to appear, if it has one, when recording in-house-use for the copy. Display copy location check in alert for in-house-use set to true will cause an alert message indicating that the item needs to be routed to its location if the location has check in alert set to true. |
3) To record in-house use for non-cataloged items, enter number of uses, choose non-cataloged type from drop-down menu, and click Submit.
| The statistics of in-house use are separated from circulation statistics. The in-house use count of cataloged items is not included in the items' total use count. |
How Item Statuses Work
This section goes over all item statuses and their relationship to the system.
List of Item Statuses
-Available: Item is available for checkout.
-Checked out: Item is checked out to a patron account. This status does not indicate whether or not the item is overdue.
-Claims Returned: item has been claimed as returned by the patron. This option as an item status is controlled by a library setting.
-Bindery: Manually set for items that are being sent out to be re-bound.
-Lost: Item has been checked out past a due date threshold or is no longer in a patron’s possession while they’re still responsible for the item. Can be automated based on due date, or manually set by staff.
-Missing: Item cannot be found on the shelves - either manually set, or applied upon “claims returned” (as well as claims never checked out?)
-In process: An item is newly cataloged and waiting to be checked in.
-In transit: Item has been checked in and is being sent to a different library, whether as a return to its home library, or to fulfill a hold.
-Reshelving: A transitional status for items that have been checked in, and need reshelving.
-On holds shelf: Item is captured for a hold of a patron at their pickup location and waiting to be checked out.
-On order: A title has been ordered, but the physical copy has not yet been processed and added to the catalog. Can allow patrons to discover forthcoming acquisitions, and to place holds prior to the library receiving the item in question.
-ILL: Inter-library loan.
-Cataloging: An item has been pulled to be edited by a cataloger.
-Reserves: In reserves collection.
-Discard/Weed: Item has been manually flagged for removal from the collection, but has not yet been deleted.
-Damaged: Item is damaged and the patron was billed.
-On reservation shelf: Used with room/booking module. When an item has been booked/reserved, it is placed in a unique location, ready for pick-up.
-Long Overdue: Item has been checked out past a due date threshold.
-Lost and Paid: Item was marked lost and the patron paid the replacement cost.
-Canceled Transit: Item that was in transit status but was then canceled.
Actions that Change Item Statuses
-Available: checking in an item that isn’t eligible for a hold
-Claims Returned: item is marked as claimed returned via the patron account
-In Transit: item is captured for a transit to another location at check in
-On reservation shelf: Item is captured for reservation through the Booking module.
-On order: Items is created via activating a purchase order in Acquisitions.
-In process: An item is newly cataloged and waiting to be checked in. Also, item is received in acquisitions.
-Damaged: Marked Damaged needs to be executed on a screen
Item Status Properties
| Name | Holdable? | OPAC Visible? | Sets copy active? | Is available? | Assignable? |
|---|---|---|---|---|---|
Available |
Yes |
Yes |
Yes |
Yes |
System controller |
Bindery |
No |
No |
No |
No |
Yes |
Canceled Transit |
Yes |
Yes |
No |
No |
System controlled |
Cataloging |
No |
No |
No |
No |
Yes |
Checked out |
Yes |
Yes |
Yes |
No |
System controlled |
Damaged |
No |
No |
No |
No |
Yes |
Discard/weed |
No |
No |
No |
No |
Yes |
ILL |
No |
No |
Yes |
No |
Yes |
In process |
Yes |
Yes |
No |
No |
Yes |
In receiving |
Yes |
Yes |
No |
No |
System controlled |
In transit |
Yes |
Yes |
No |
No |
System controlled |
Long Overdue |
No |
No |
No |
No |
System controlled |
Long Overdue (Legacy) |
No |
No |
No |
No |
Yes |
Lost |
No |
No |
No |
No |
Yes |
Lost and paid |
No |
No |
No |
No |
Yes |
Missing |
No |
No |
No |
No |
Yes |
On holds shelf |
Yes |
Yes |
Yes |
No |
System controlled |
On order |
No |
No |
No |
No |
Yes |
On reservation shelf |
No |
No |
Yes |
No |
Yes |
Reserves |
No |
No |
Yes |
No |
Yes |
Reshelving |
Yes |
Yes |
Yes |
Yes |
System controlled |
Temporarily unavailable |
No |
No |
No |
No |
Yes |
The following properties can be set for each status:
-Holdable - If checked, users can place holds on copies in this status, provided nothing else prevents holds. If unchecked, users cannot place holds on copies in this status.
-OPAC Visible - If checked, copies in this status will be visible in the public catalog. If unchecked, copies in this status will Not be visible in the public catalog, but they will be visible when using the catalog in the staff client. Sets copy active - If checked, moving a copy that does not yet have an active date to this status will set the active date. If the copy already has an active date, then no changes will be made to the active date. If “No”, this status will never set the copy’s active date.
-Is Available - If checked, copies with this status will appear in catalog searches where “limit to available” is selected as a search filter. Also, copies with this status will check out without status warnings. By default, the “Available” and “Reshelving” statuses have the “Is Available” flag set as true/yes.
-Hopeless Holds (as of ver. 3.6): need info
Default Evergreen statuses have a further property:
-Assignable – Status is system controlled and editing to either assign or change in the Holdings editor is not always possible.
Item Status
The Item Status screen is very useful. Many actions can be taken by either circulation staff or catalogers on this screen. Here we will cover some circulation-related functions, namely checking item status, viewing past circulations, inserting item alert messages, marking items missing or damaged, etc.
Checking item status
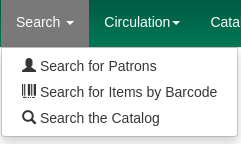
1) To check the status of an item, select Search → Search for copies by Barcode.
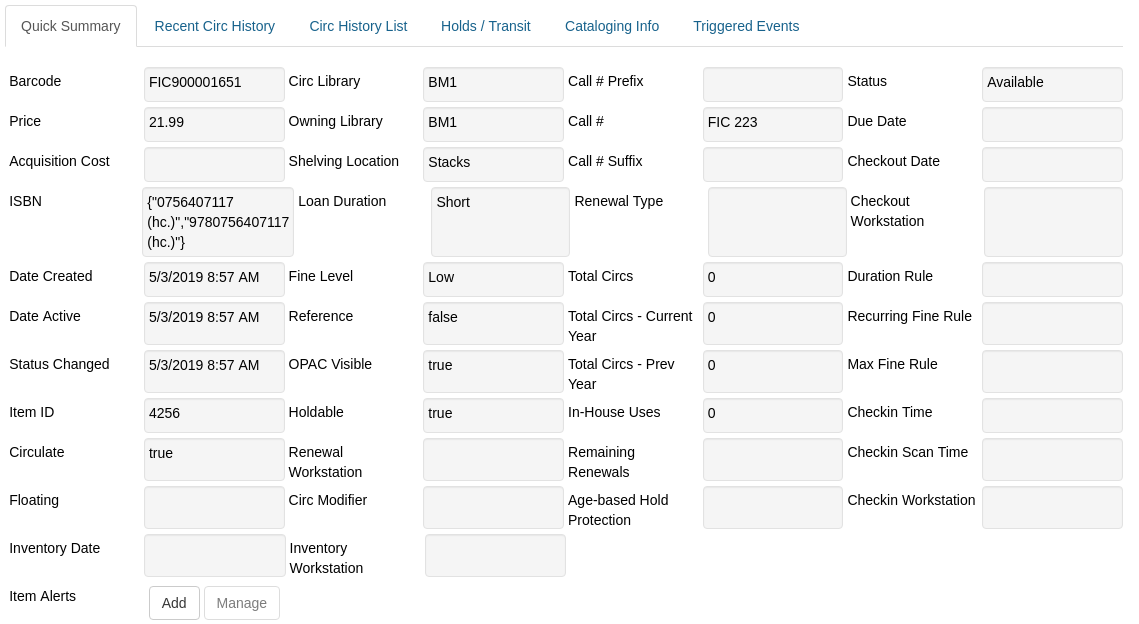
2) Scan the barcode or type it and click Submit. The current status of the item is displayed with selected other fields. You can use the column picker to select more fields to view.

3) Click the Detail View button and the item summary and circulation history will be displayed.
4) Click List View to go back.

| If the item’s status is "Available", the displayed due date refers to the previous circulation’s due date. |
| Upload From File allows you to load multiple items saved in a file on your local computer. The file contains a list of the barcodes in text format. To ensure smooth uploading and further processing on the items, it is recommended that the list contains no more than 100 items. |
Viewing past circulations
1) To view past circulations, retrieve the item on the Item Status screen as described above.
2) Select Detail view.

3) Choose Recent Circ History. The item’s recent circulation history is displayed.
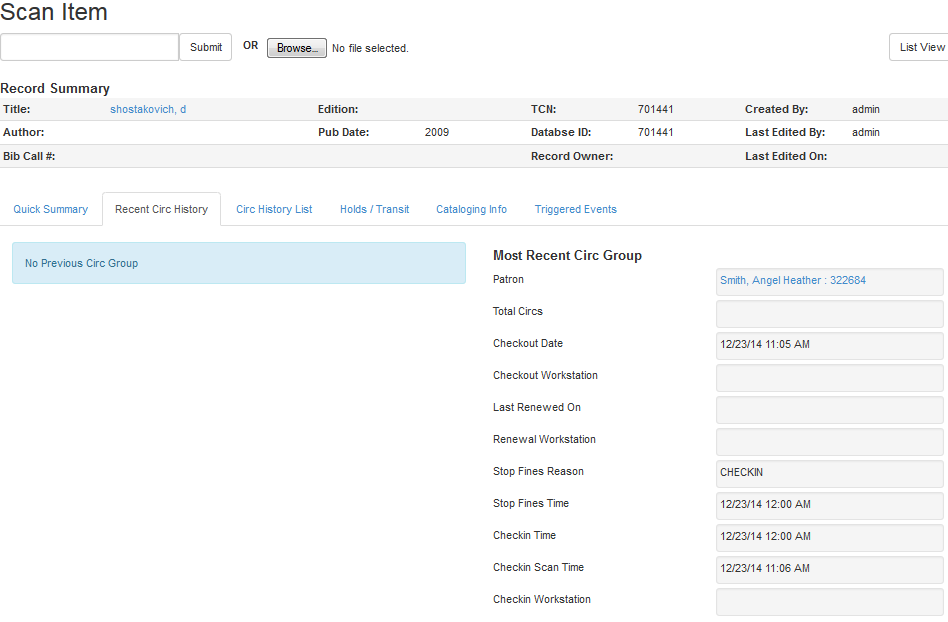
4) To retrieve the patron(s) of the last circulations, click on the name of the patron. The patron record will be displayed.
| The number of items that displays in the circulation history can be set in Local Administration → Library Settings Editor. |
| You can also retrieve the past circulations on the patron’s Items Out screen and from the Check In screen. |
Marking items damaged or missing and other functions
1) To mark items damaged or missing, retrieve the item on the Item Status screen.
2) Select the item. Click on Actions for Selected Items → Mark Item Damaged or Mark Item Missing.
| Depending on the library’s policy, when marking an item damaged, bills (cost and/or processing fee) may be inserted into the last borrower’s account. |
3) Following the above procedure, you can check in and renew items by using the Check in Items and Renew Items on the dropdown menu.
Item alerts
The Edit Item Attributes function on the Actions for Selected Items dropdown list allows you to edit item records. Here, we will show you how to insert item alert messages by this function. See cataloging instructions for more information on item editing. 1) Retrieve record on Item Status screen.
2) Once item is displayed, highlight it and select Actions for Selected Items → Edit Item Attributes.
3) The item record is displayed in the Copy Editor.
4) Click Alert Message in the Miscellaneous column. The background color of the box changes. Type in the message then click Apply.
5) Click Modify Copies, then confirm the action.
Long Overdue Items
Items Marked Long Overdue
Once an item has been overdue for a configurable amount of time, Evergreen will mark the item long overdue in the borrowing patron’s account. This will be done automatically through a Notification/Action Trigger. When the item is marked long overdue, several actions will take place:
-
The item will go into the status of “Long Overdue”
-
The accrual of overdue fines will be stopped
Optionally the patron can be billed for the item price, a long overdue processing fee, and any overdue fines can be voided from the account. Patrons can also be sent a notification that the item was marked long overdue. And long-overdue items can be included on the "Items Checked Out" or "Other/Special Circulations" tabs of the "Items Out" view of a patron’s record. These are all controlled by library settings.
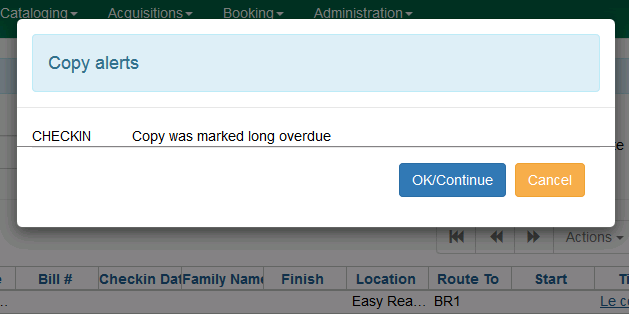
Checking in a Long Overdue item
If an item that has been marked long overdue is checked in, an alert will appear on the screen informing the staff member that the item was long overdue. Once checked in, the item will go into the status of “In process”. Optionally, the item price and long overdue processing fee can be voided and overdue fines can be reinstated on the patron’s account. If the item is checked in at a library other than its home library, a library setting controls whether the item can immediately fill a hold or circulate, or if it needs to be sent to its home library for processing.
Notification/Action Triggers
Evergreen has two sample Notification/Action Triggers that are related to marking items long overdue. The sample triggers are configured for 6 months. These triggers can be configured for any amount of time according to library policy and will need to be activated for use.
-
Sample Triggers
-
6 Month Auto Mark Long-Overdue—will mark an item long overdue after the configured period of time
-
6 Month Long Overdue Notice—will send patron notification that an item has been marked long overdue on their account
-
Library Settings
The following Library Settings enable you to set preferences related to long overdue items:
-
Circulation: Long-Overdue Check-In Interval Uses Last Activity Date —Use the long-overdue last-activity date instead of the due_date to determine whether the item has been checked out too long to perform long-overdue check-in processing. If set, the system will first check the last payment time, followed by the last billing time, followed by the due date. See also the "Long-Overdue Max Return Interval" setting.
-
Circulation: Long-Overdue Items Usable on Checkin —Long-overdue items are usable on checkin instead of going "home" first
-
Circulation: Long-Overdue Max Return Interval —Long-overdue check-in processing (voiding fees, re-instating overdues, etc.) will not take place for items that have been overdue for (or have last activity older than) this amount of time
-
Circulation: Restore Overdues on Long-Overdue Item Return
-
Circulation: Void Long-Overdue item Billing When Returned
-
Circulation: Void Processing Fee on Long-Overdue Item Return
-
Finances: Leave transaction open when long overdue balance equals zero —Leave transaction open when long-overdue balance equals zero. This leaves the lost copy on the patron record when it is paid
-
Finances: Long-Overdue Materials Processing Fee
-
Finances: Void Overdue Fines When Items are Marked Long-Overdue
-
GUI: Items Out Long-Overdue display setting
| Learn more about these settings in the chapter about the Library Settings Editor. |
Permissions to use this Feature
The following permissions are related to this feature:
-
COPY_STATUS_LONG_OVERDUE.override
-
Allows the user to check-in long-overdue items thus removing the long-overdue status on the item
-